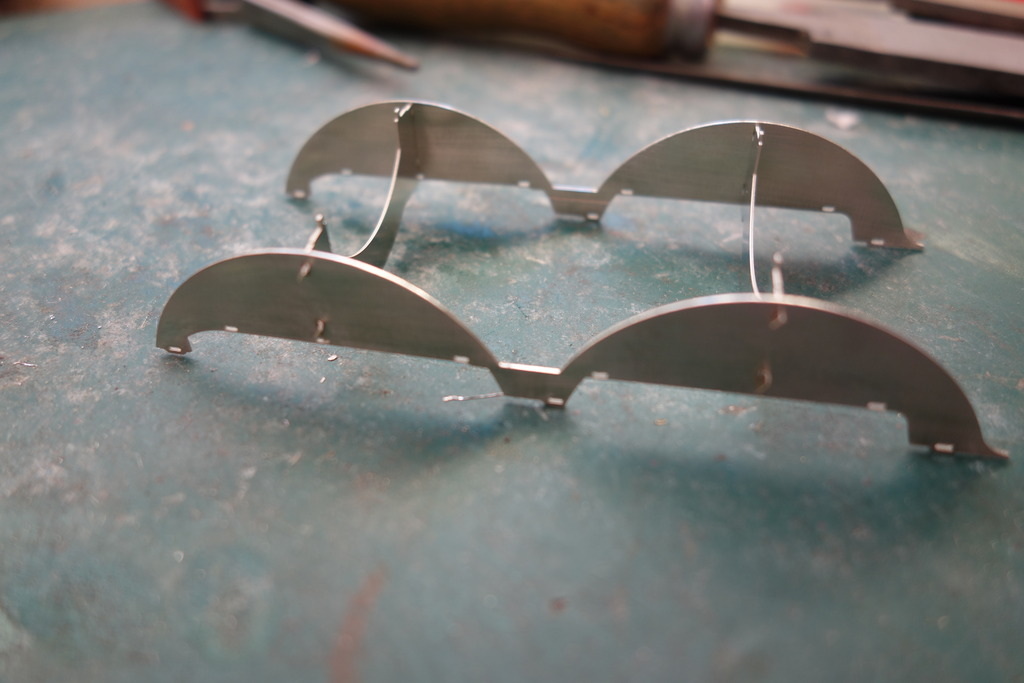
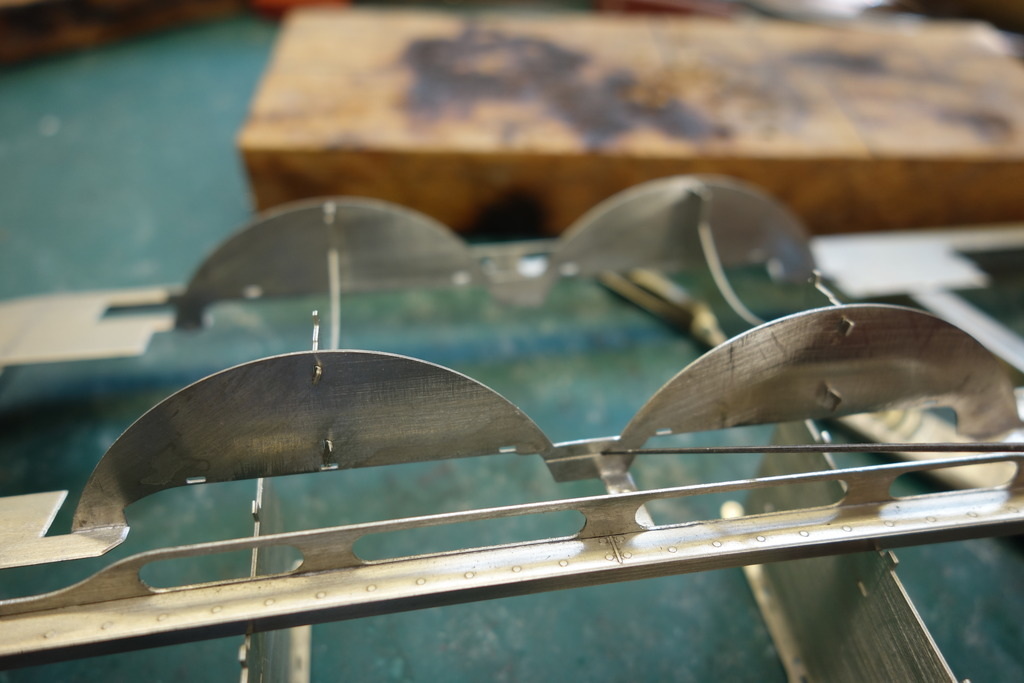
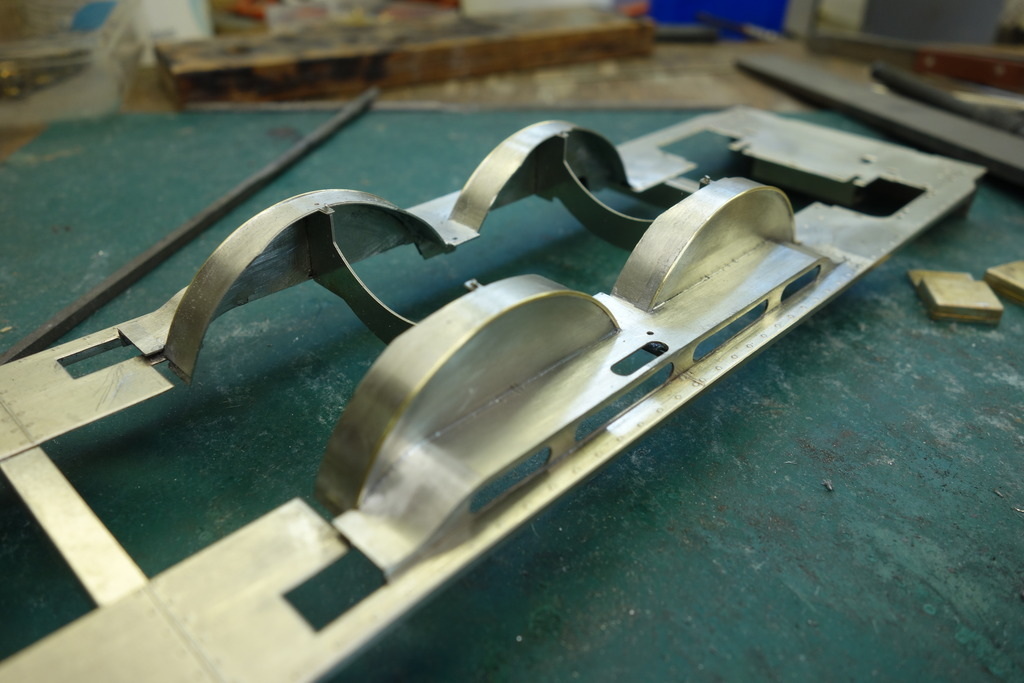
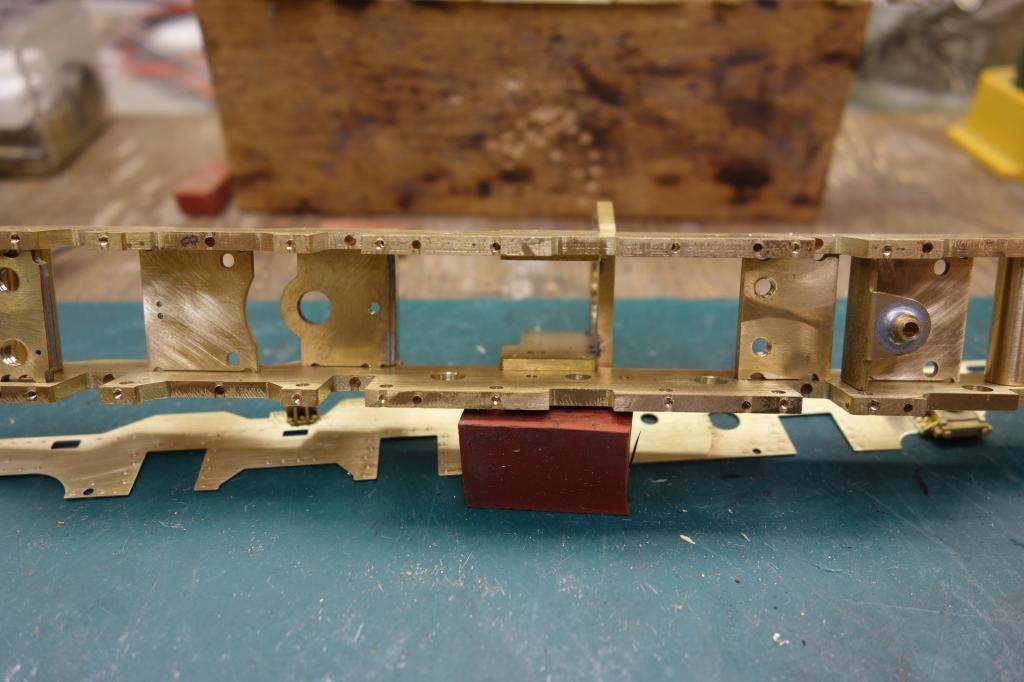
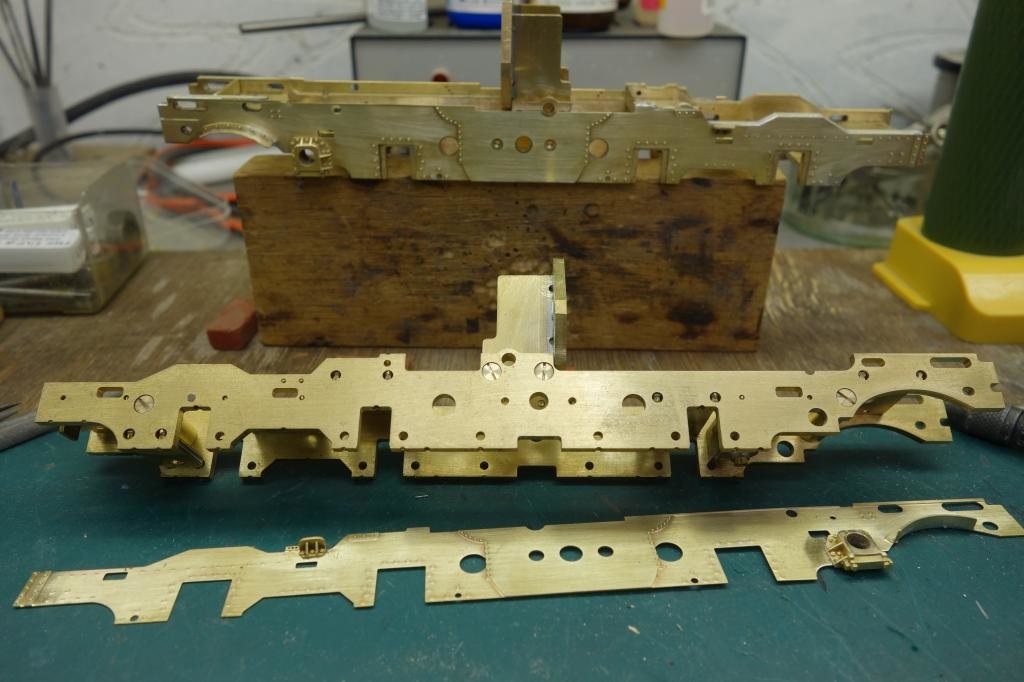
There are always a few projects competing for space on the workbench....
3rd November 2018
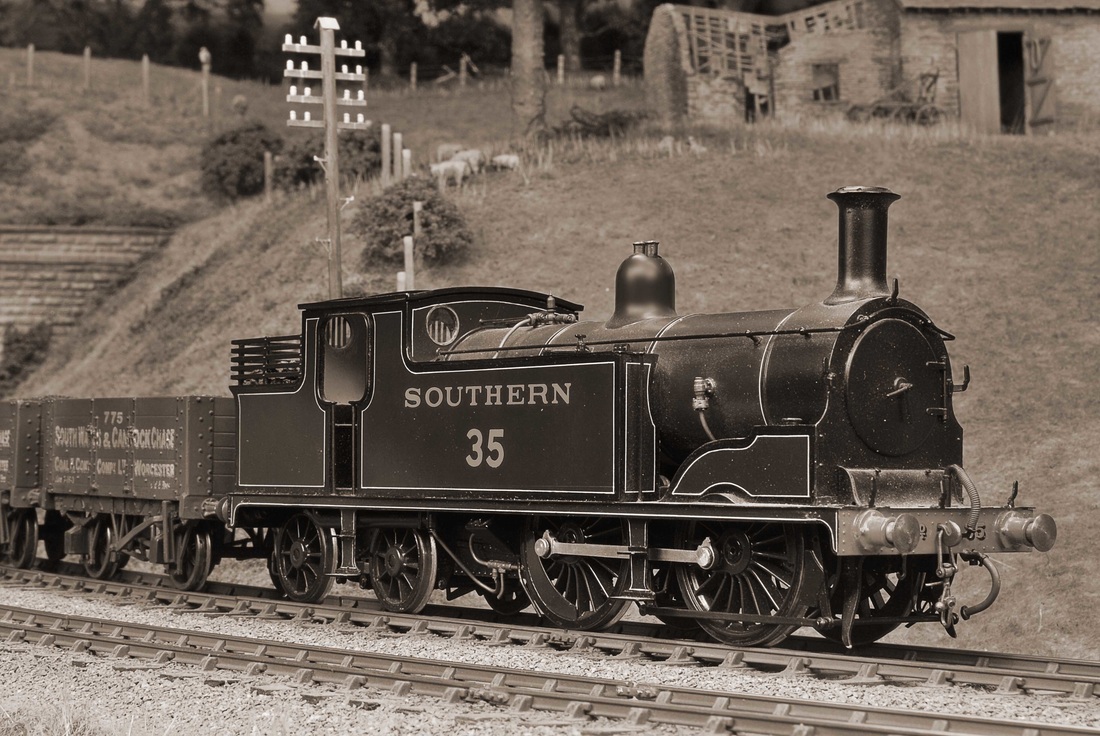
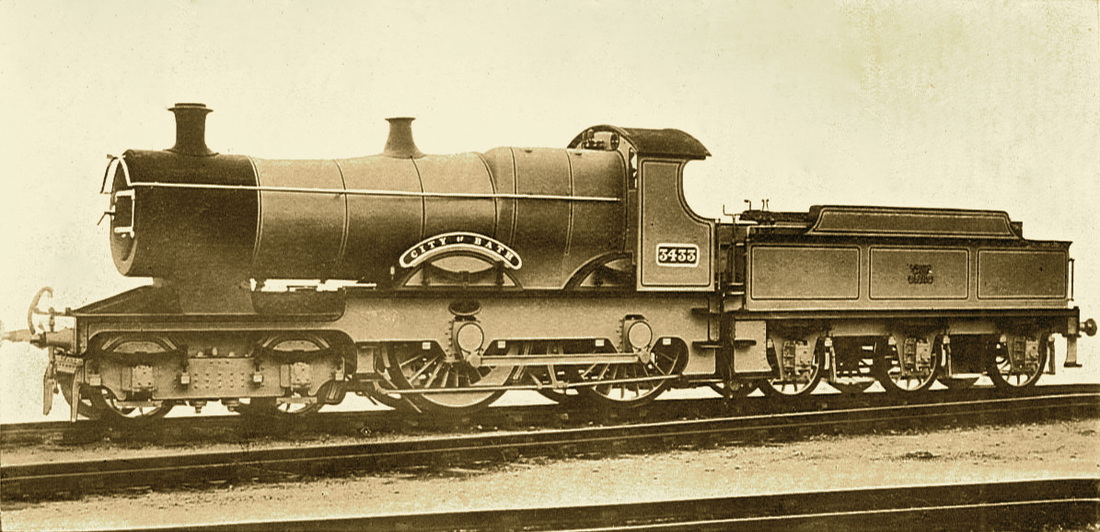
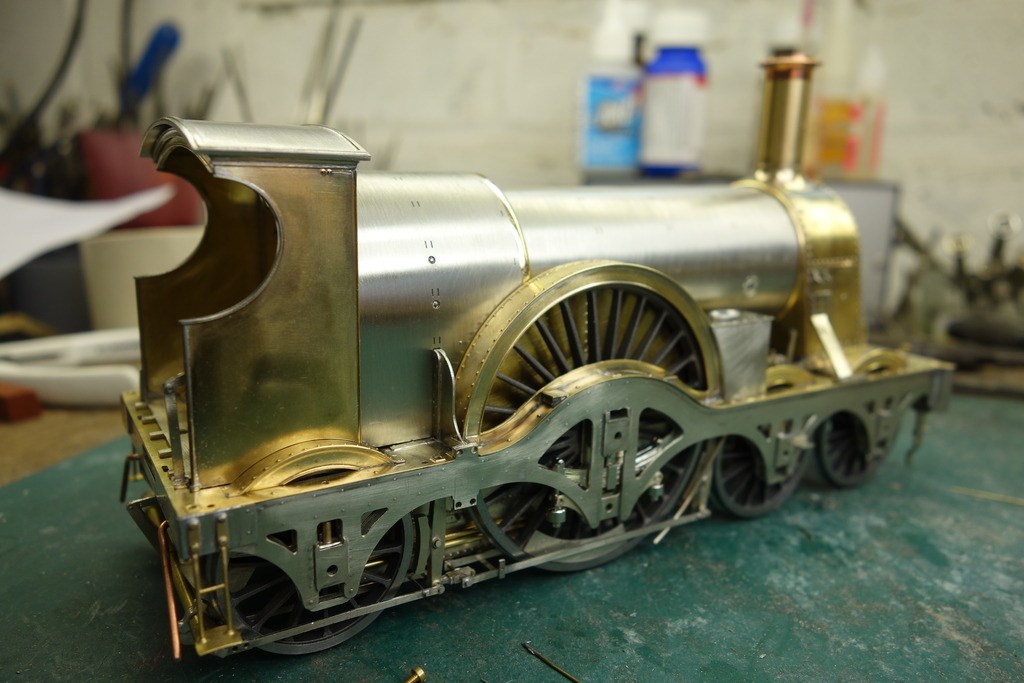
Just a few photos from recent running sessions. I will soon have some pictures of the City class 4-4-0 which has now been painted.
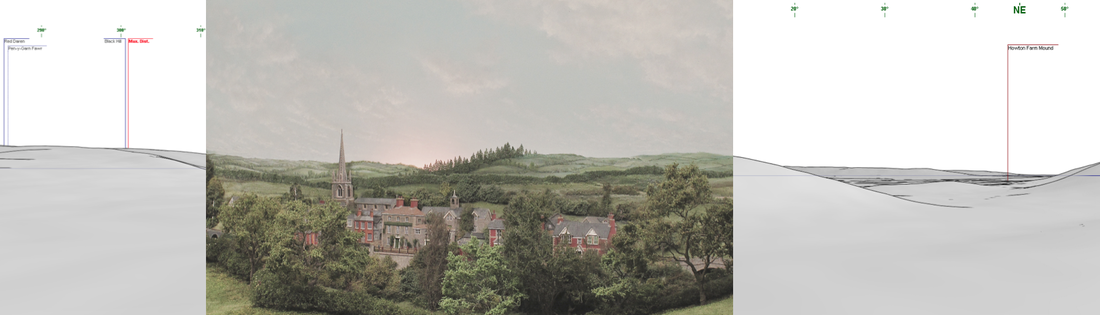
Bucks Hill has appeared in this excellent supplement magazine by Peco. Steve Flint
The cover of issue No 250 features a photo from Chris Nevard’s excellent Bucks Hill portfolio. Chris Nevard/Model Rail Magazine.

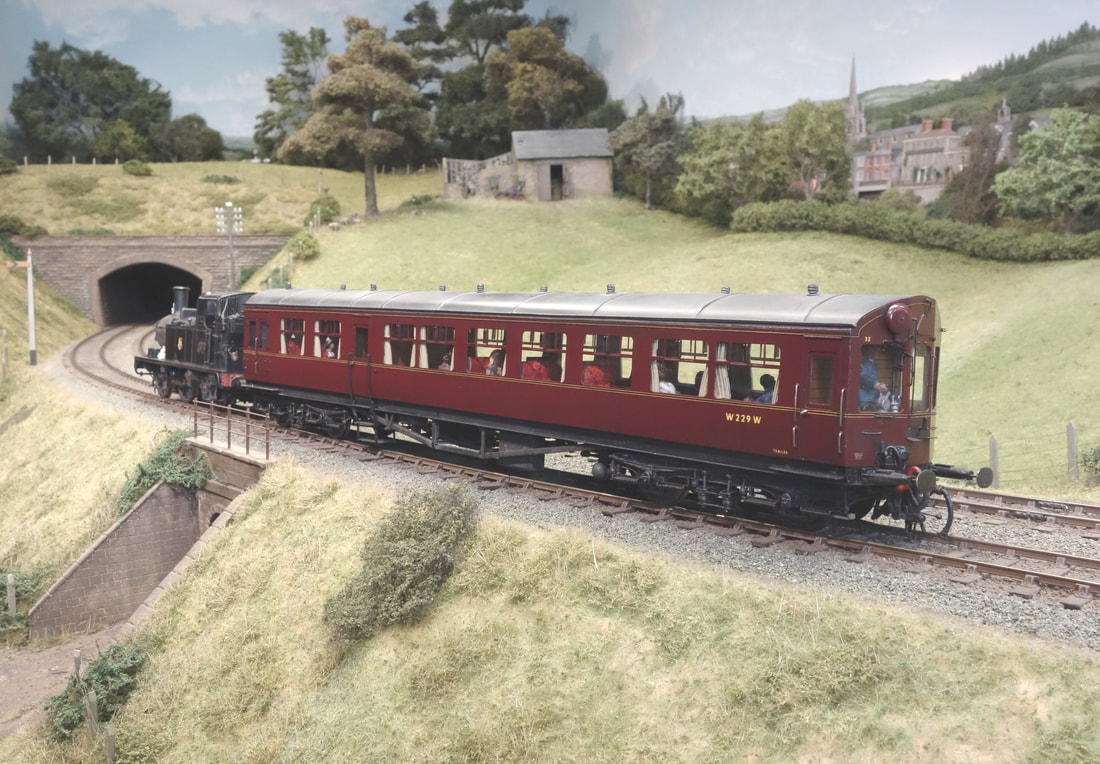
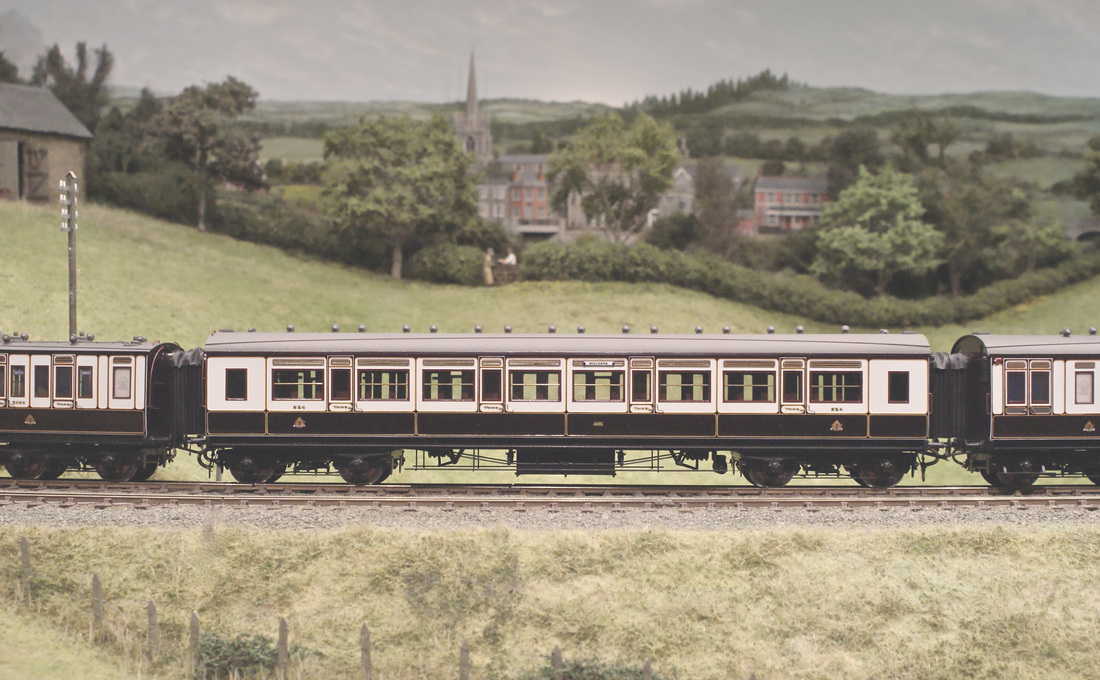
Phil Gomm’s lake liveried auto trailer No W229W at Bucks Hill station.
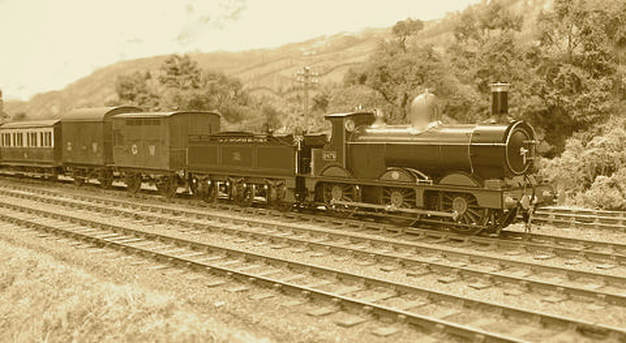
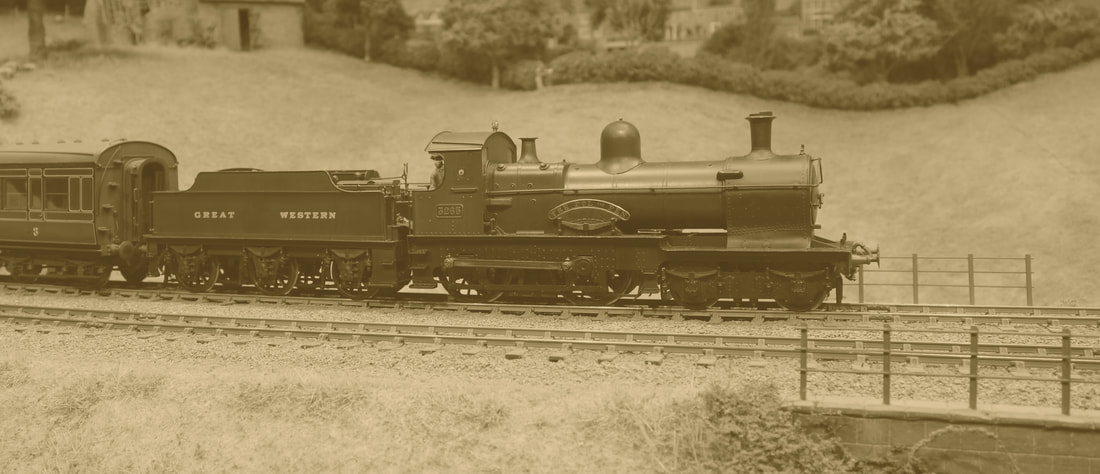
Lee has published some pics of the sample Dean ‘Goods’ 0-6-0 at Bucks Hill, and here’s a small sepia version. Kevin Wilson/Lee Marsh.
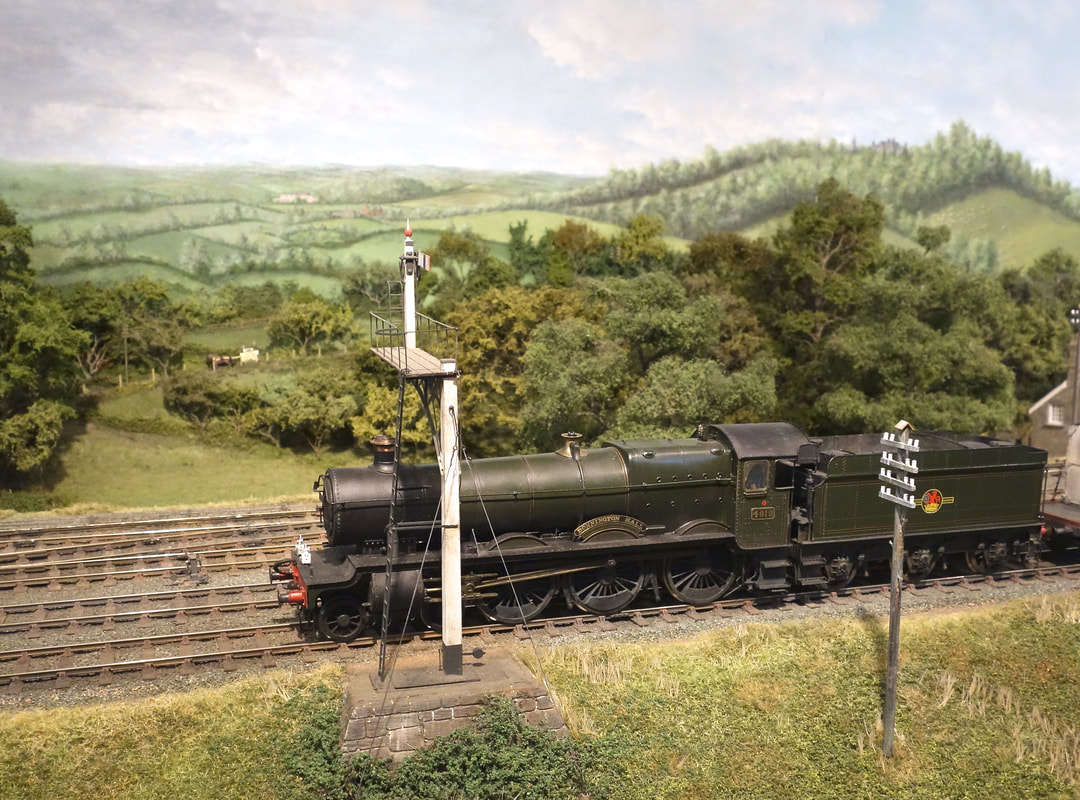
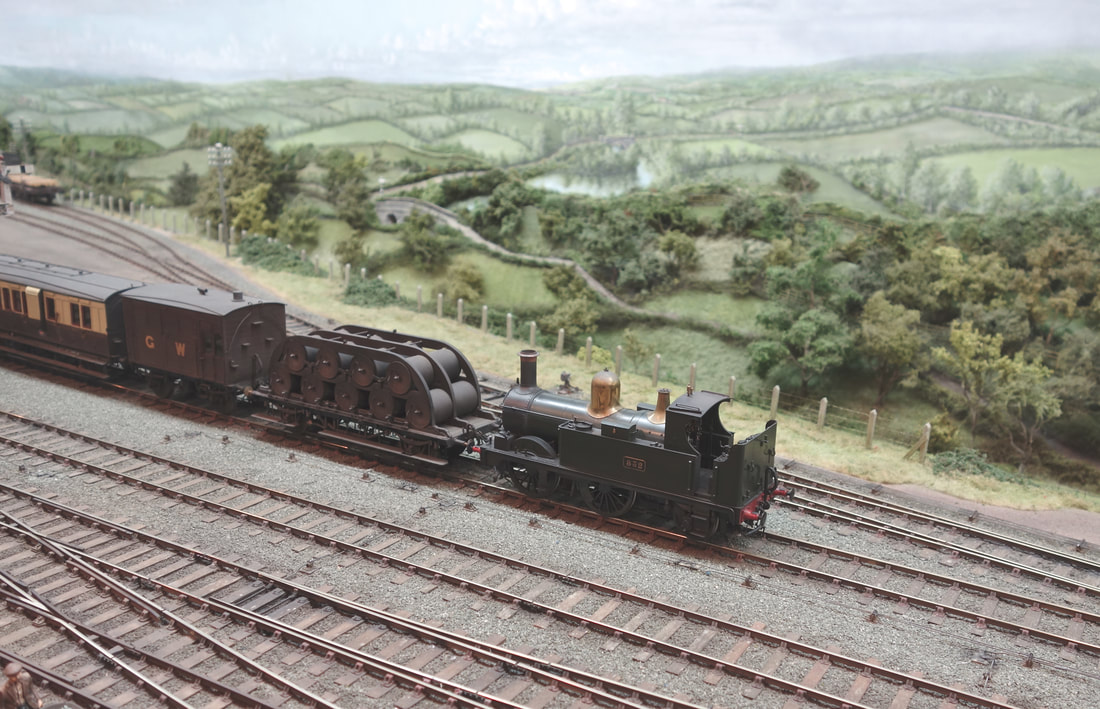
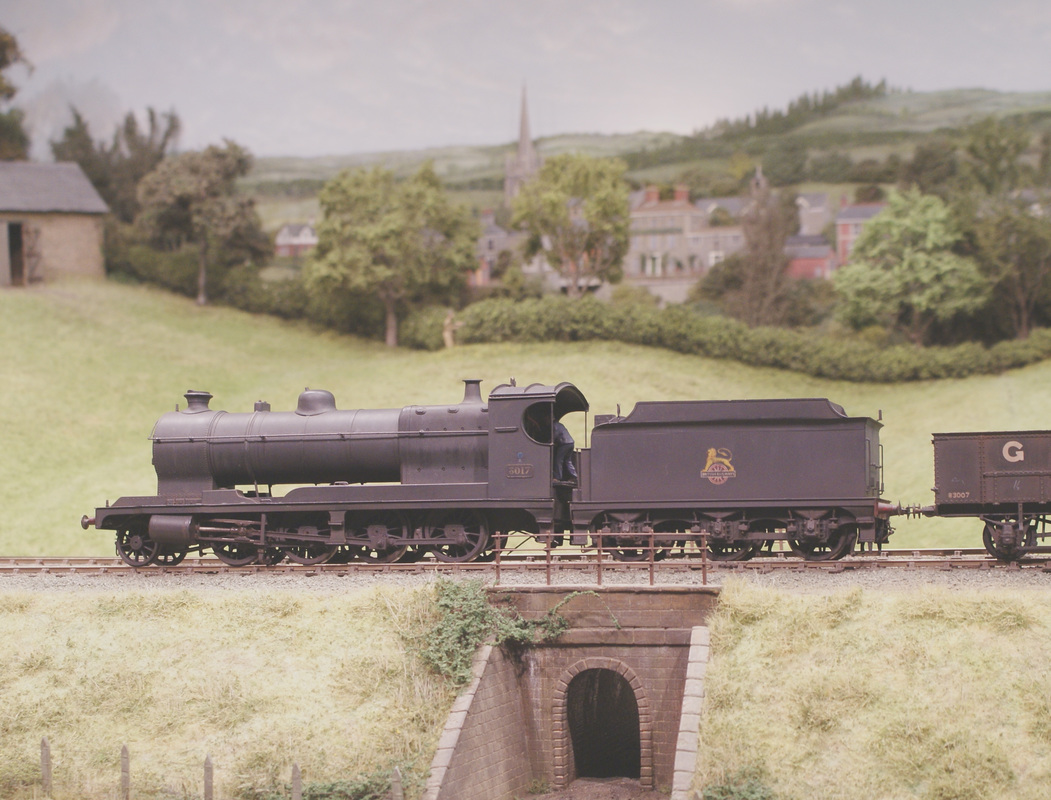
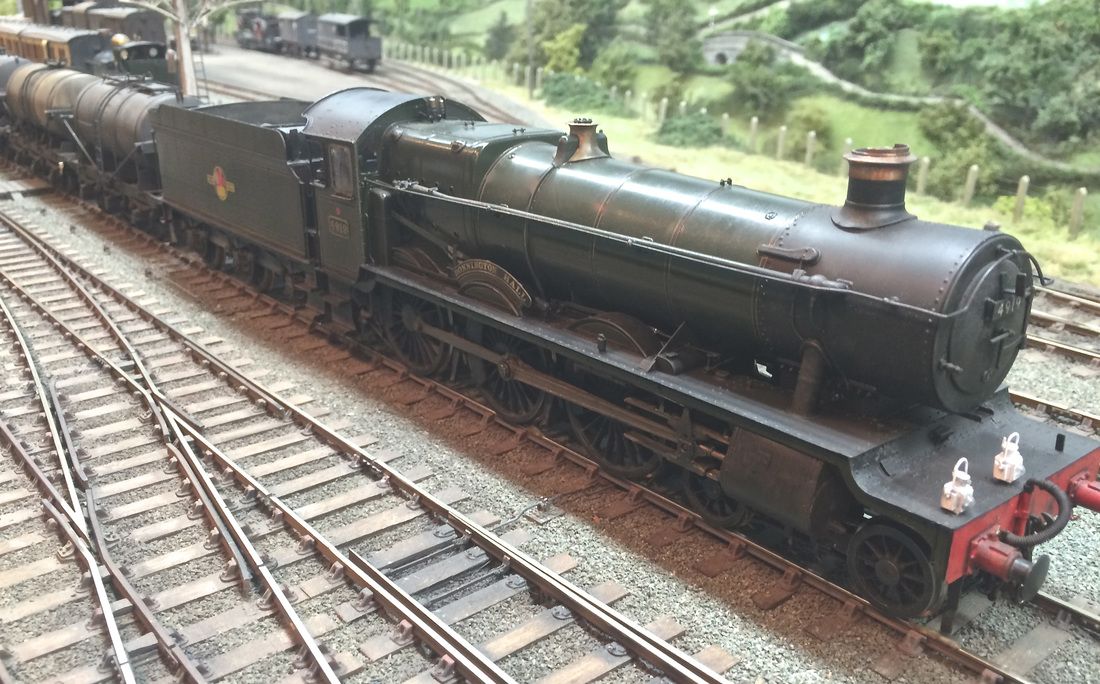
Ex G.W.R. No 4919 Donnington Hall waits in the up loop. This one was taken in different lighting as an attempt to give an evening shadow effect and I might do a few more like this.
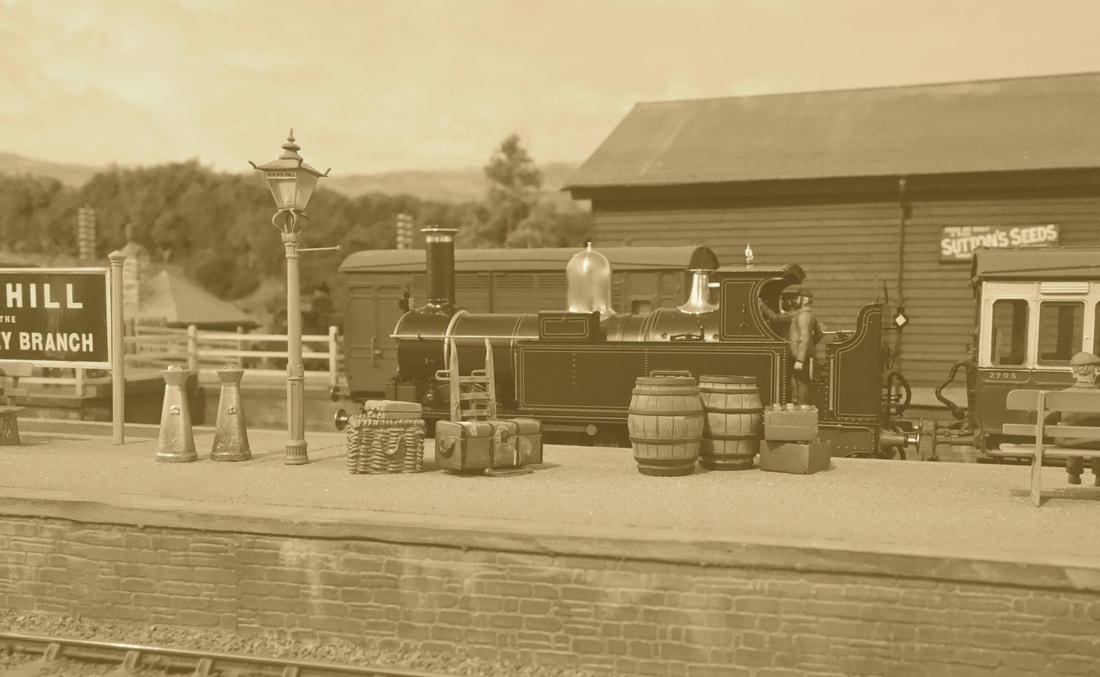
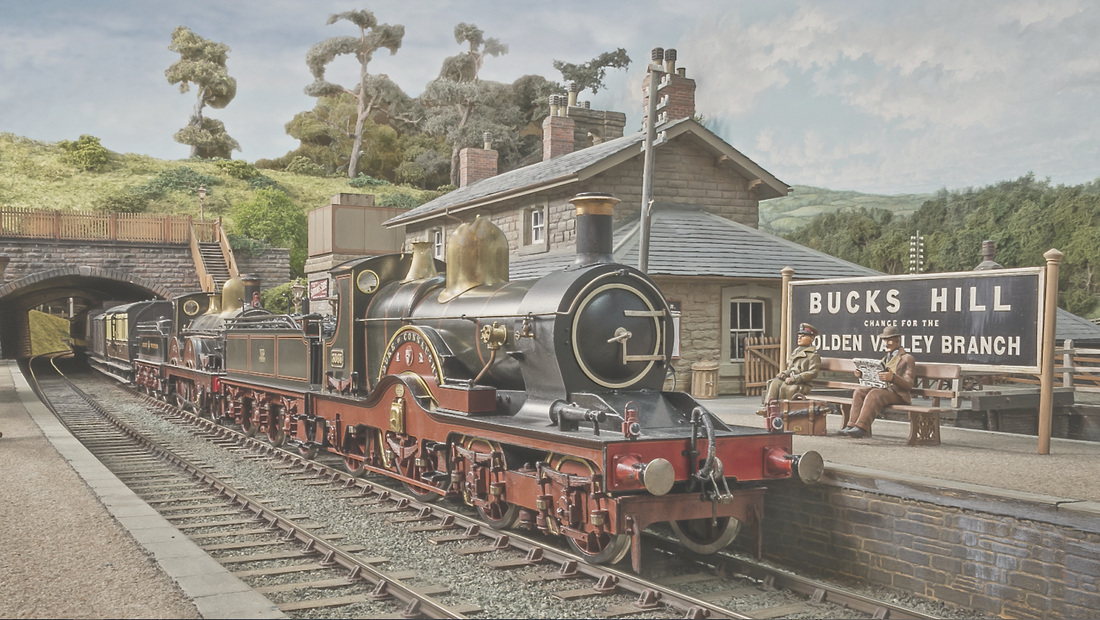
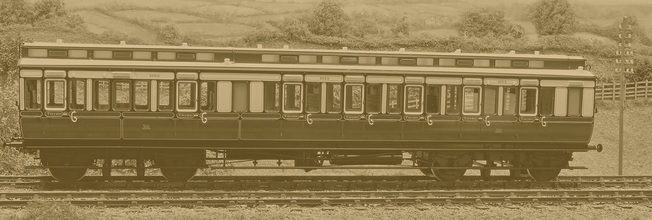
The branch line train arrives at Bucks Hill headed by a Lee Marsh Model co ‘517’ class 0-4-2T. The stone face of the down through platform is in the foreground, with barrows, baskets churns etc, with the wooden cattle dock and goods shed behind.
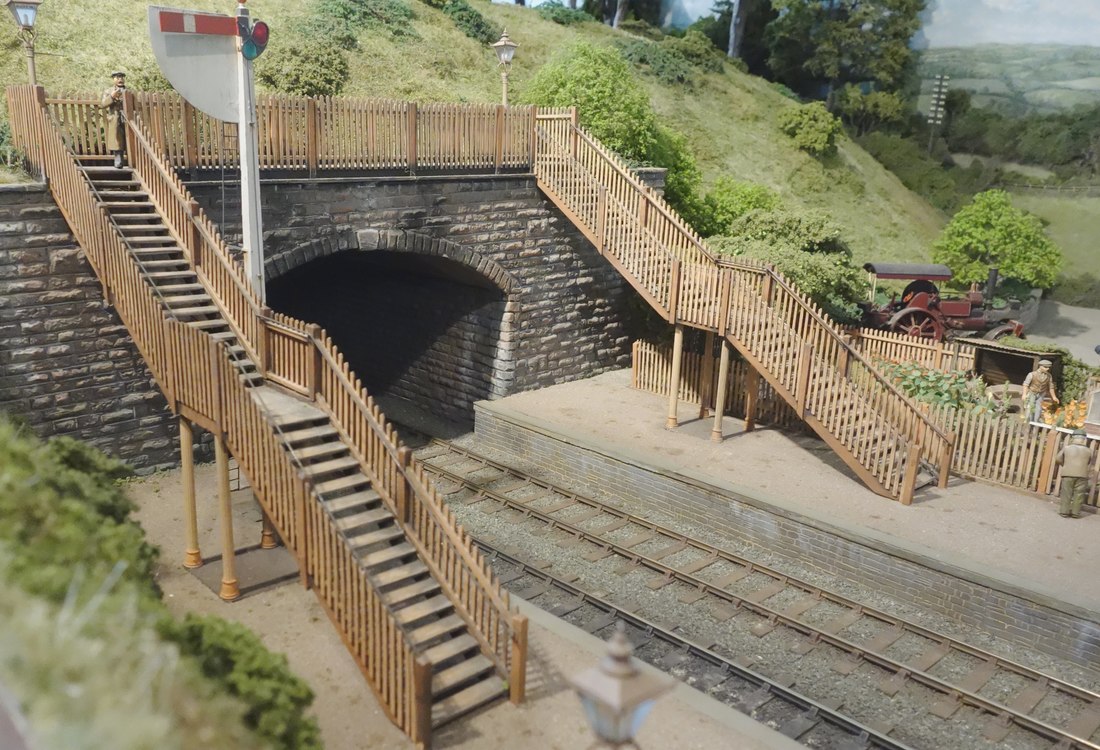
The timber footbridge with shadows in the ‘warm late evening’ lighting.
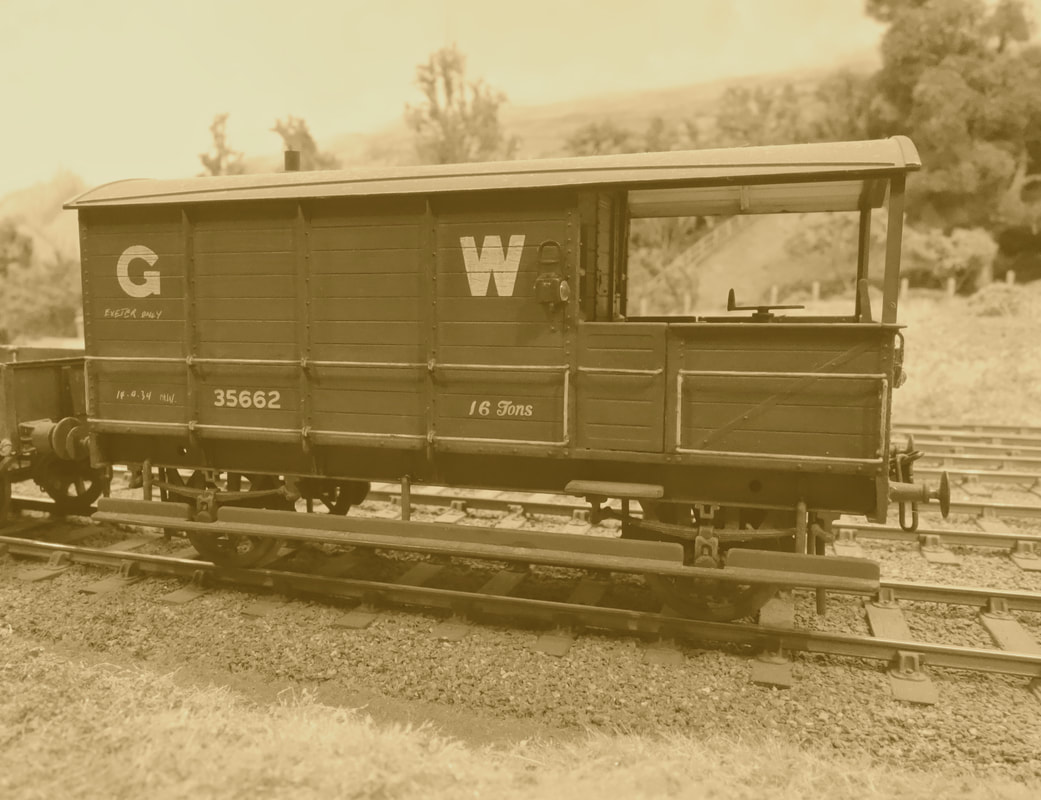
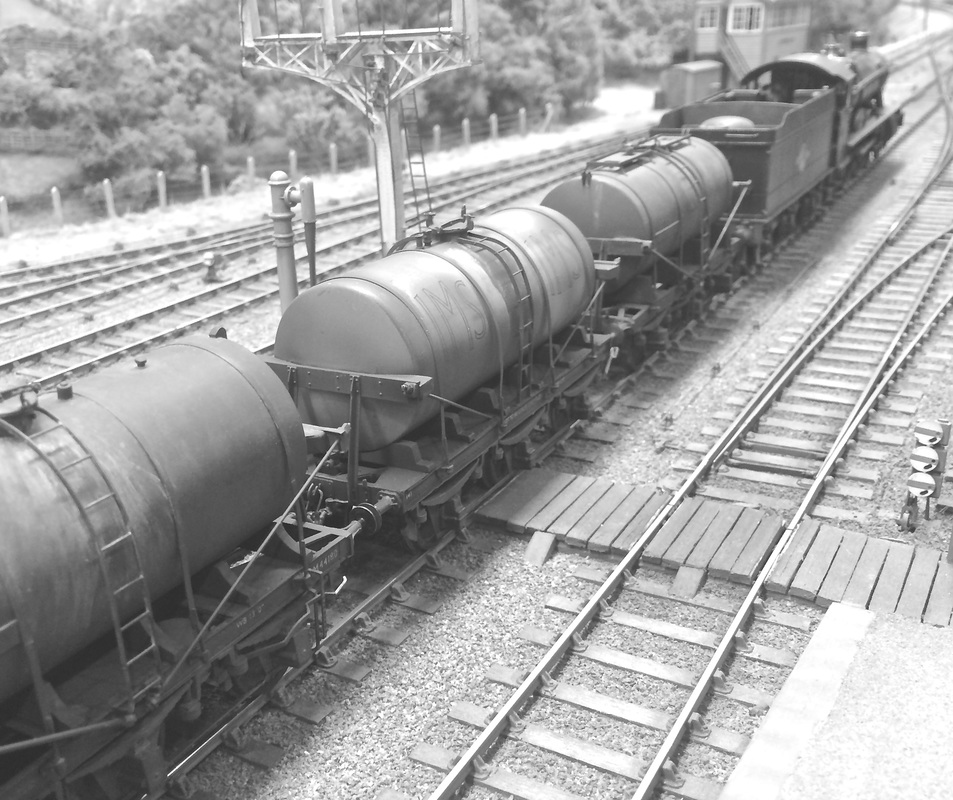
Sepiatone study of 'Toad' brake van No 35662 as it tails a P way train in the down goods loop.
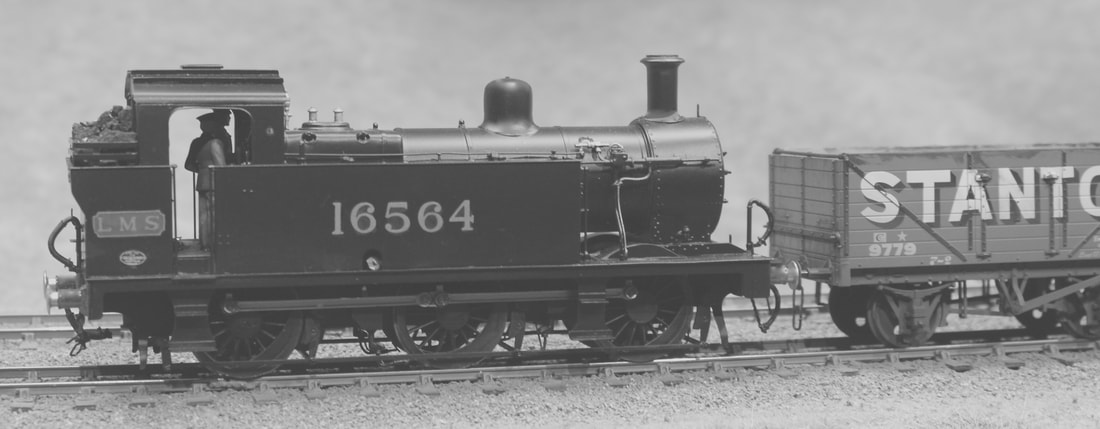
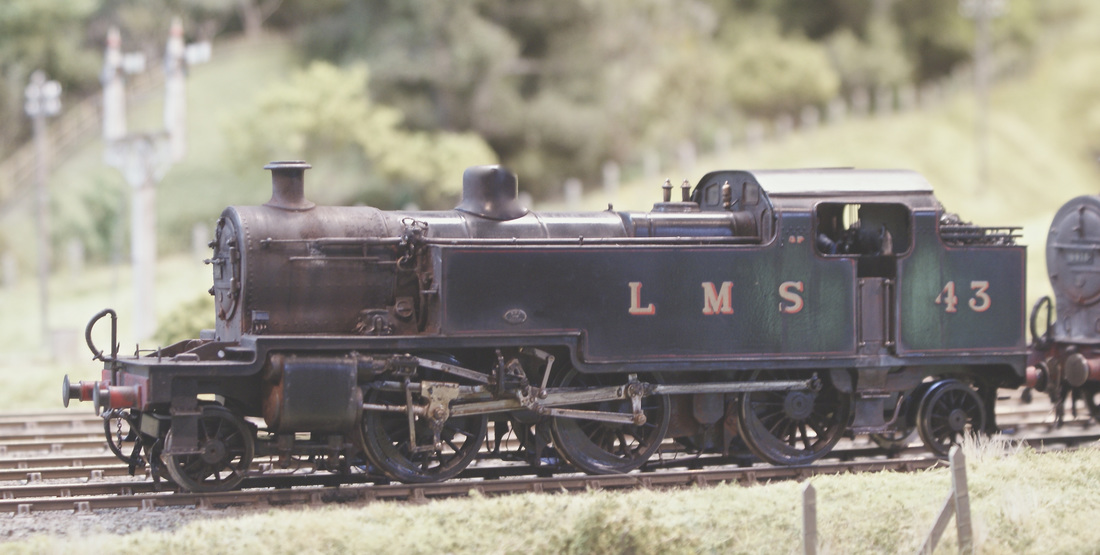
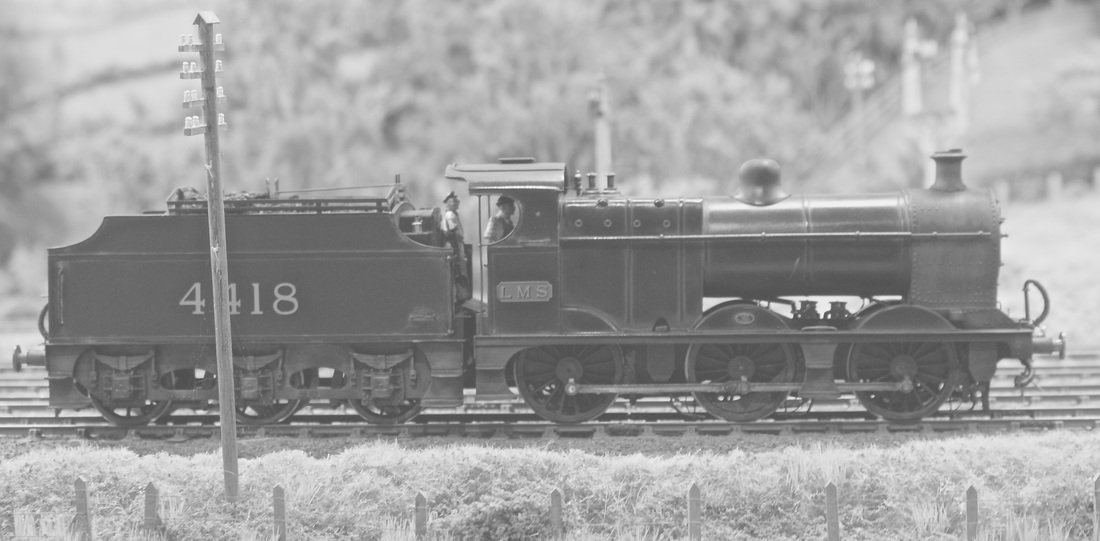
Fowler L.M.S. 0-6-0T No 16564 trundles along the up main with a short rake
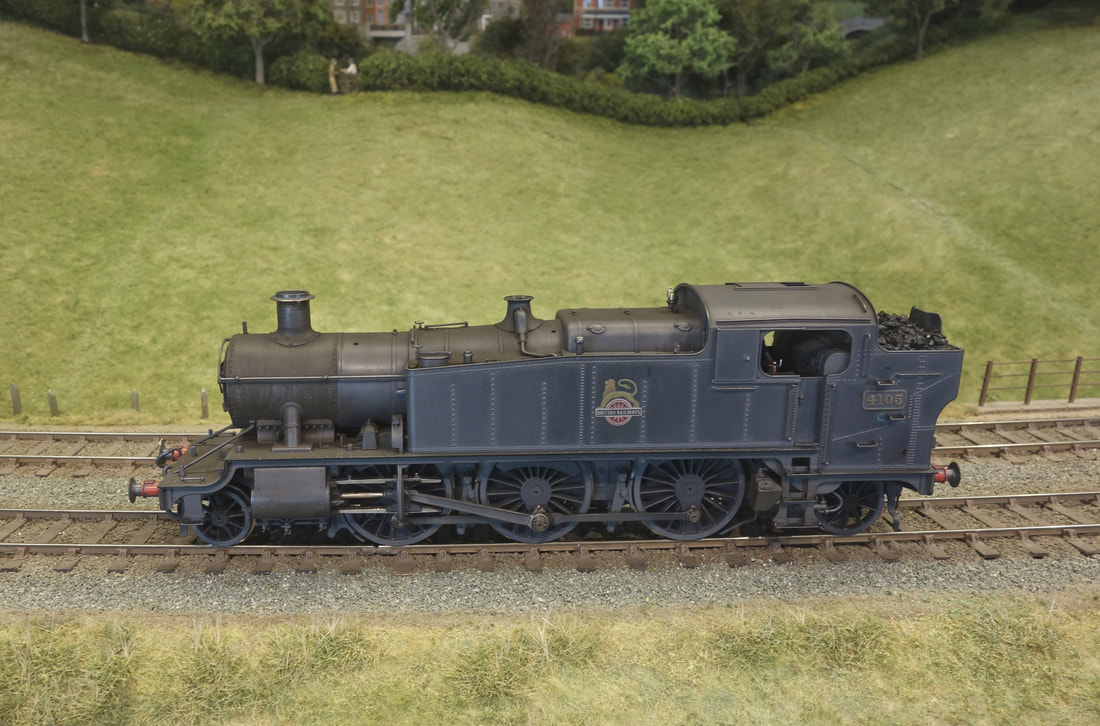
No 4105, a “5101” class 2-6-2T “large prairie”, as running in the early to late 1950’s. Allocated to 83A Newton Abbot shed. A top end “Lee Marsh” ready to run loco, weathered by John Edwards. DCC & sound fitted.
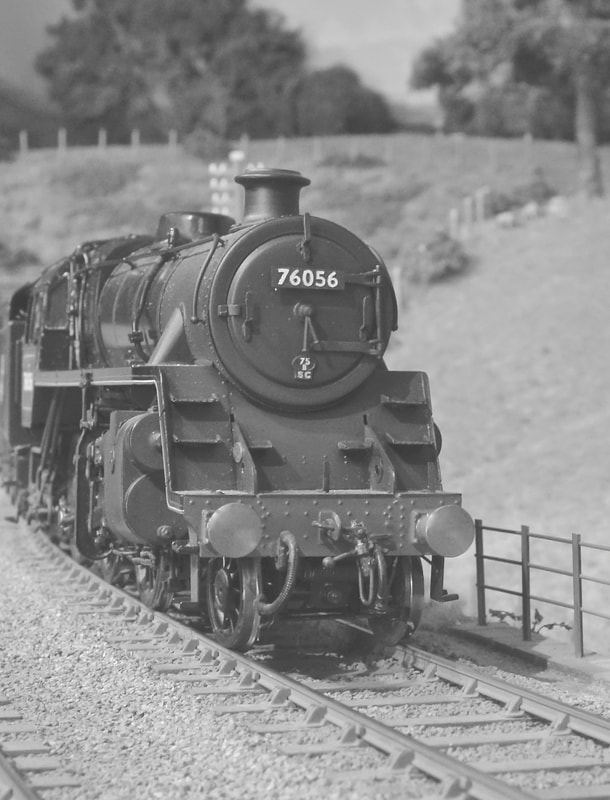
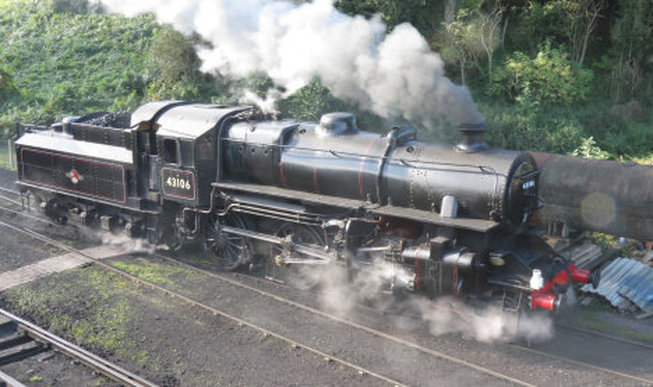
A British Railways standard 2-6-0 No 76056 heads east at Ewyas Harold.
Phil Gomm's excellent BR era autotrain
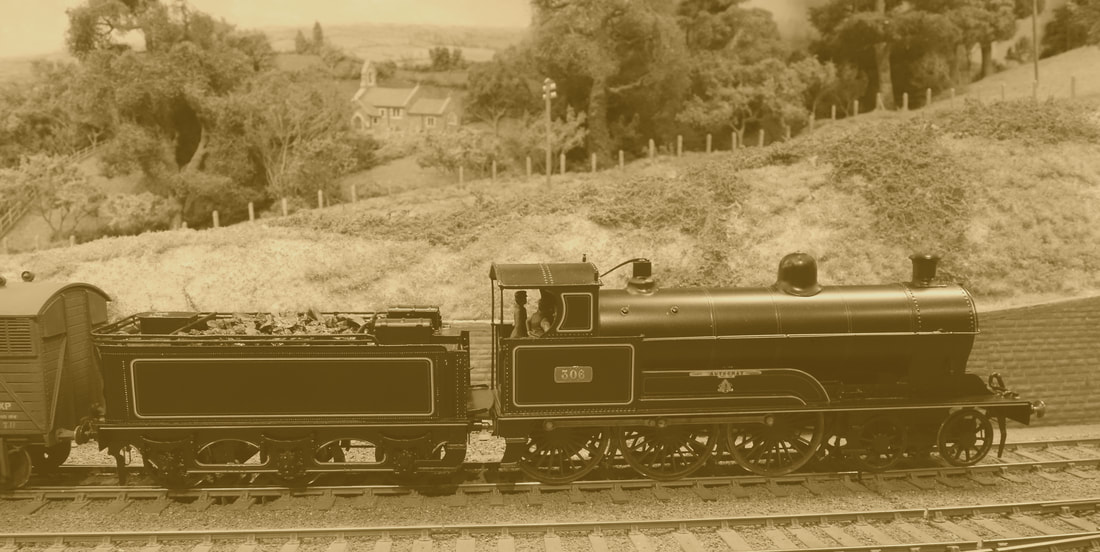
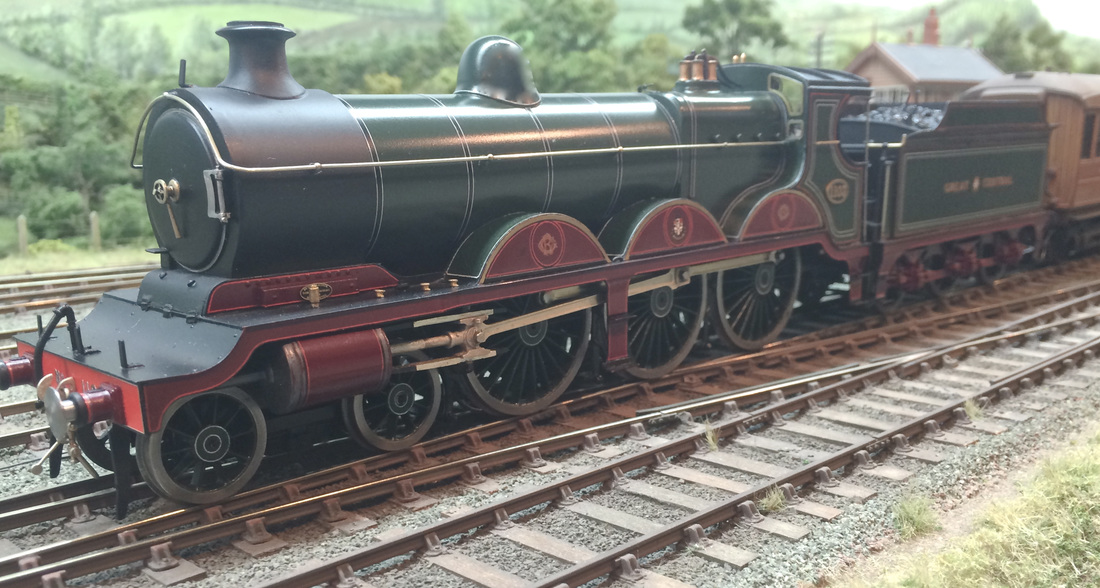
No 306 Autocrat was an extended version of the Whale’s Precursor Class 4-4-0, with slightly smaller driving wheels. The first of the class, No 66 Experiment was built in 1905 and a total of 105 were constructed up until 1910. The LNWR reused numbers and names of withdrawn locomotives, with the result that the numbering system was completely haphazard!
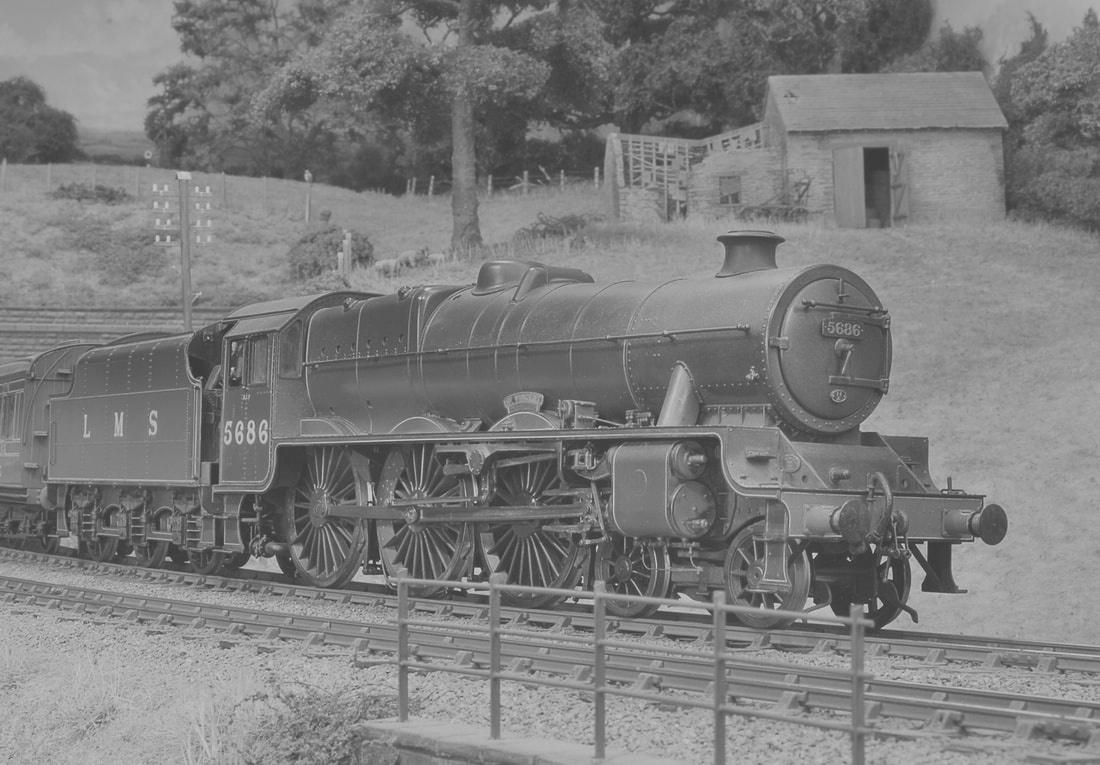
Weathered Lee Marsh Jubilee No 5686 'St Vincent' at Ewyas Harold.
13th May 2018
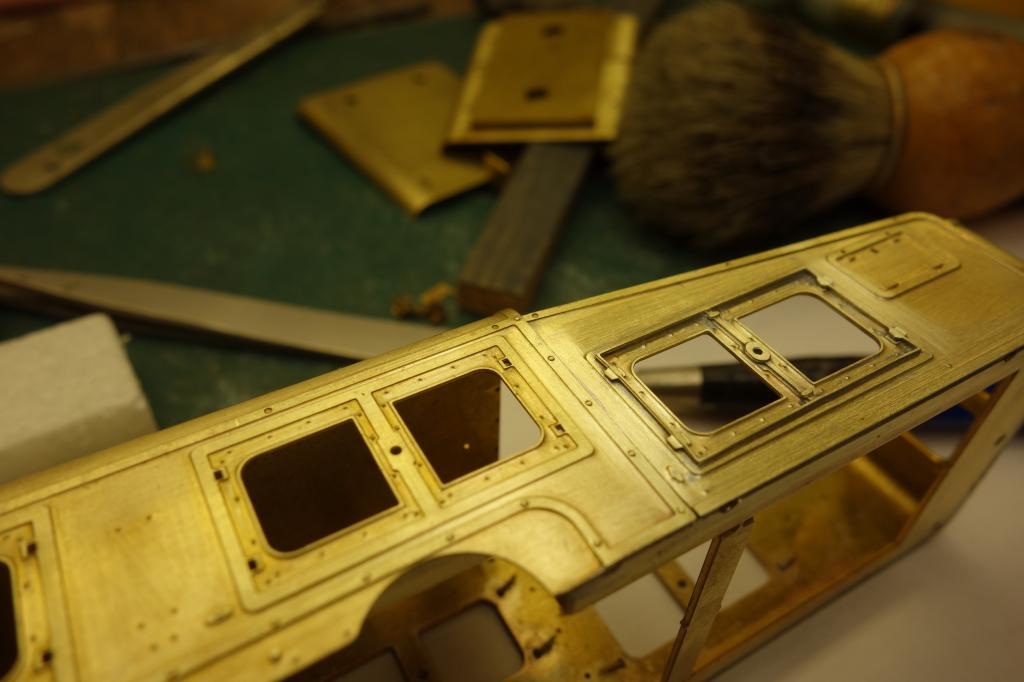
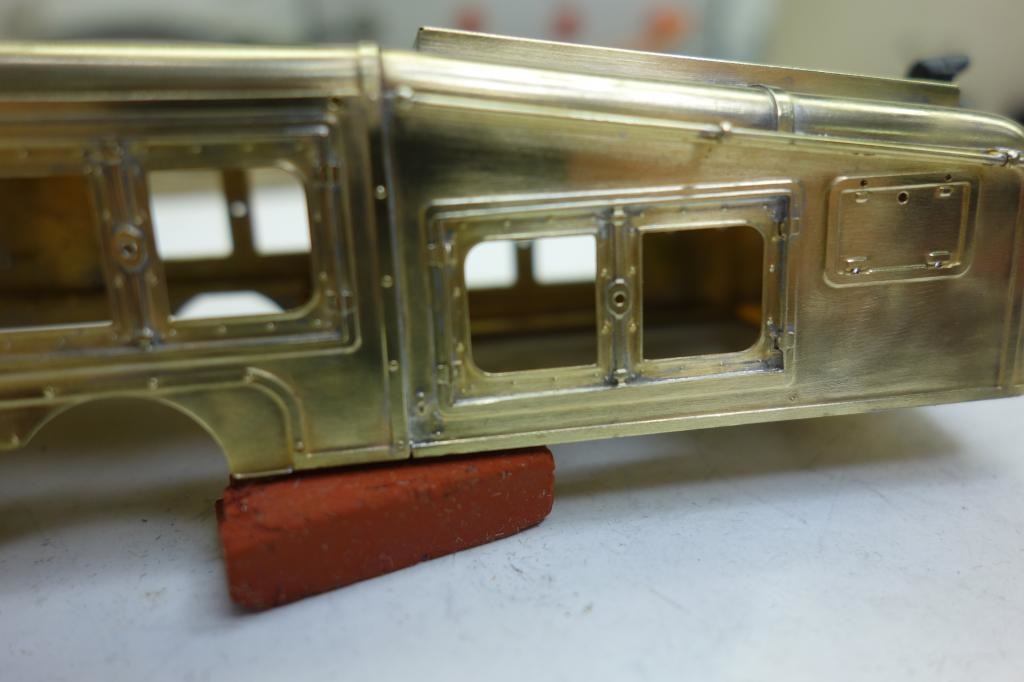
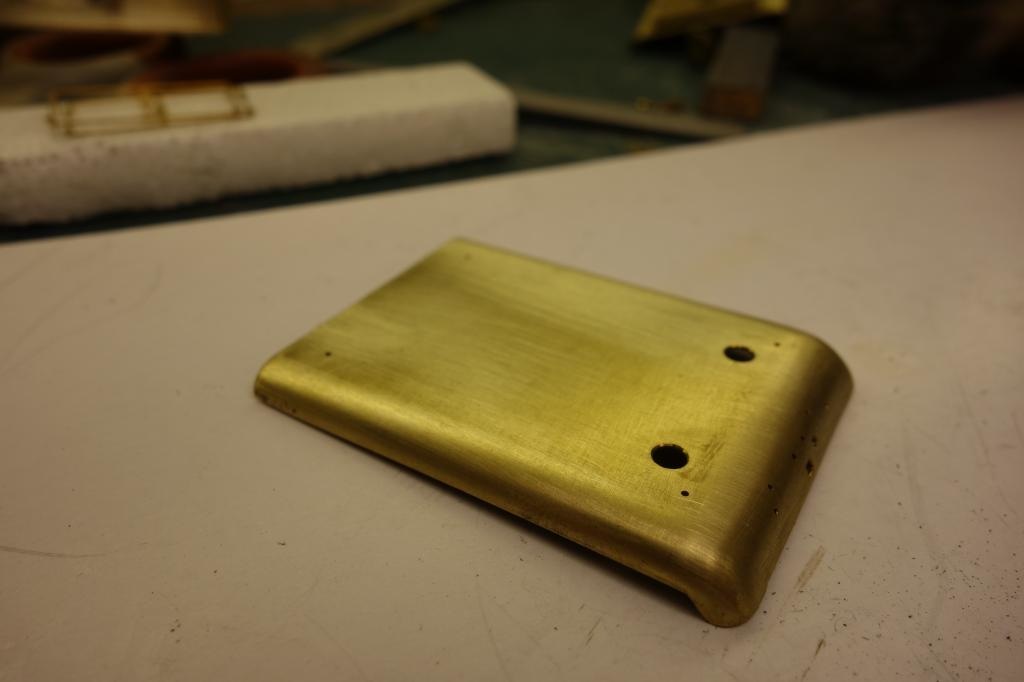
Fairly quiet lately, but I have attended some of the recent trade shows with Lee to take some of the load, and I also took care of the 7mm locomotive building class at Missenden Abbey.
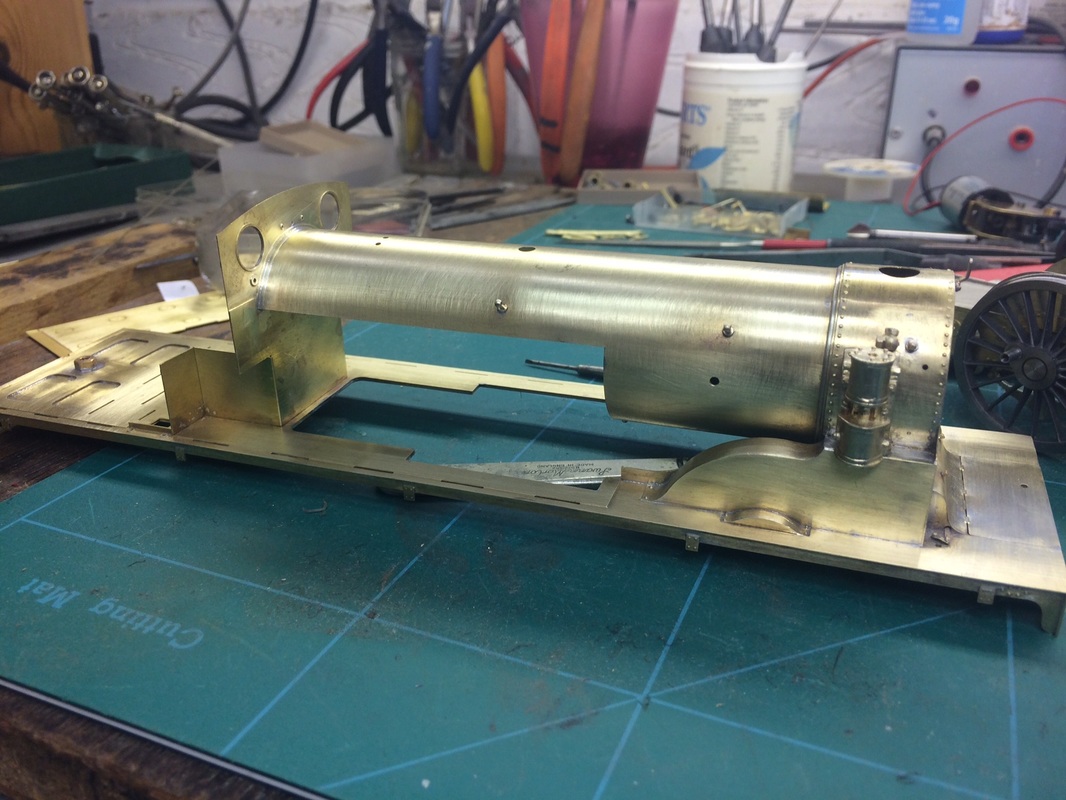
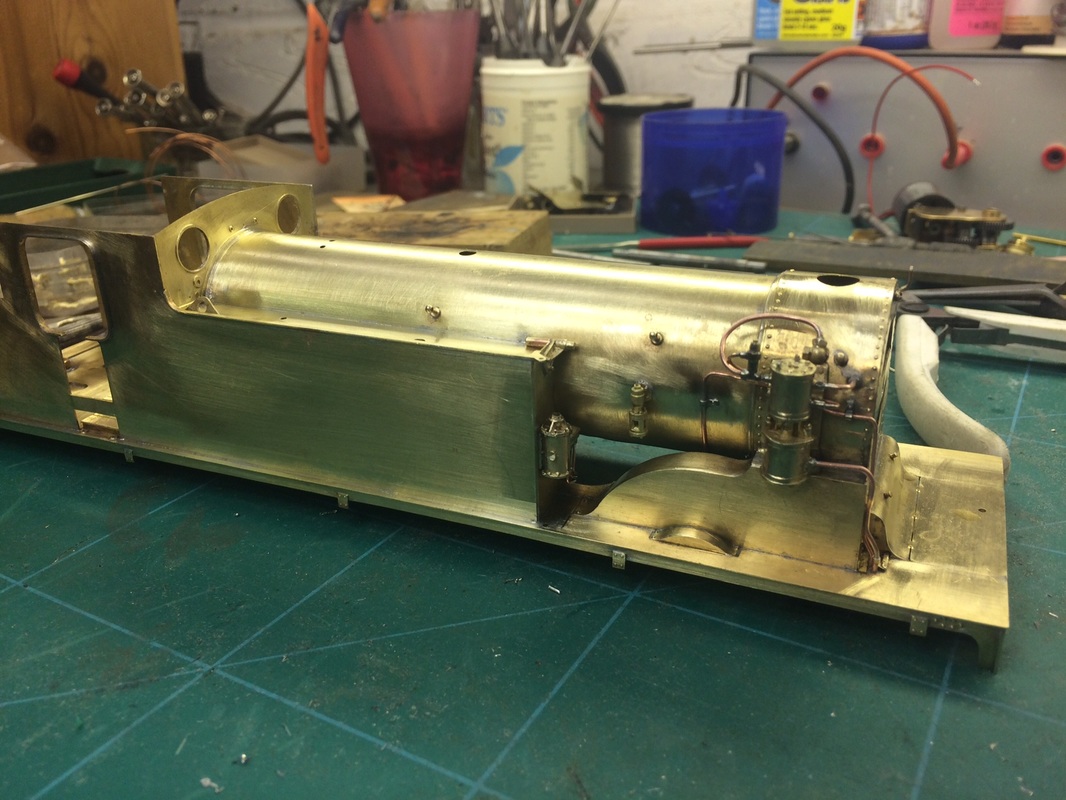
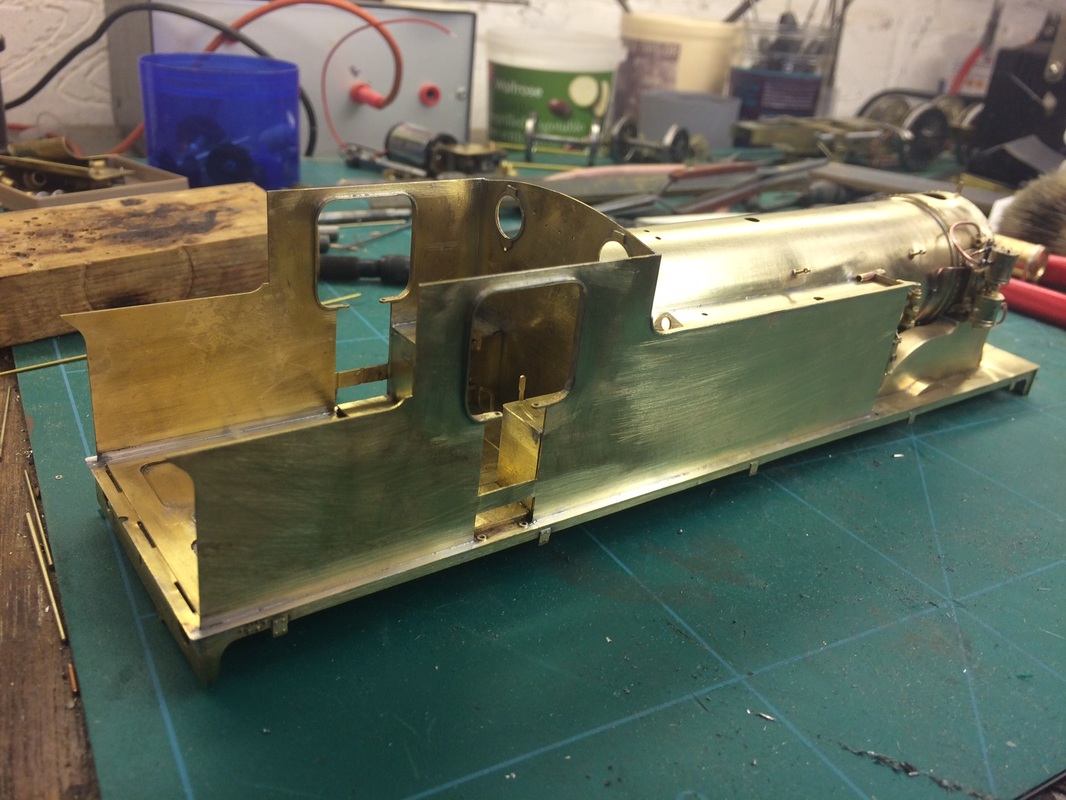
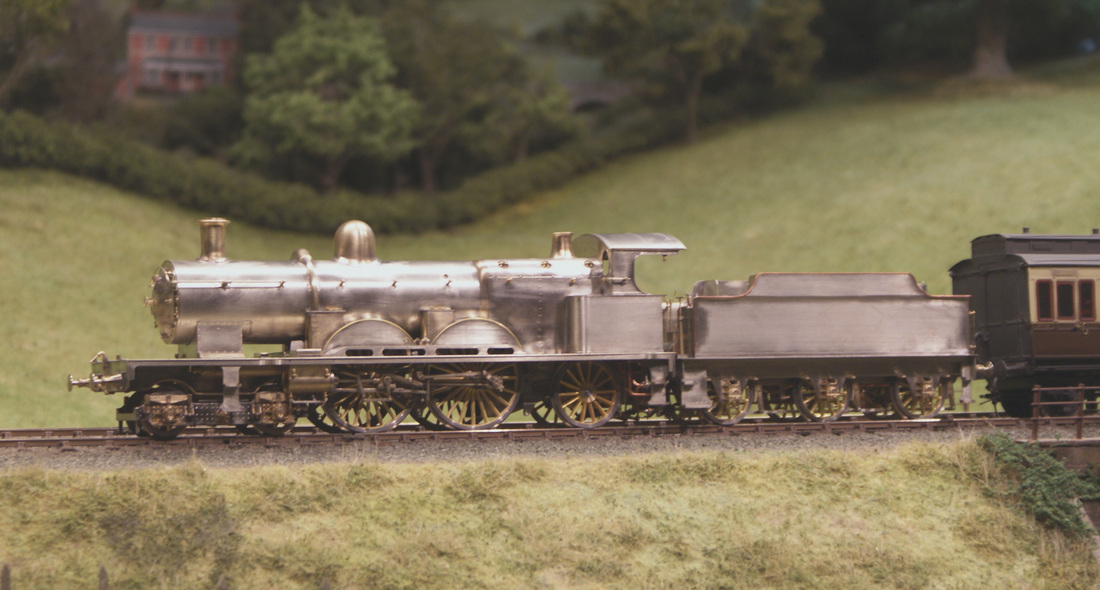
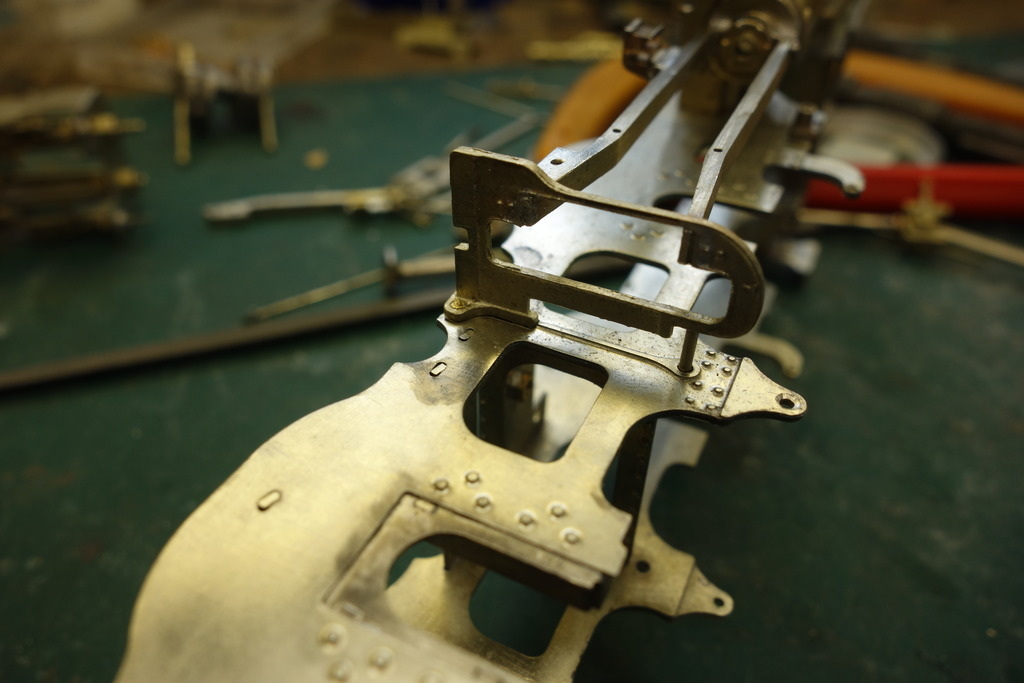
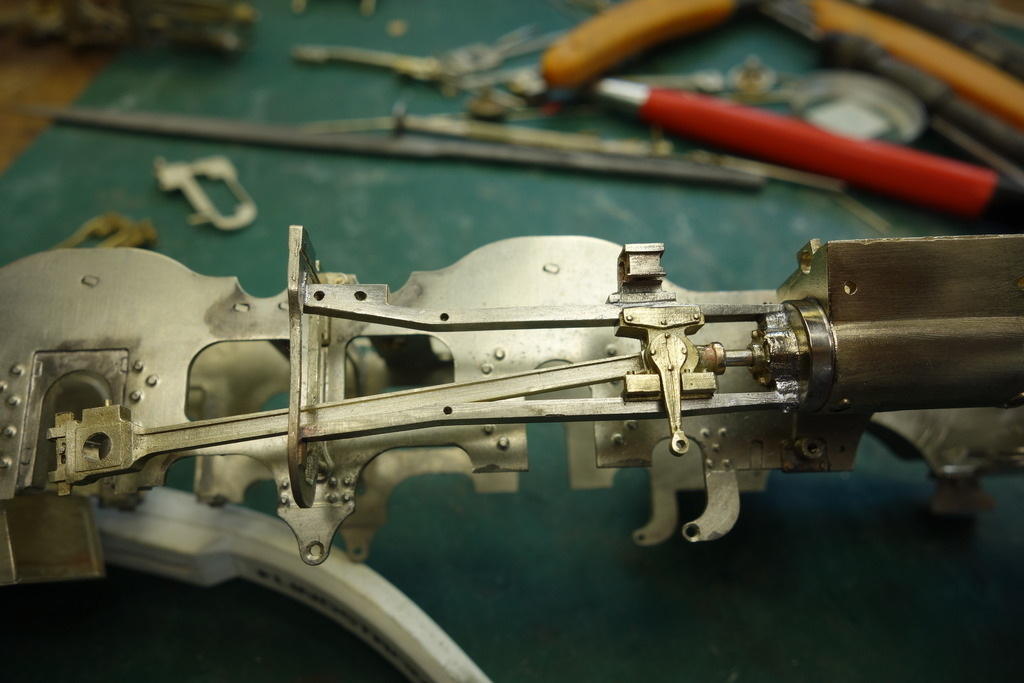
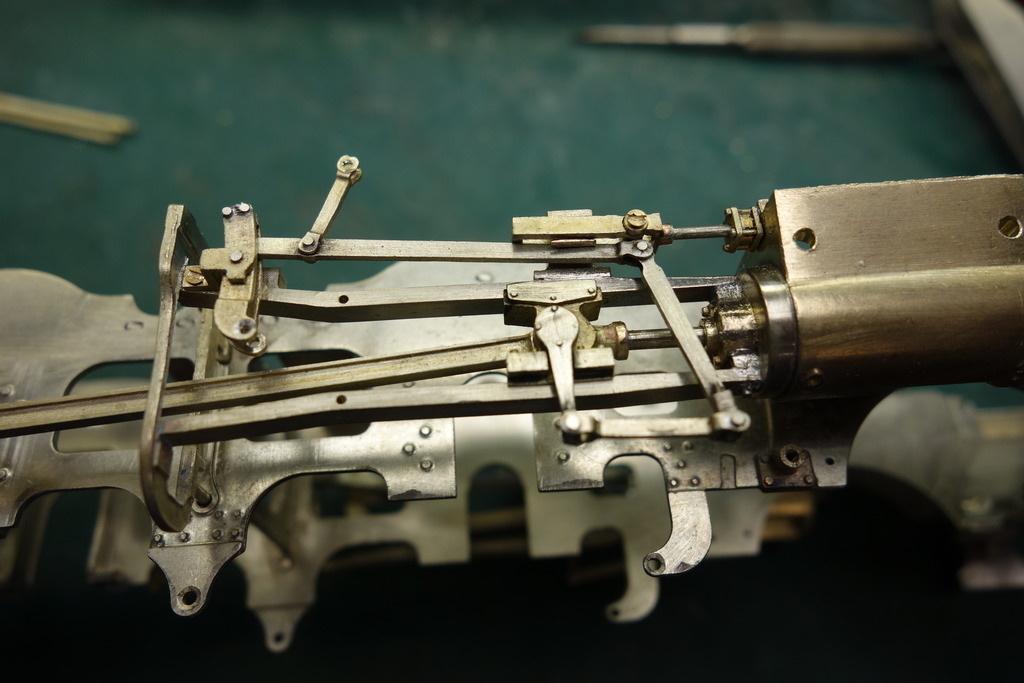
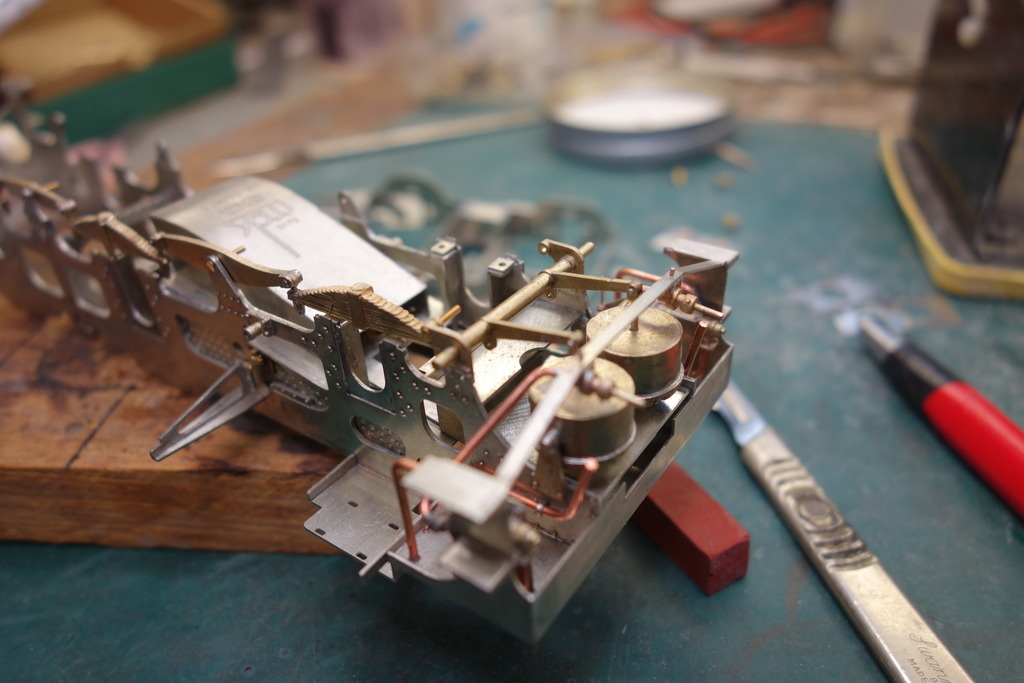
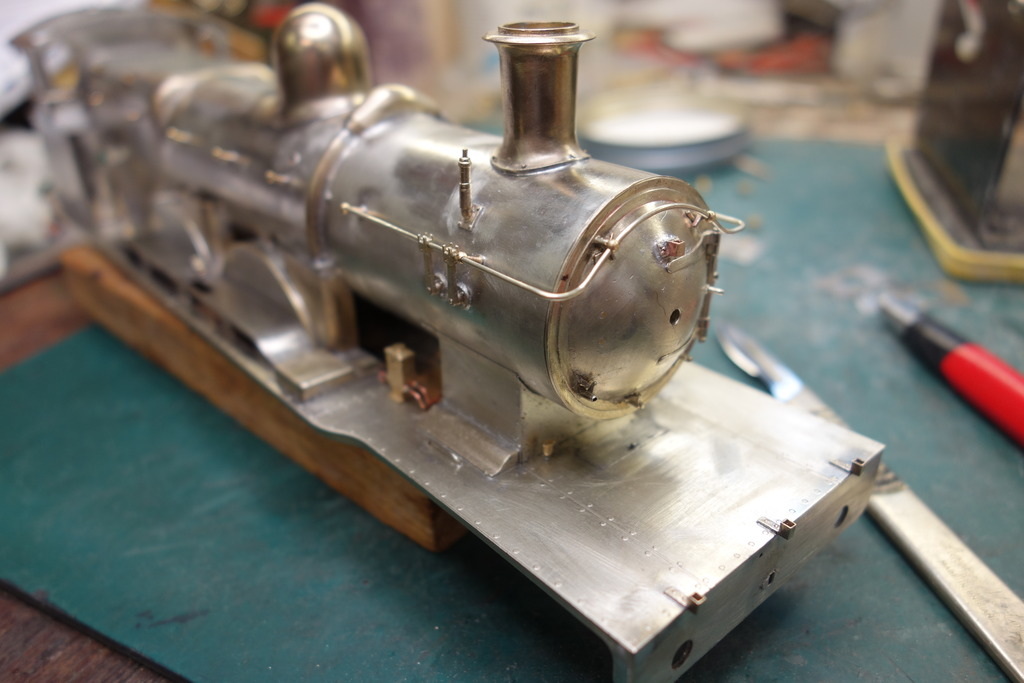
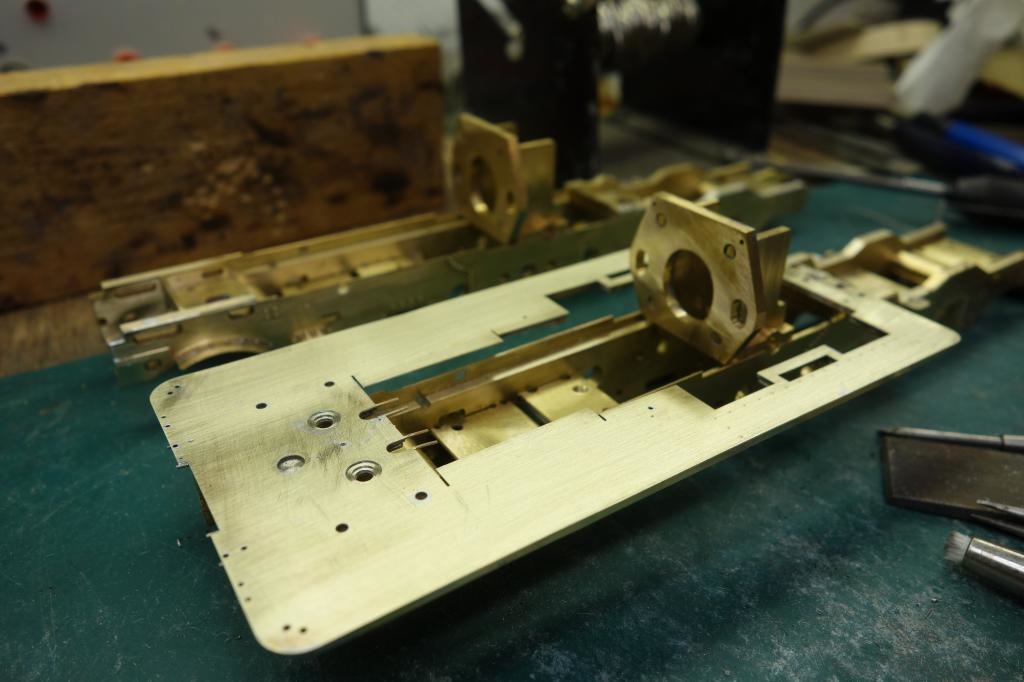
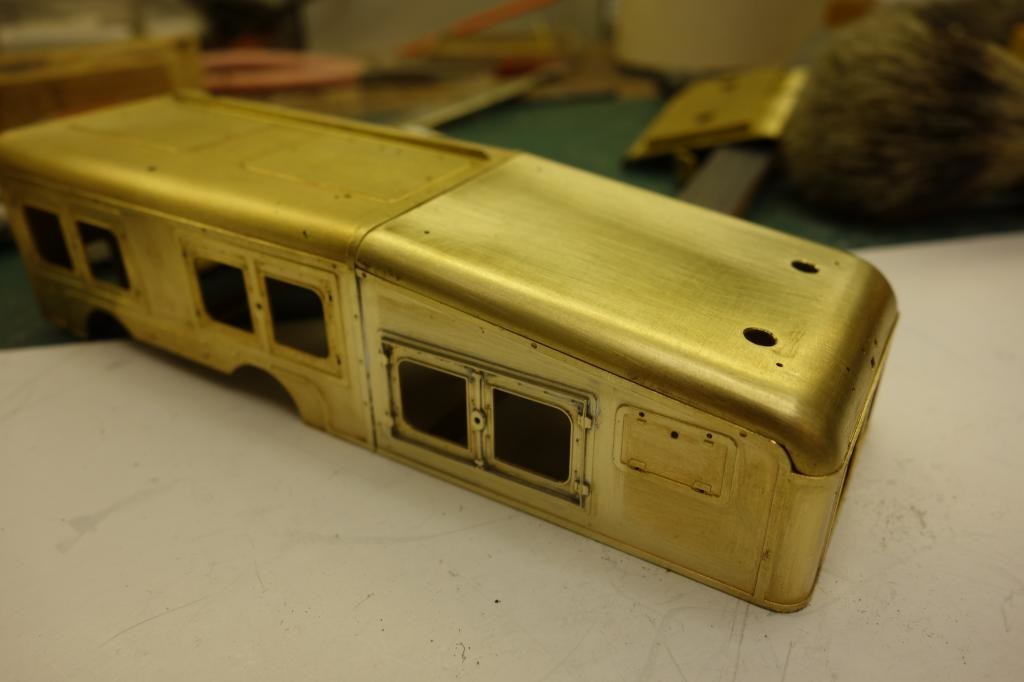
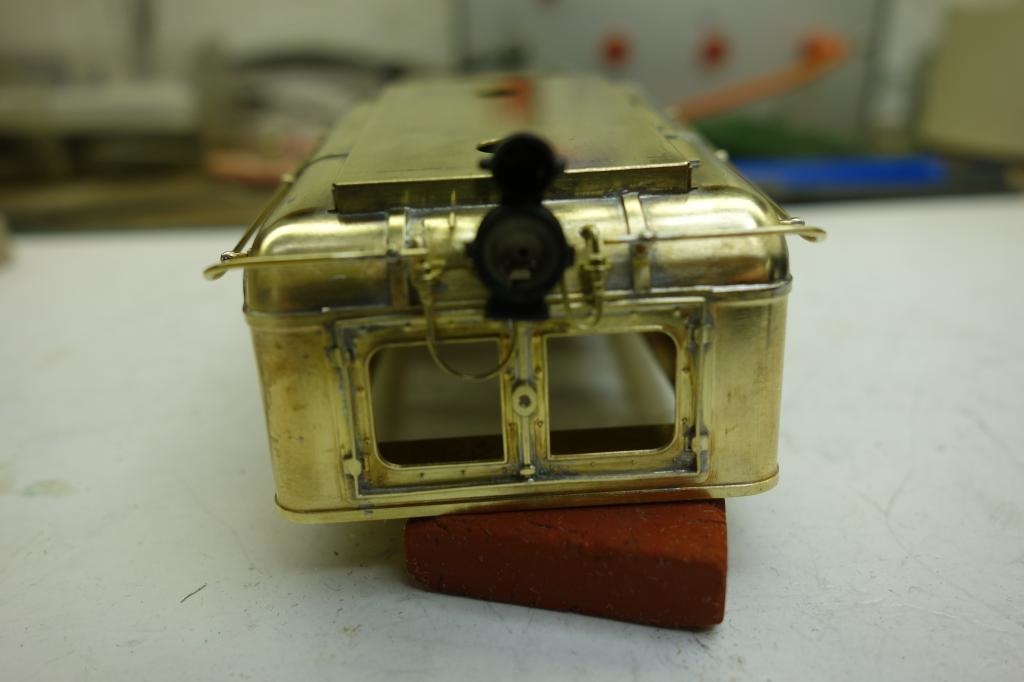
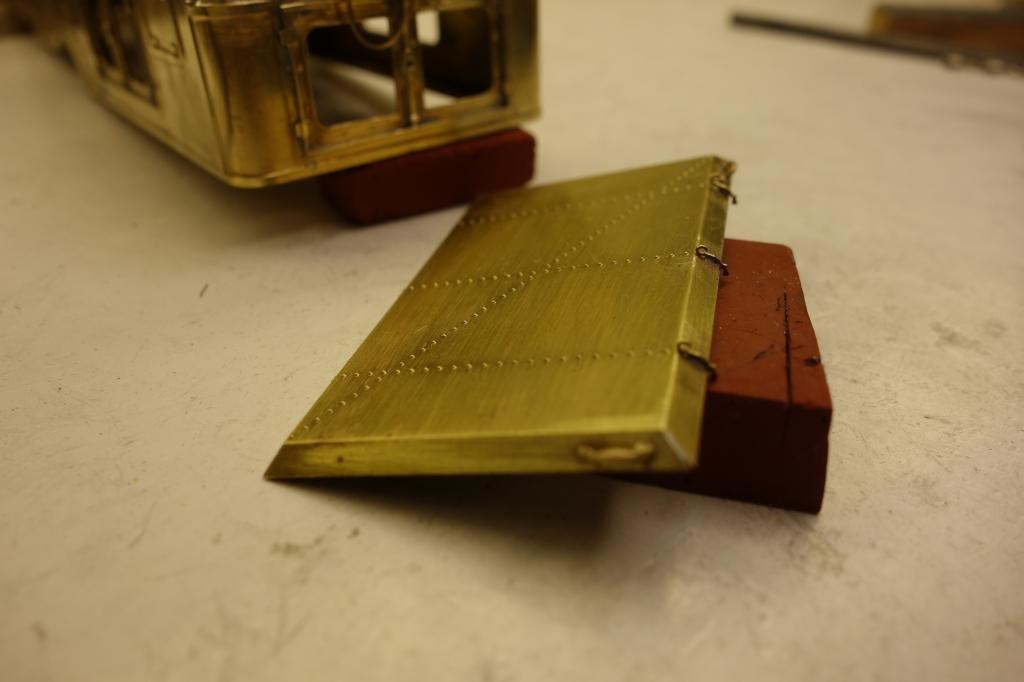
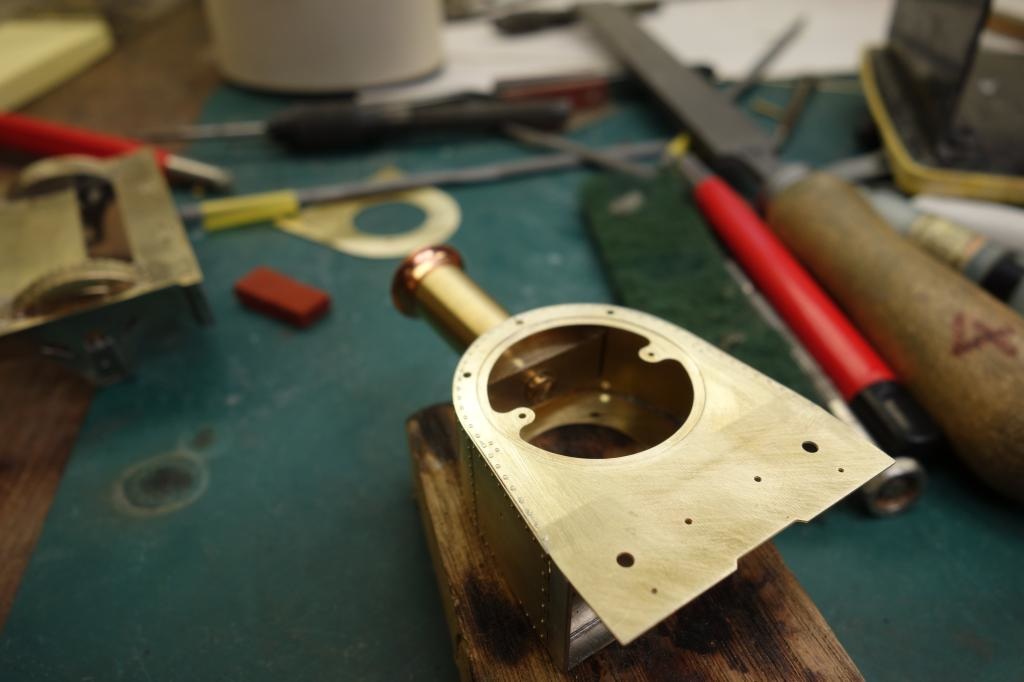
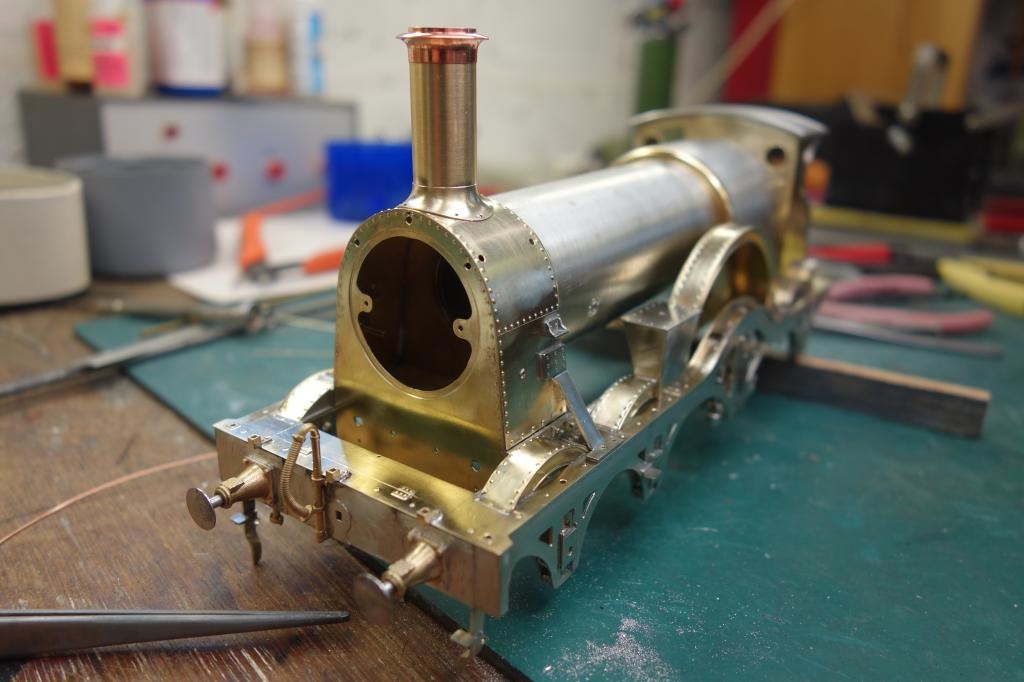
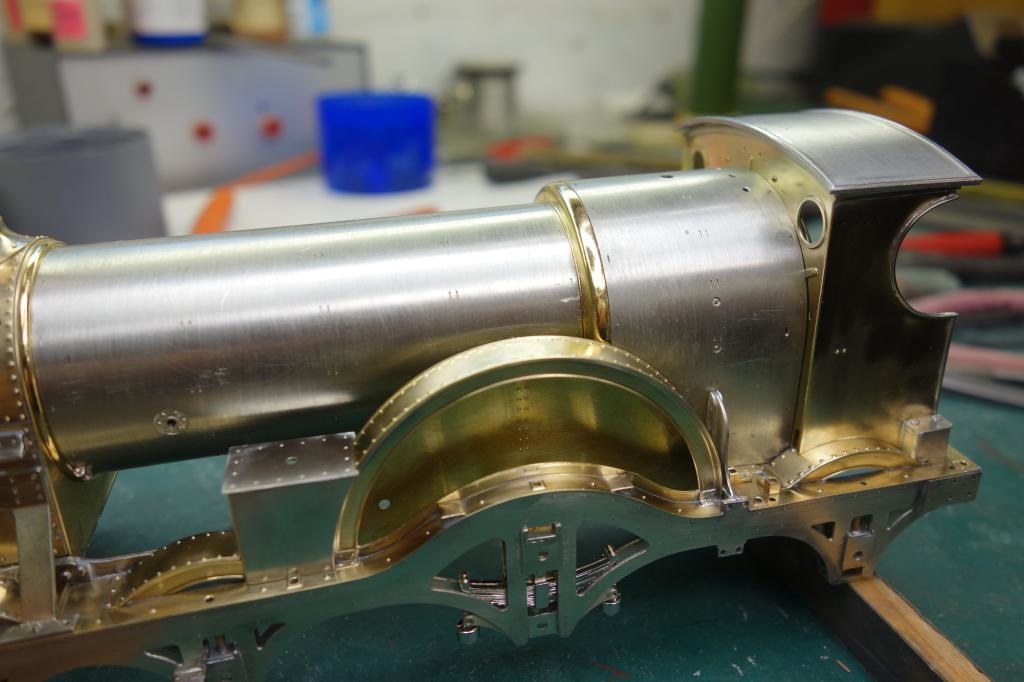
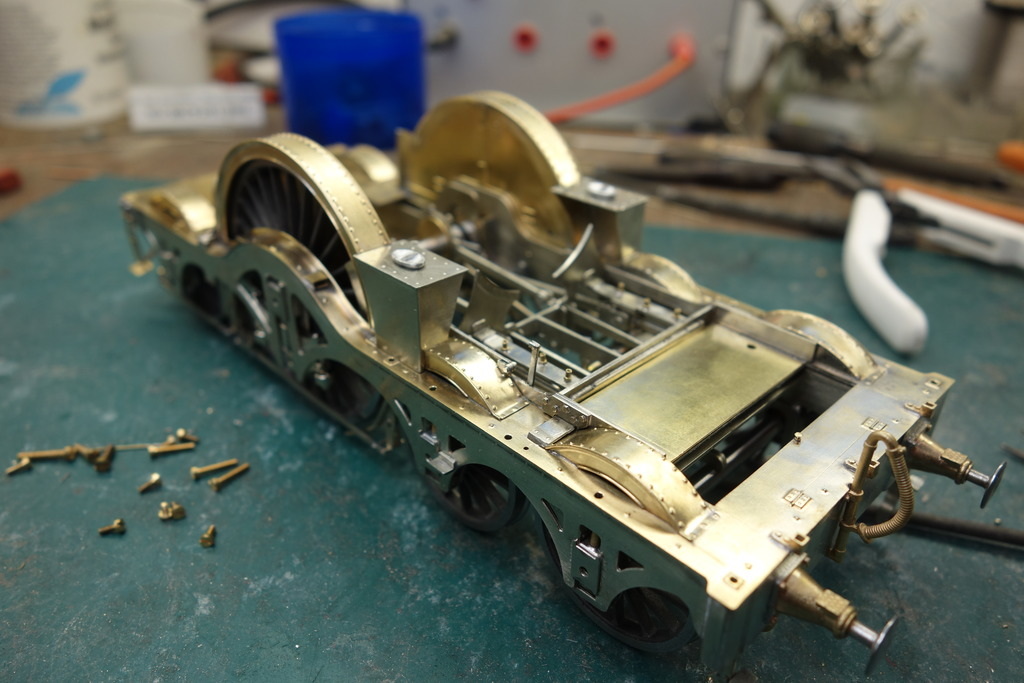
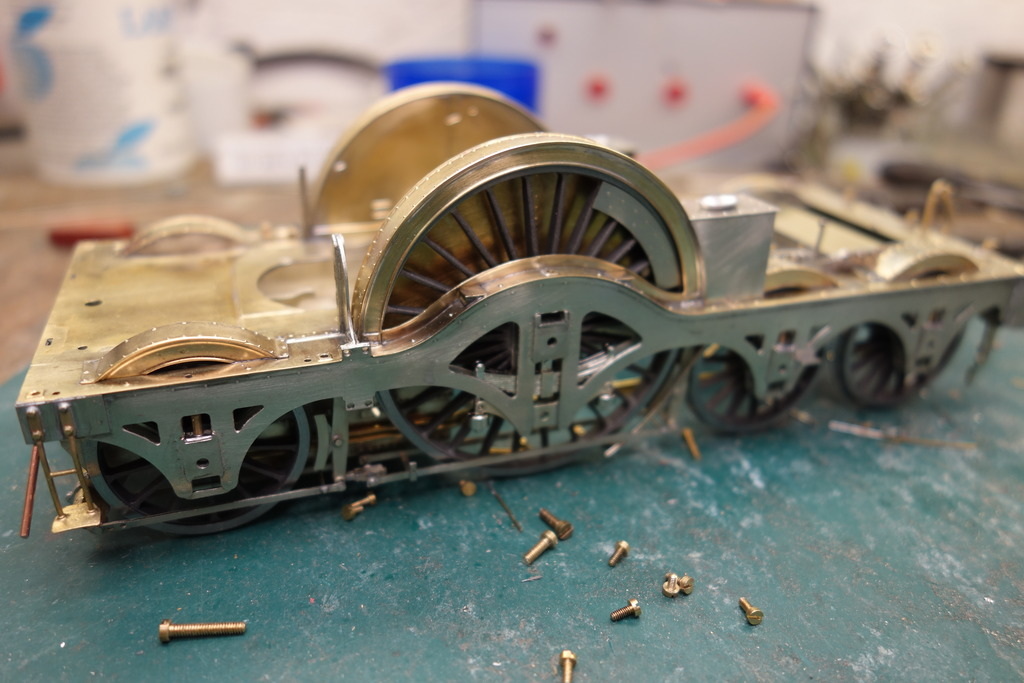
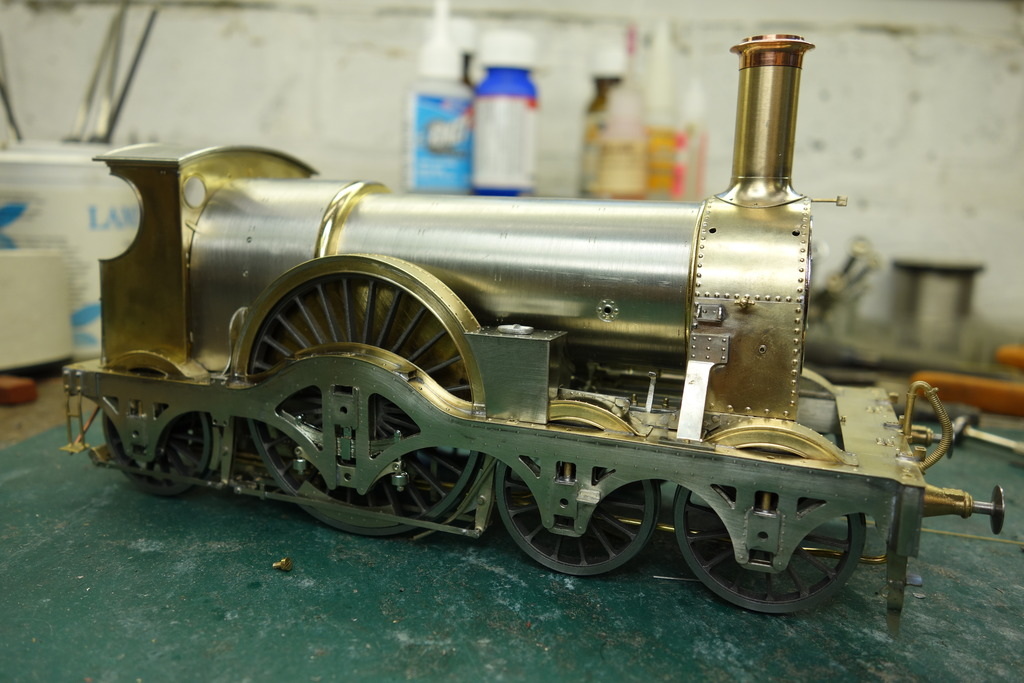
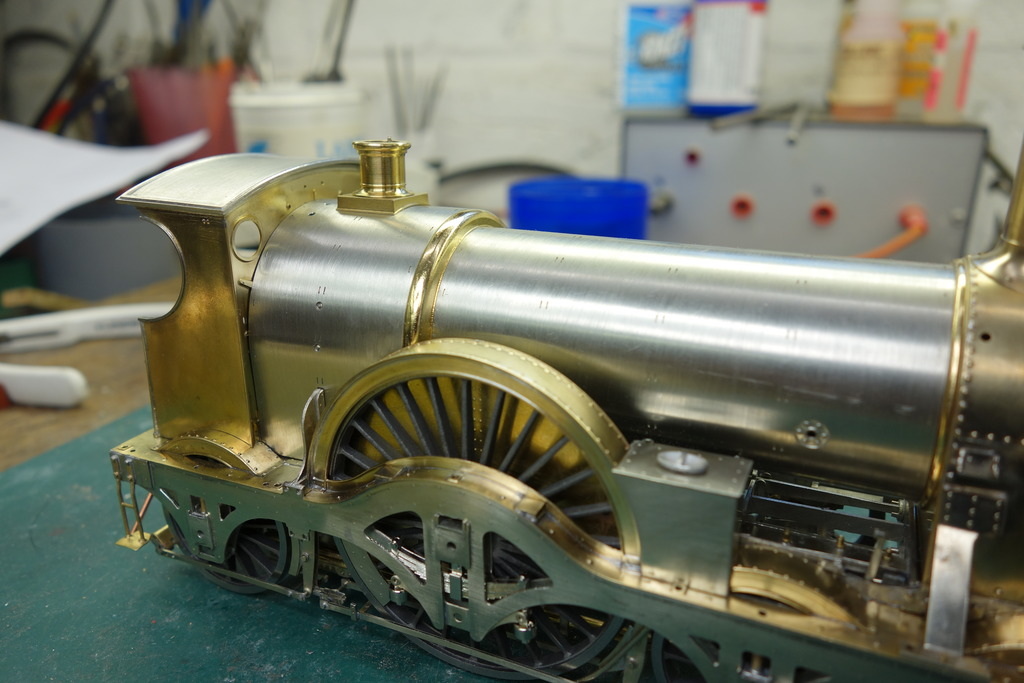
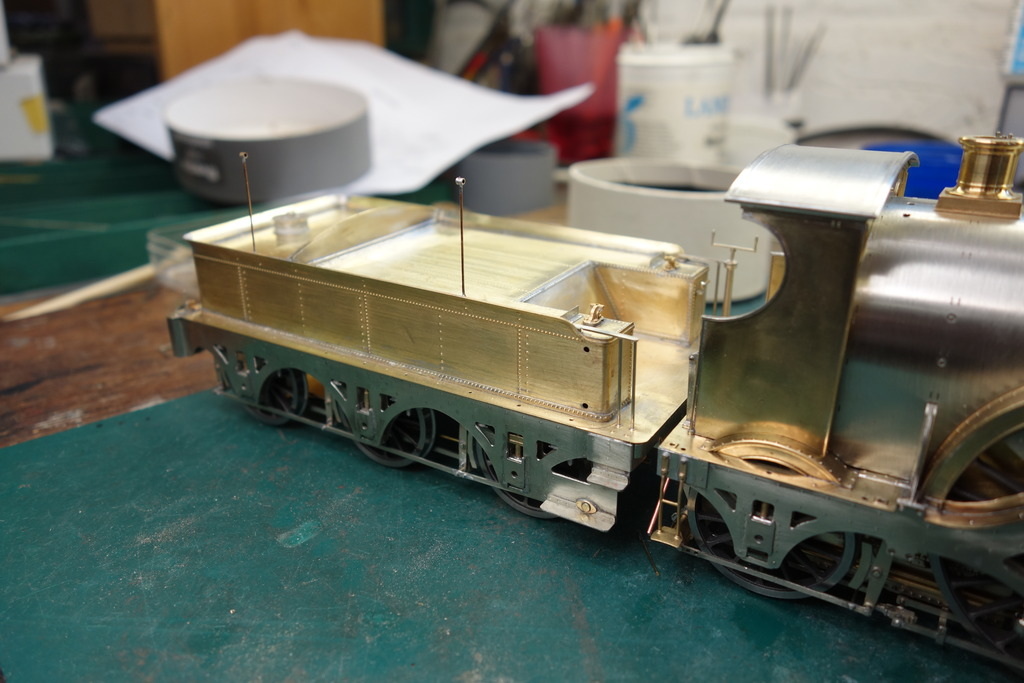
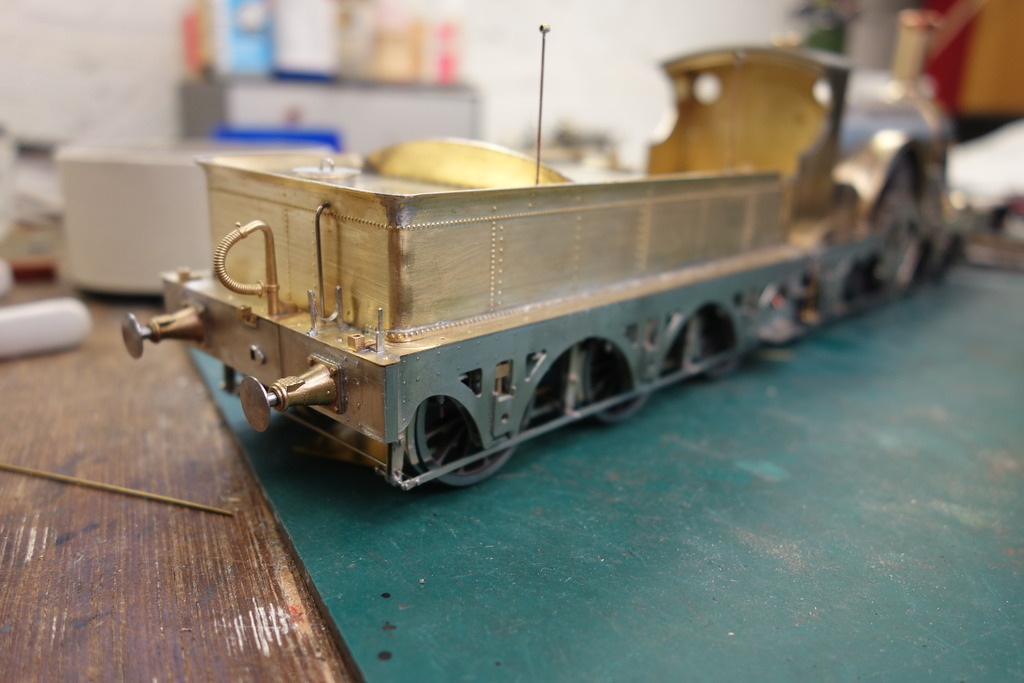
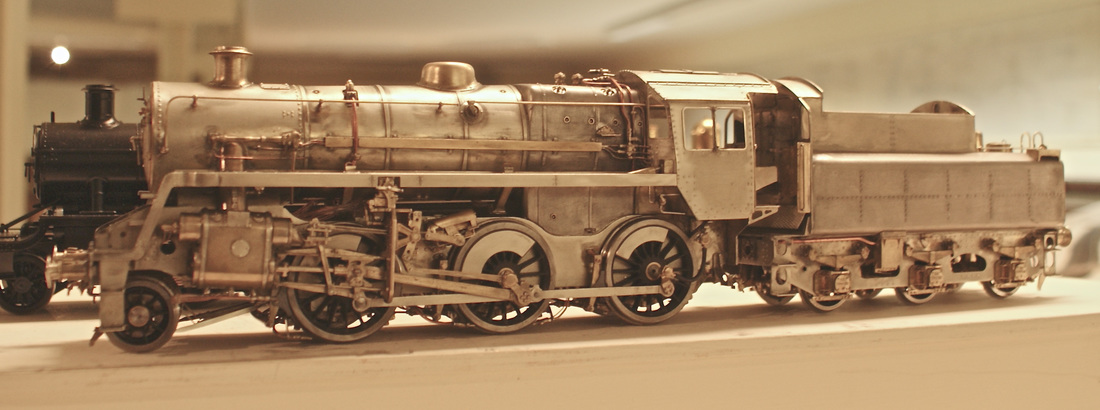
Just doing the normal maintenance the layout requires from time to time, and working on the Martin Finney City 4-4-0 which is doing fine. I will put up a few new pics from around the layout along, with some of the many visiting engines.
Just doing the normal maintenance the layout requires from time to time, and working on the Martin Finney City 4-4-0 which is doing fine. I will put up a few new pics from around the layout along, with some of the many visiting engines.
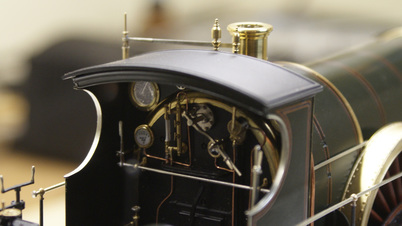
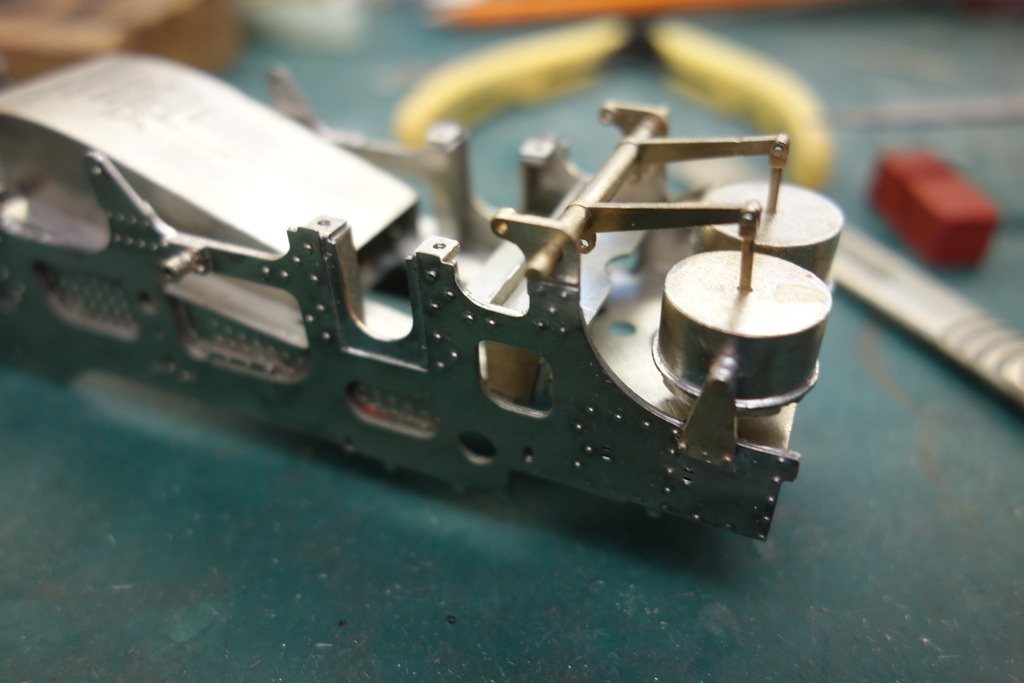
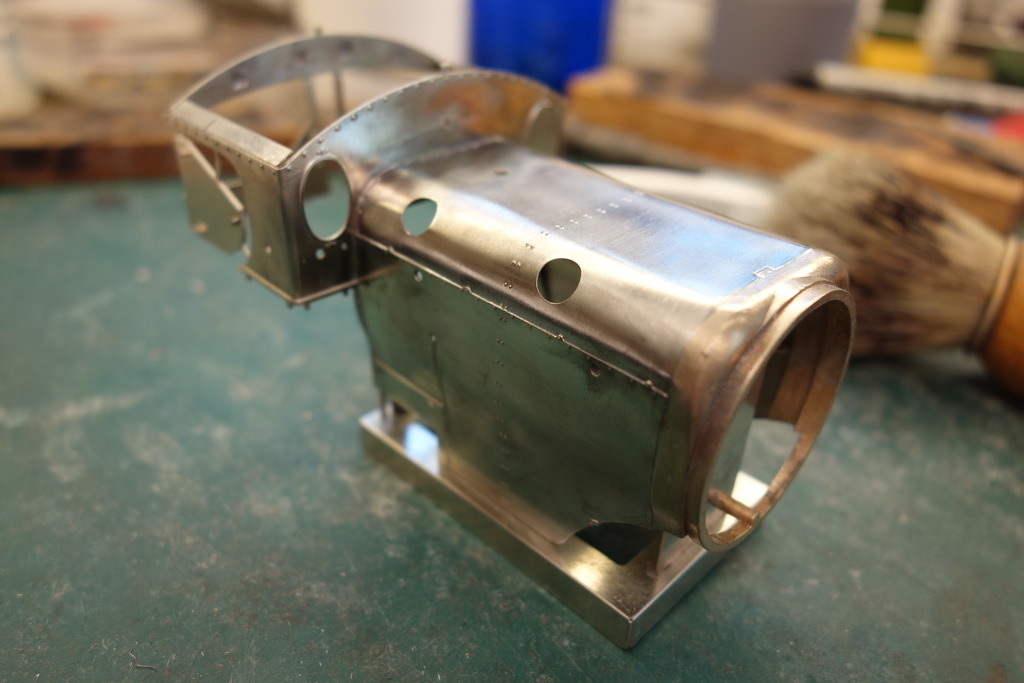
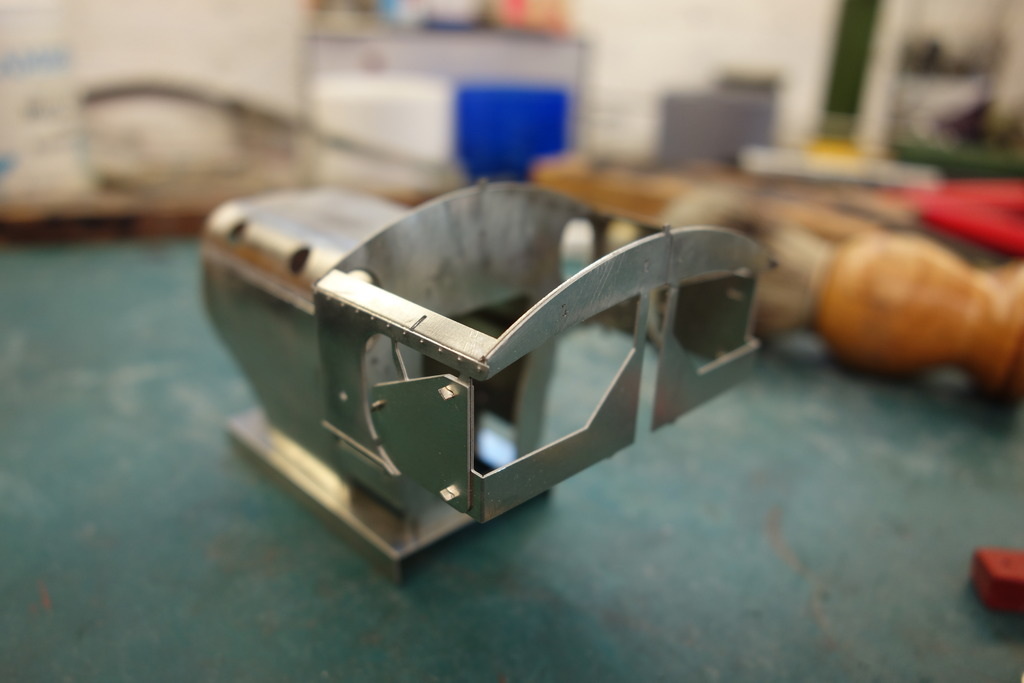
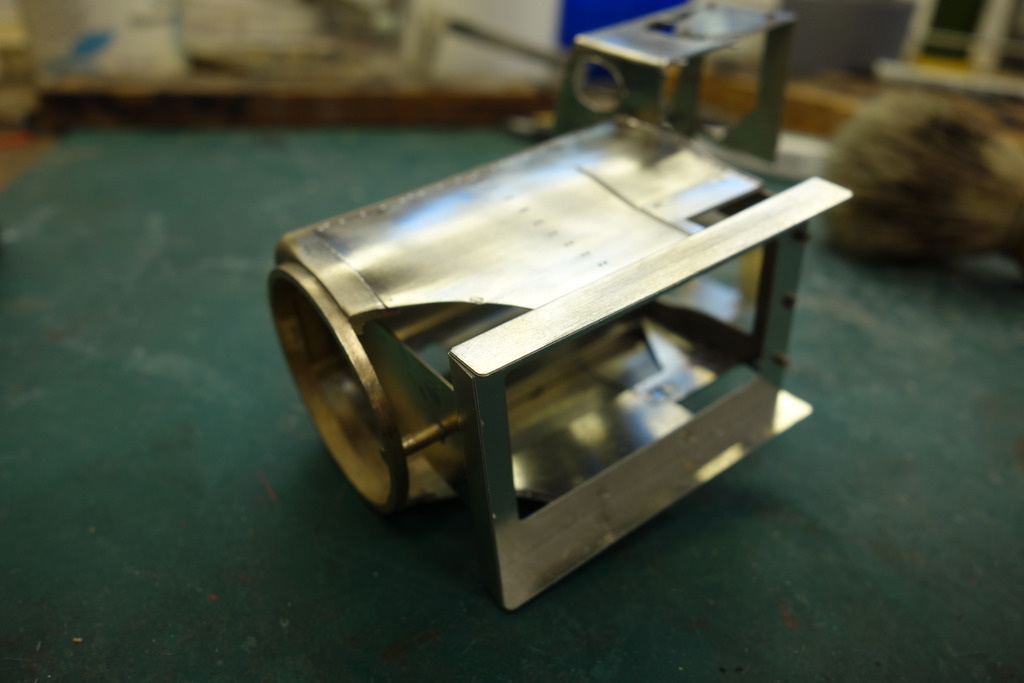
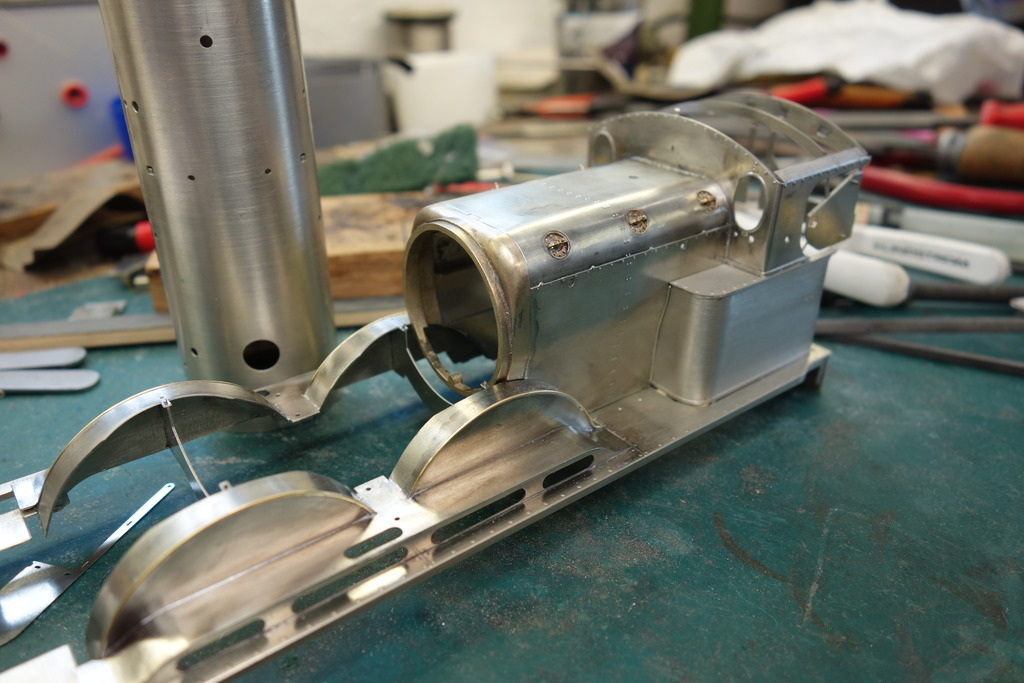
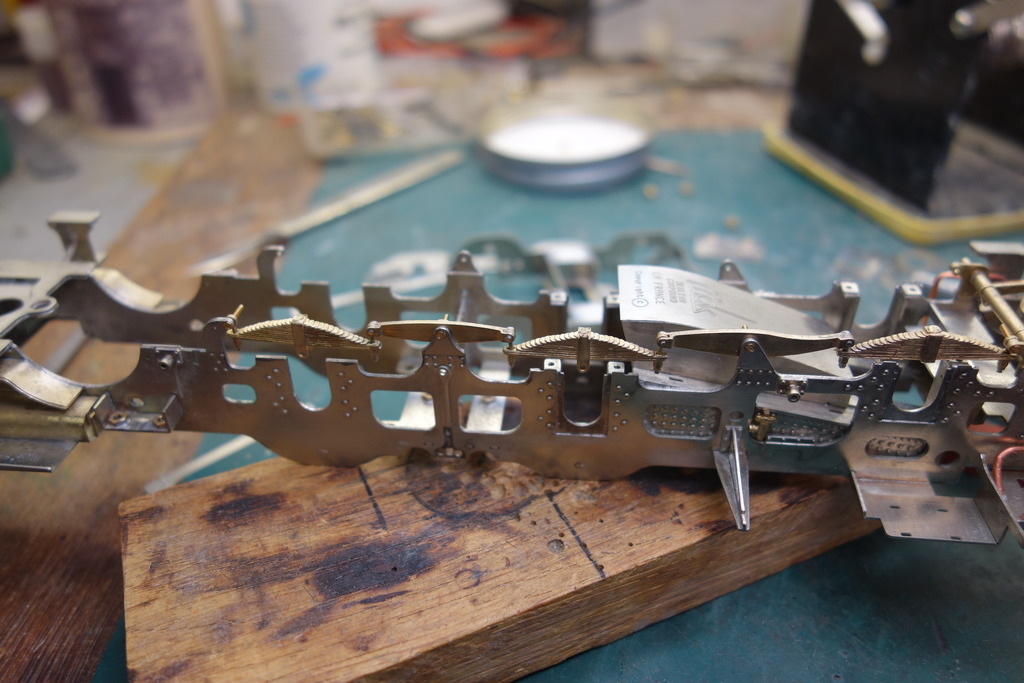
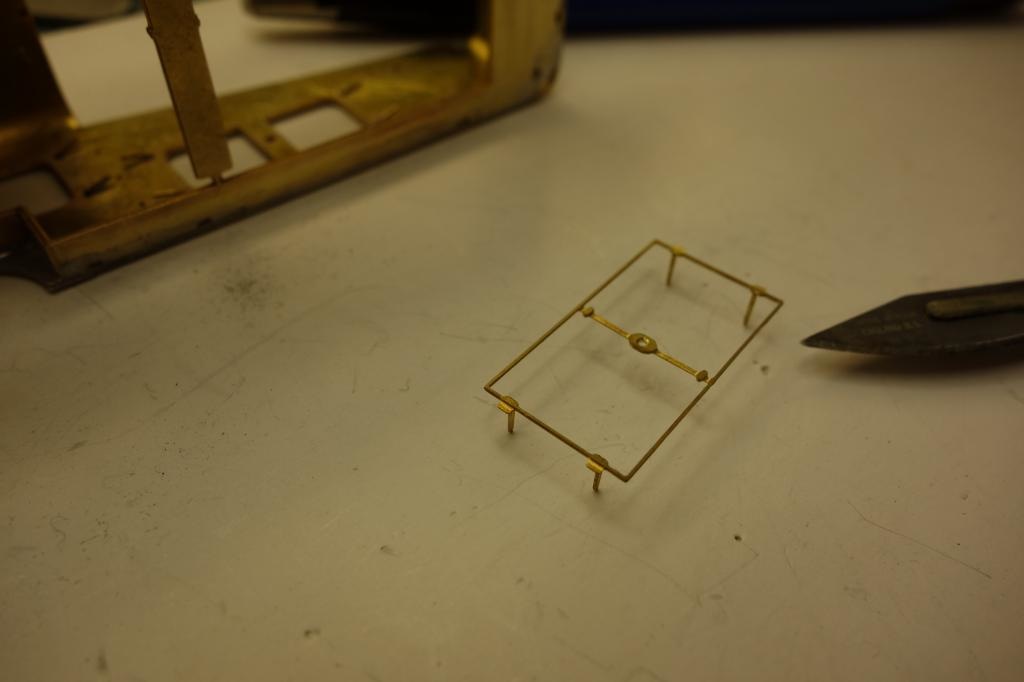
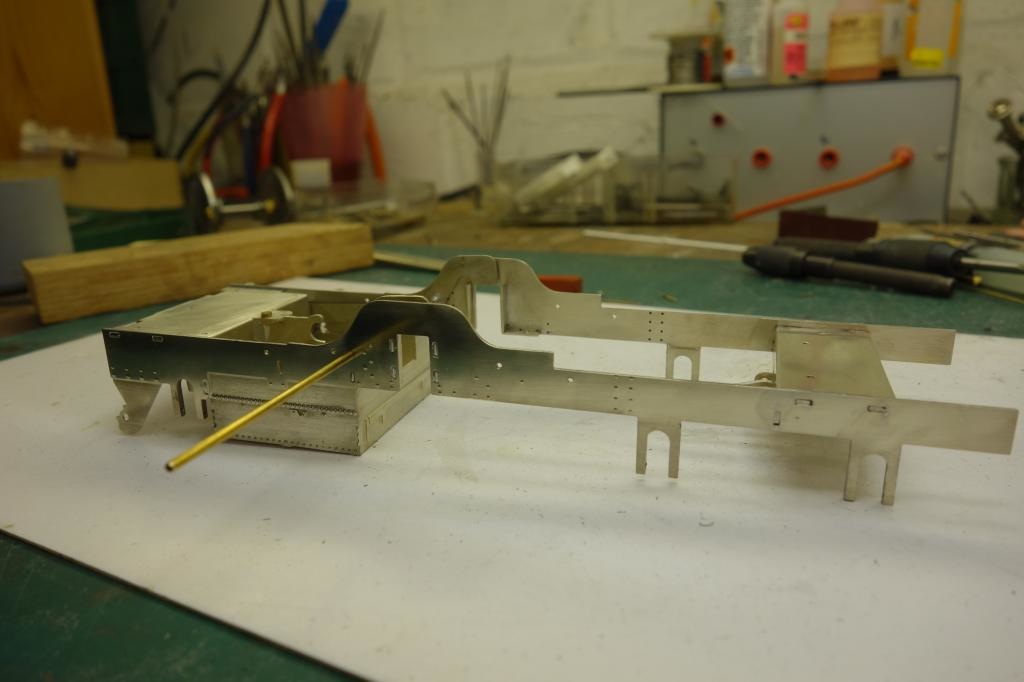
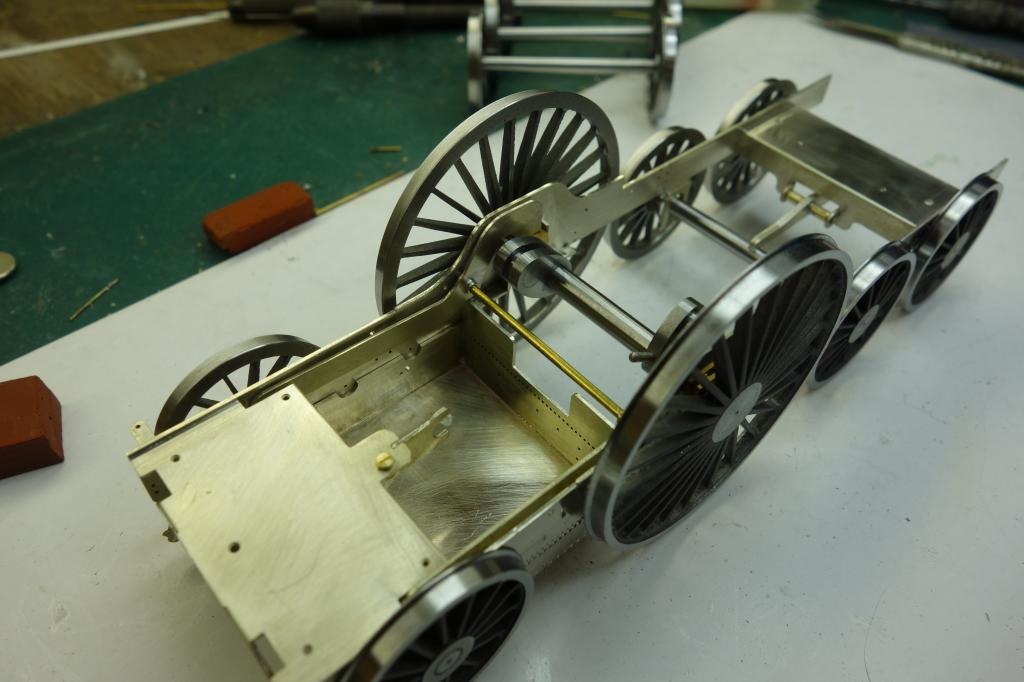
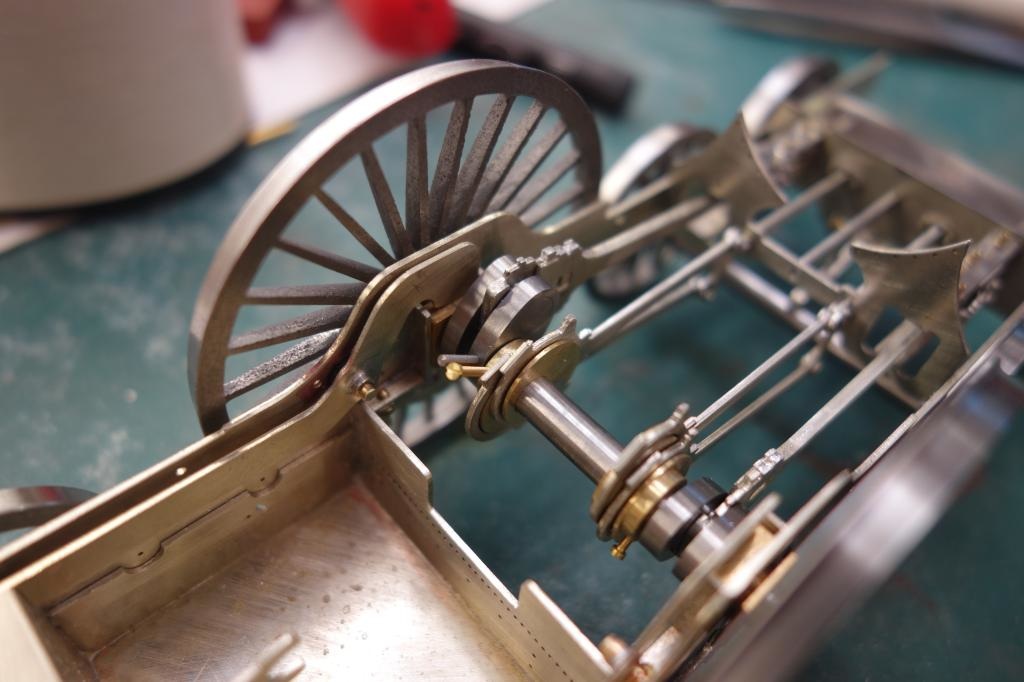
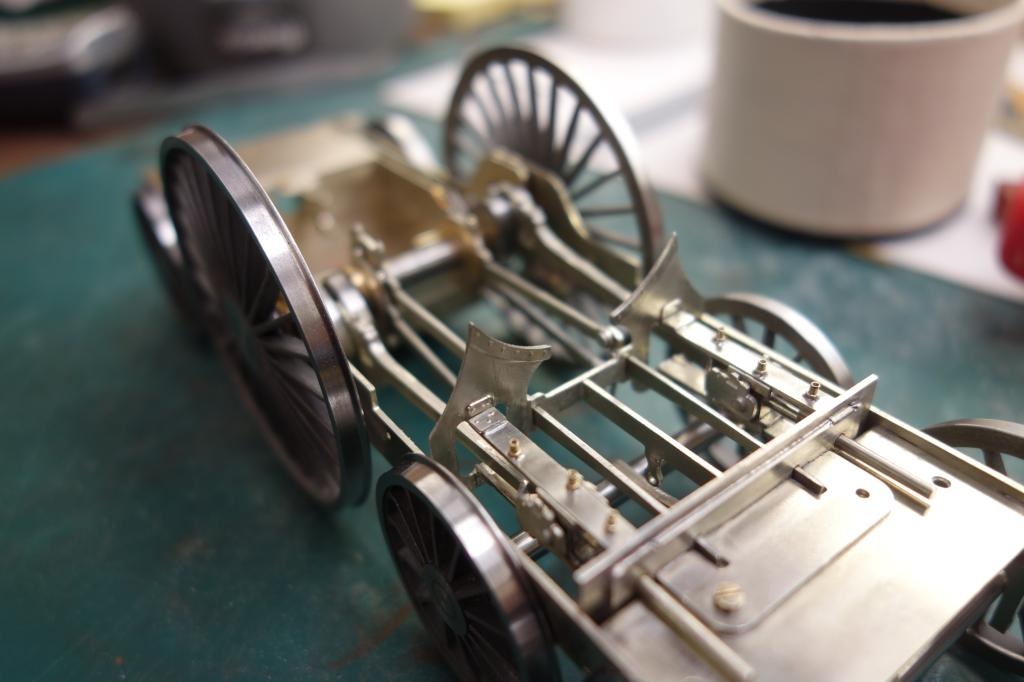
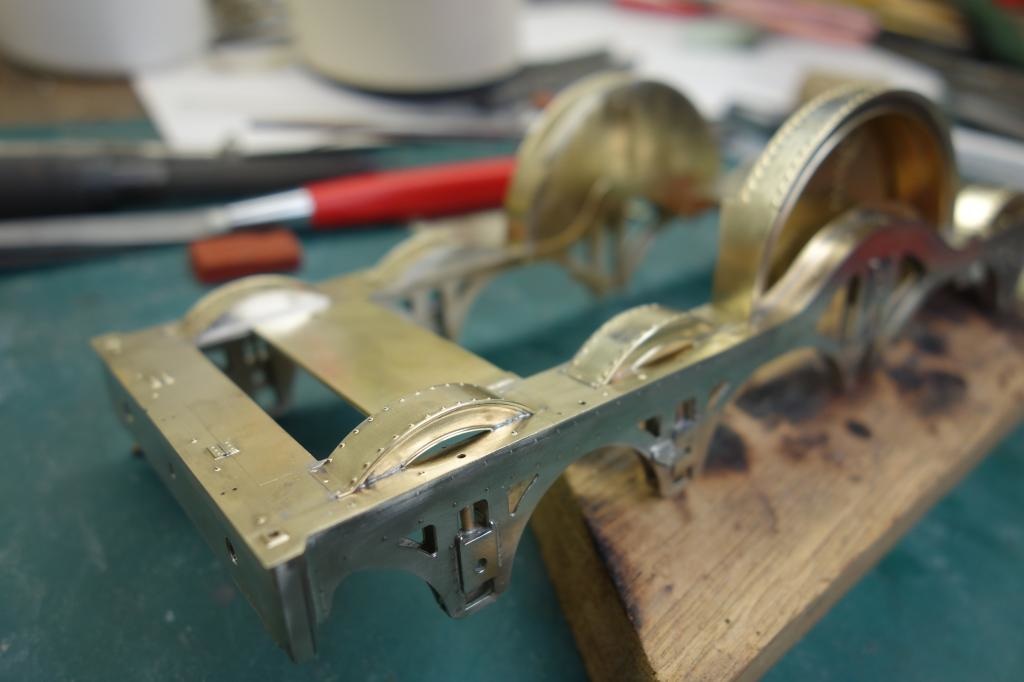
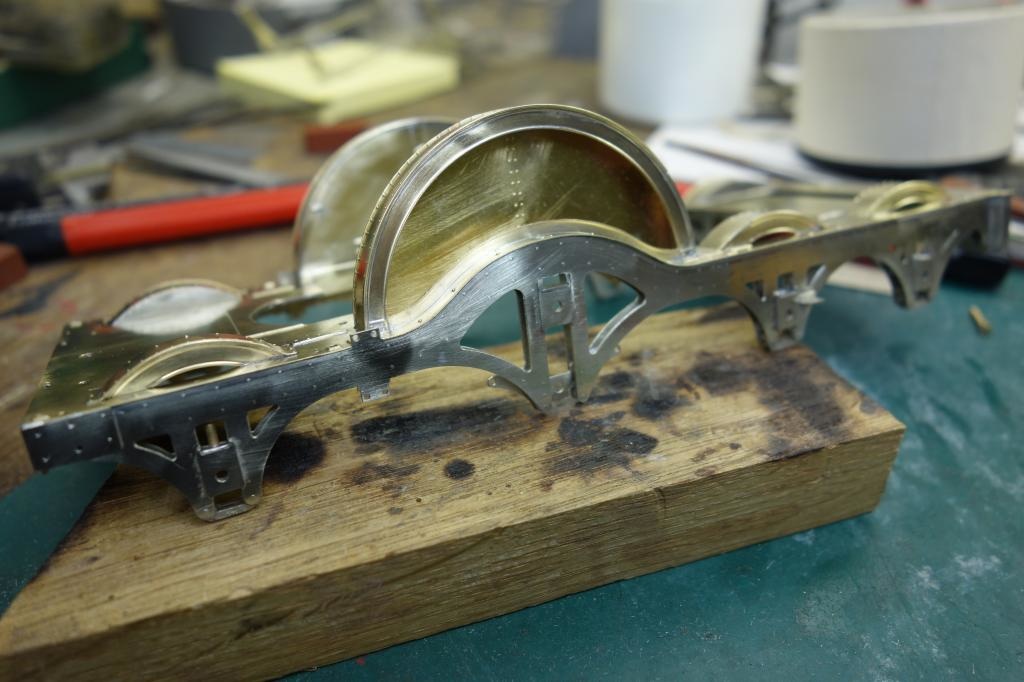
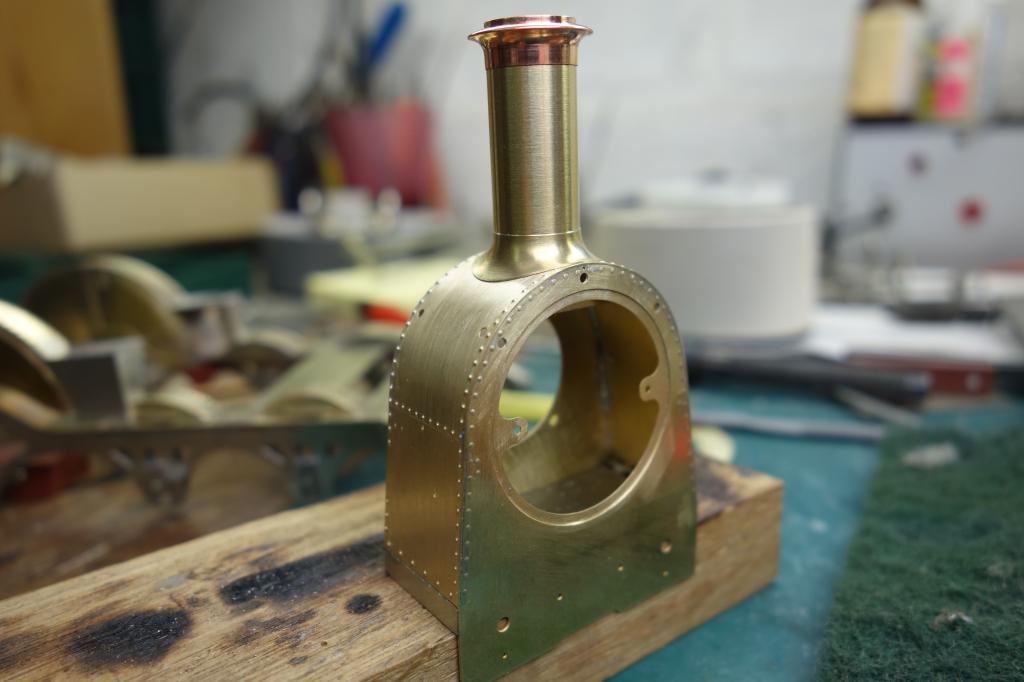
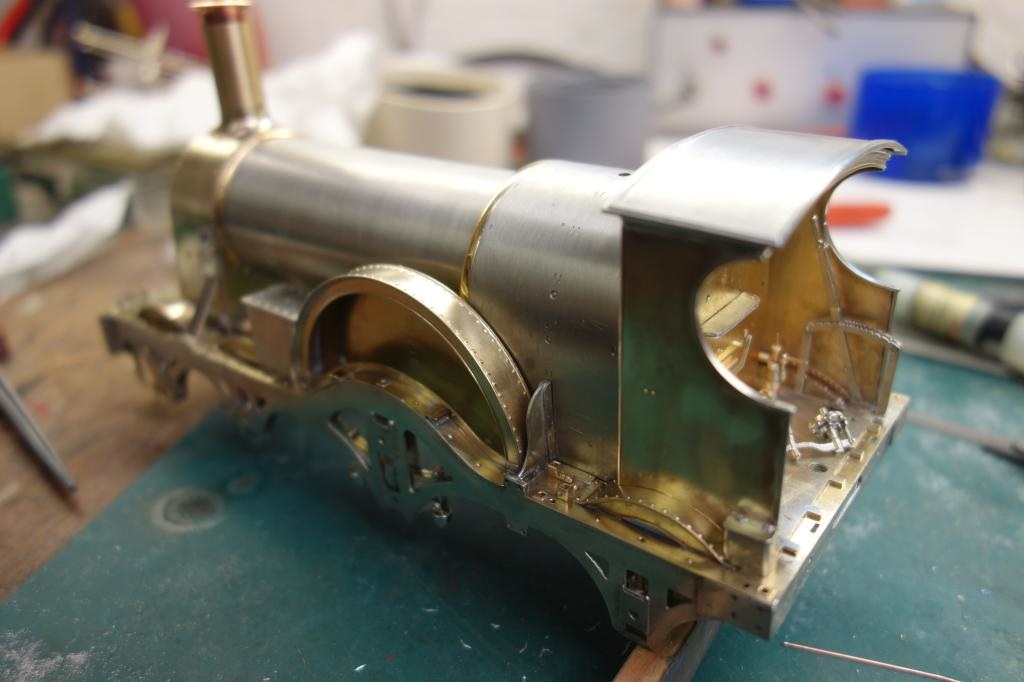
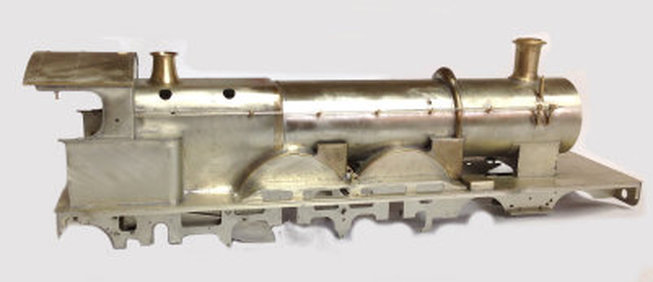
Front 3/4 view, nearly ready for painting.
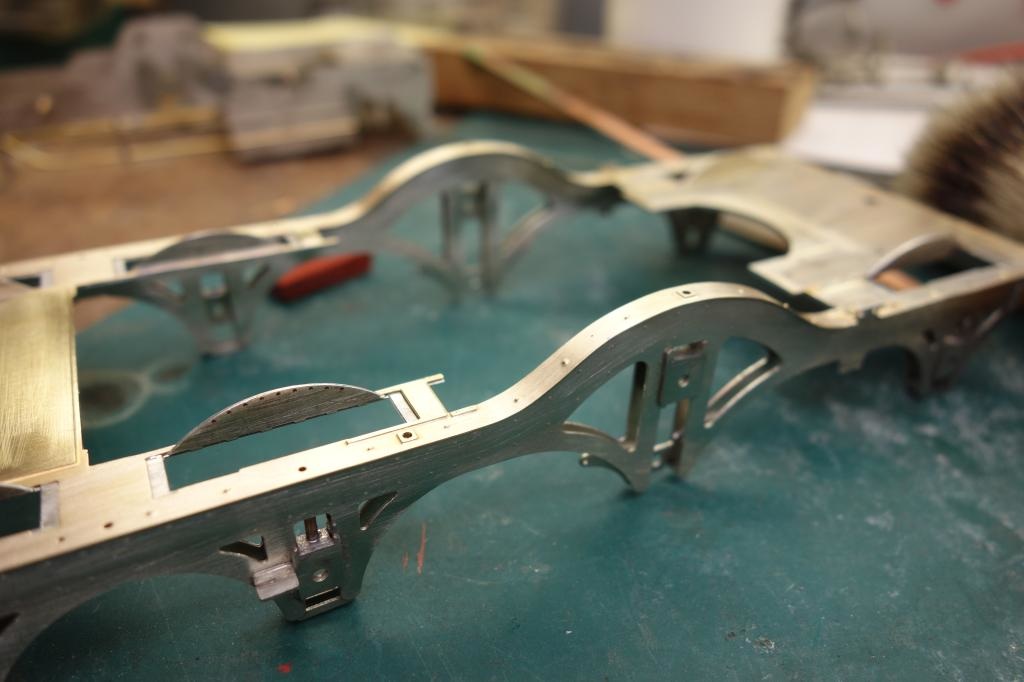
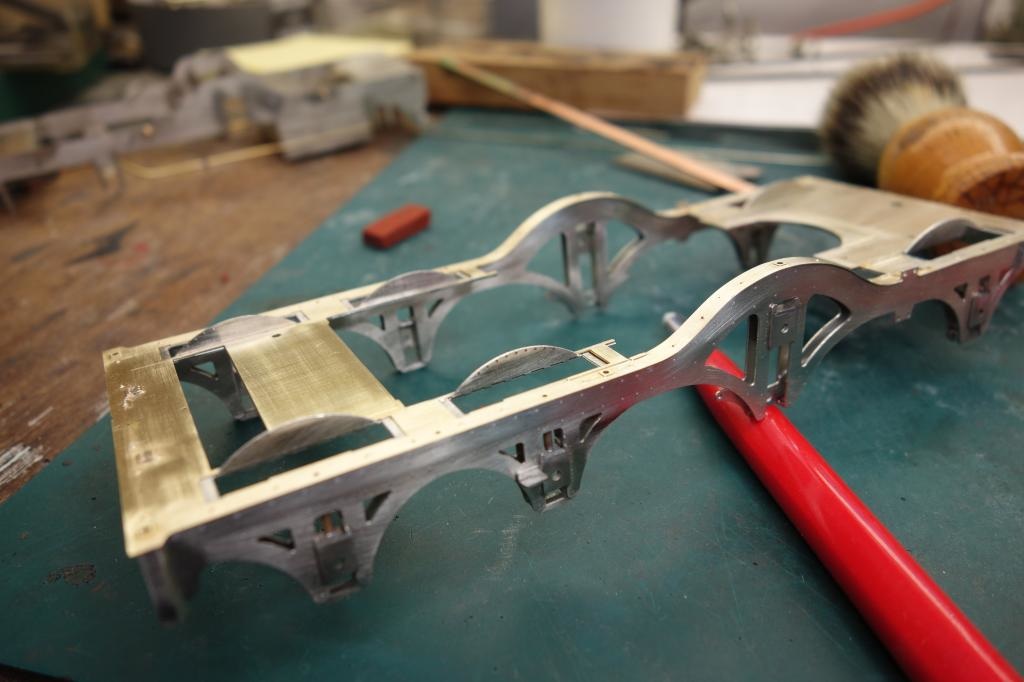
There are already a few small wheeled double framed 4-4-0s at Bucks Hill, but this will fill a bit of a gap.
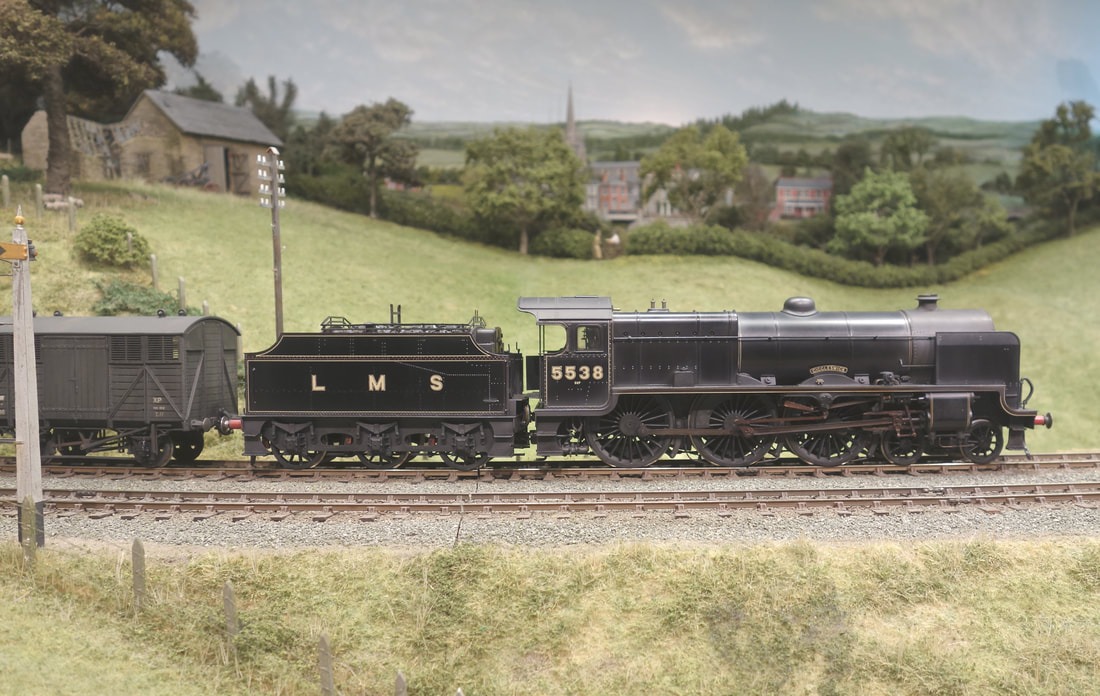
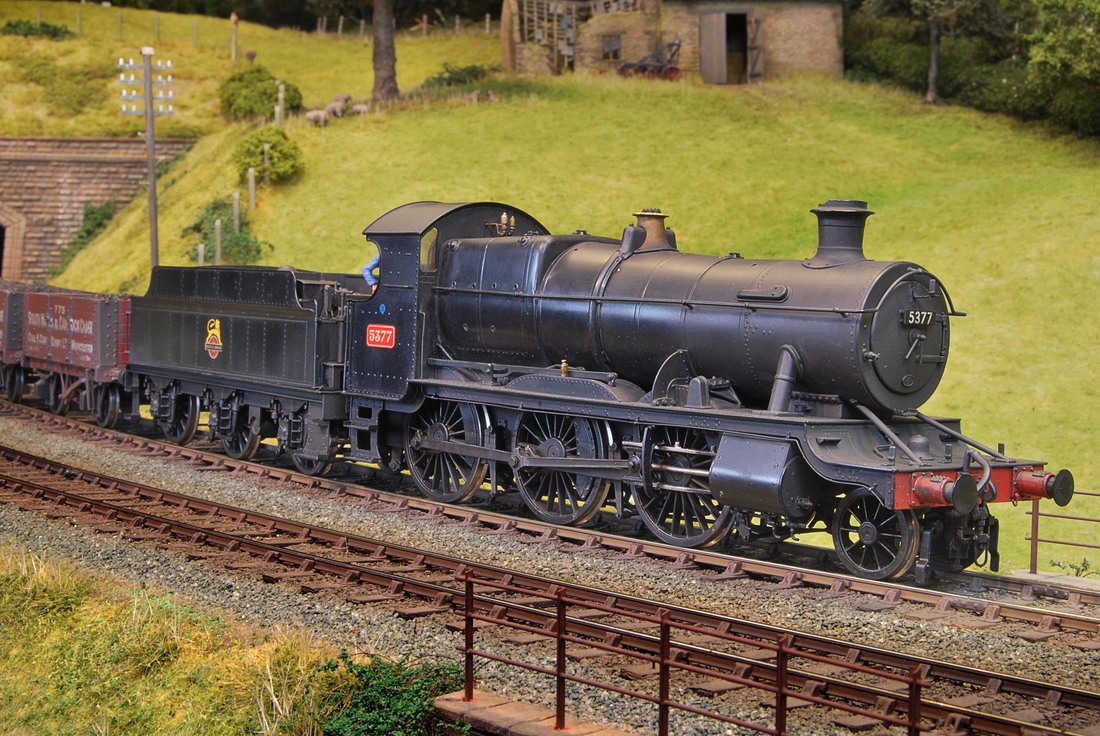
A L.M.S. Fowler Patriot class ‘Giggleswick’ takes ventilated box vans east. Like many of the 52 members of the class, No 5538 was actually named a few years after it’s 1933 build date. The weathered 4-6-0 is from a Lee Marsh limited run.
A Dean ‘Duke class 4-4-0 No 3265 ‘Tre Pol & Pen’ takes a rake of L.M.S corridor coaches past Ewyas Harold on the up main. The original 1896 locomotive was rebuilt in 1912 with a superheated boiler, and here, it's turned out in the unlined mid brunswick green livery.
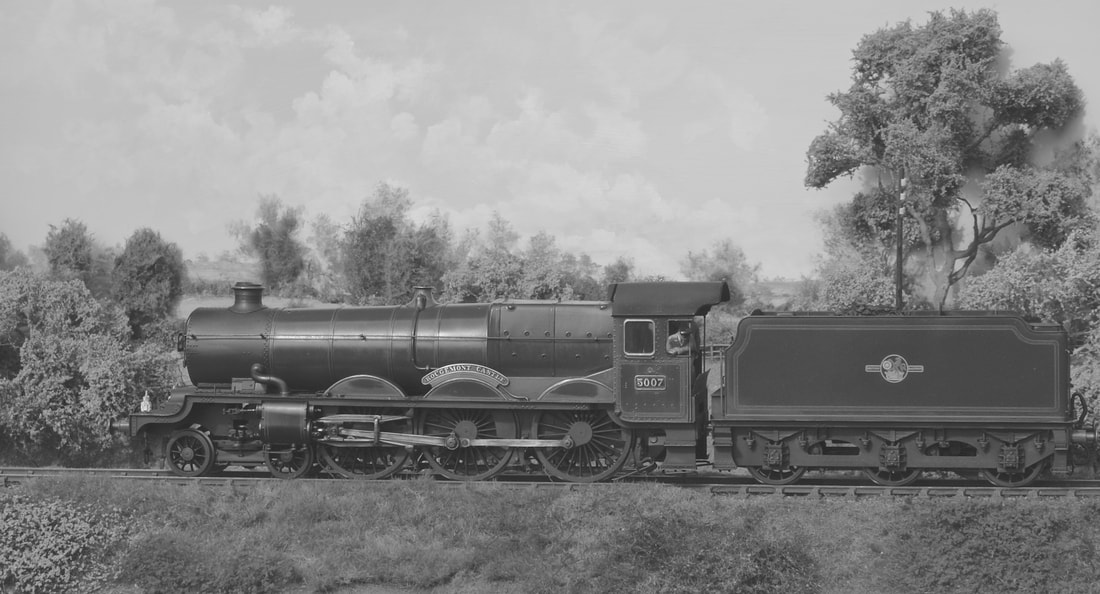
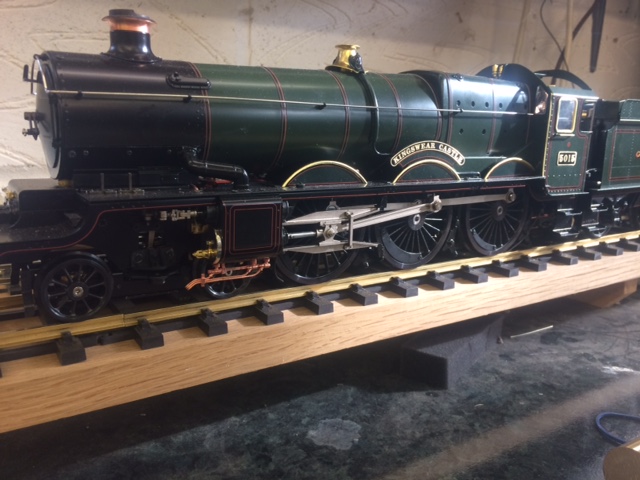
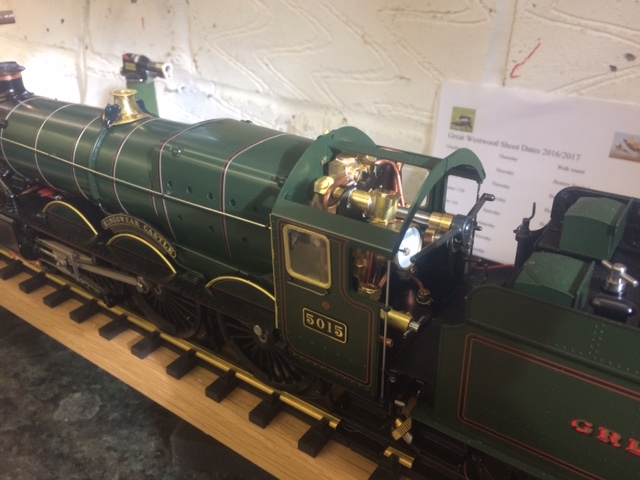
Phil Gomm's No 5007 Rougemont Castle, named after the small red stone castle in the middle of Exeter. The original locomotive was built at Swindon in June 1927, with a first shed allocation to Plymouth Laira. By the period depicted here, it was to be found at Cardiff Canton from August 1950, and then Swindon in March 1959. The last shed was Gloucester before withdrawal in September 1962.
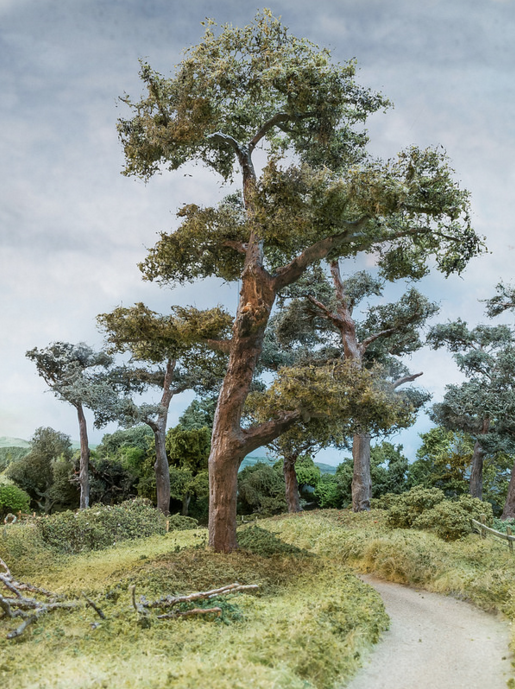
One of Anthony Reeves large Treemendus trees, standing on high ground with the lane to Ewyas Harold descending to the right. Chris Nevard
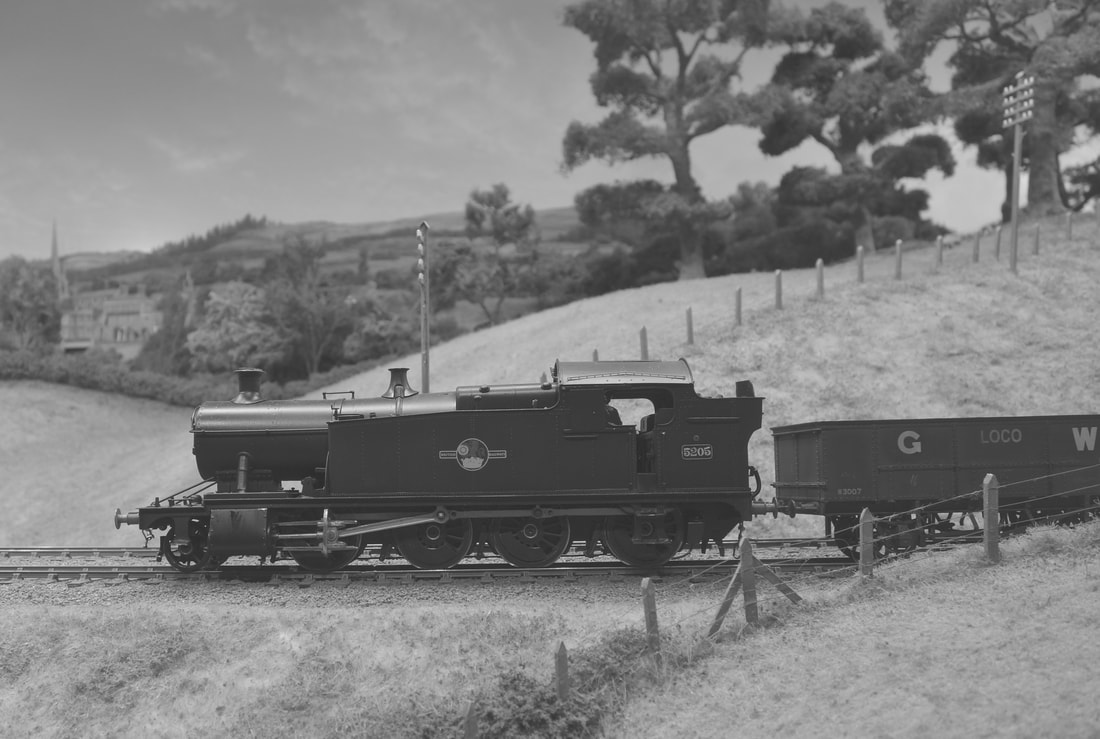
Ex G.W.R. Collett 5205 class 2-8-0T No 5205 heads west and across the Welsh border with a rake of loco coal empties. These were developed from the 4200 class but had a slightly larger cylinder bore size and outside steam pipes. The first of the class is seen here in the later B.R. livery.
An overall view of the station throat area, with a branch line train just ready to go.
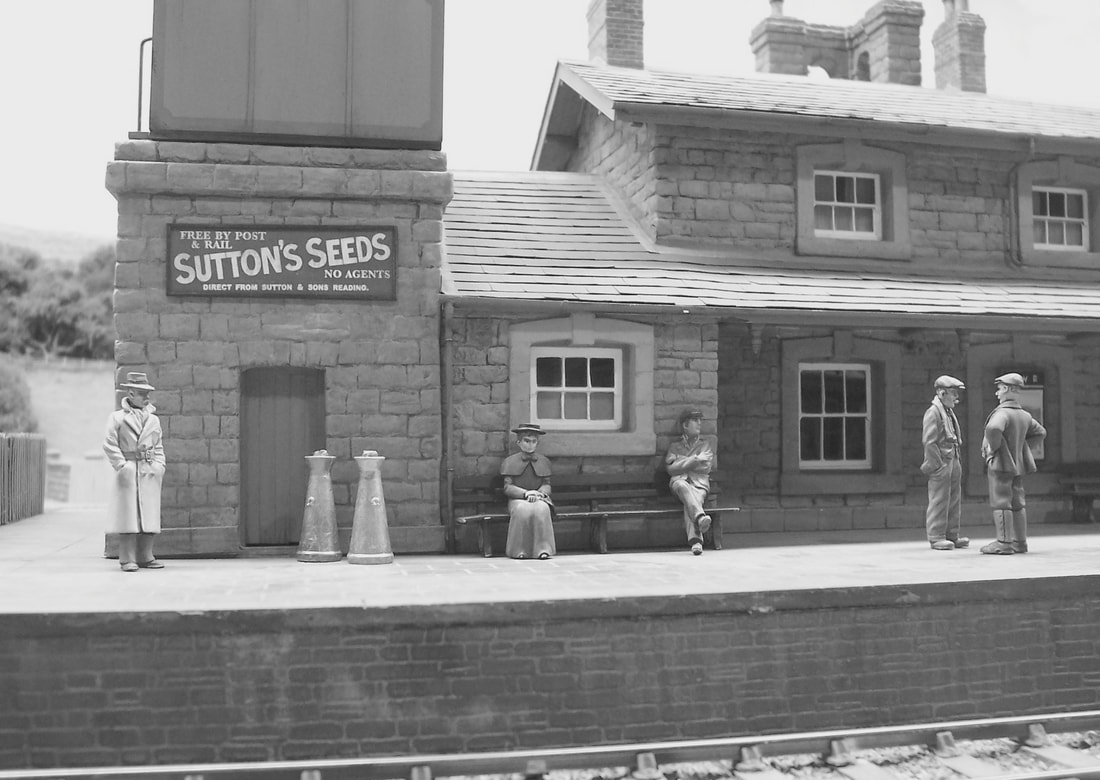
Some of the Peter Brady painted figures on the up platform by the water tower.
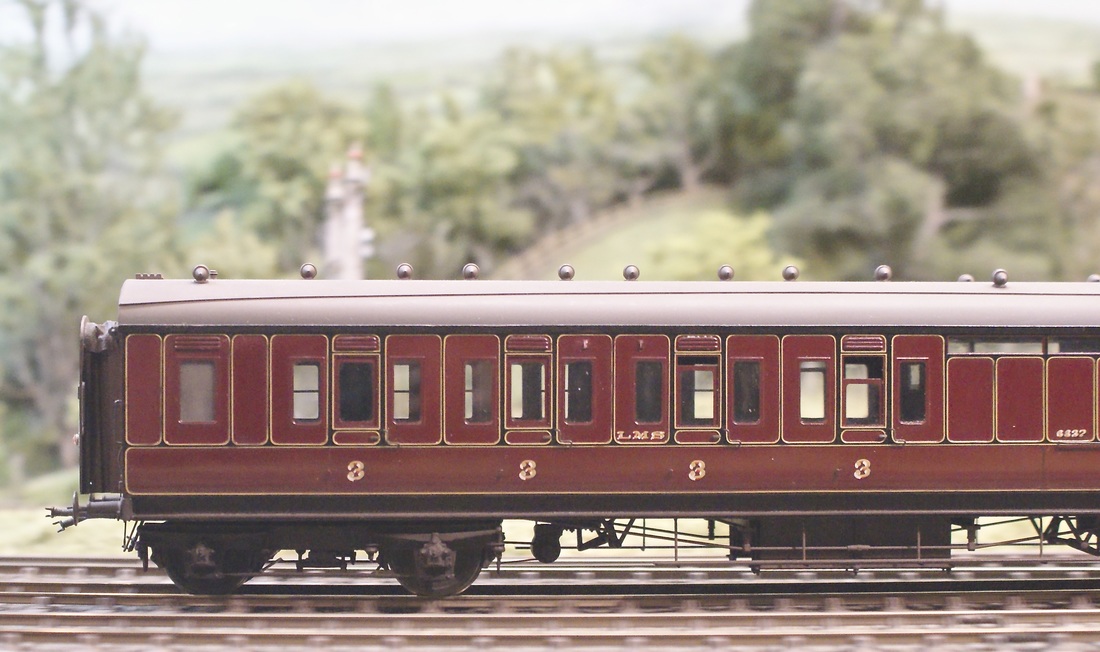
A pair of ex L.S.W.R Drummond L11 class 4-4-0s pass by heading east with vans. The pilot engine is from a Martin Finney kit, made and painted in Maunsell dark green Southern Railway livery by Chris Wesson. The loco is now owned by Jonathan Marcus who is now looking at ideas for a layout of his own. Train engine No 30171 is in the early British Railways livery, with an eight wheeled Drummond watercart tender, and it emerged from Nine Elms in 1904. Enginemen knew this class as ‘Large Hoppers’.
A Gresley V2 waits for a turn at Bucks Hill. The 2-6-2 was built for the L.N.E.R at Doncaster in 1940, and would return in 1960 to receive a double chimney draughting modification. It appears in weathered late B.R. lined Brunswick green livery.
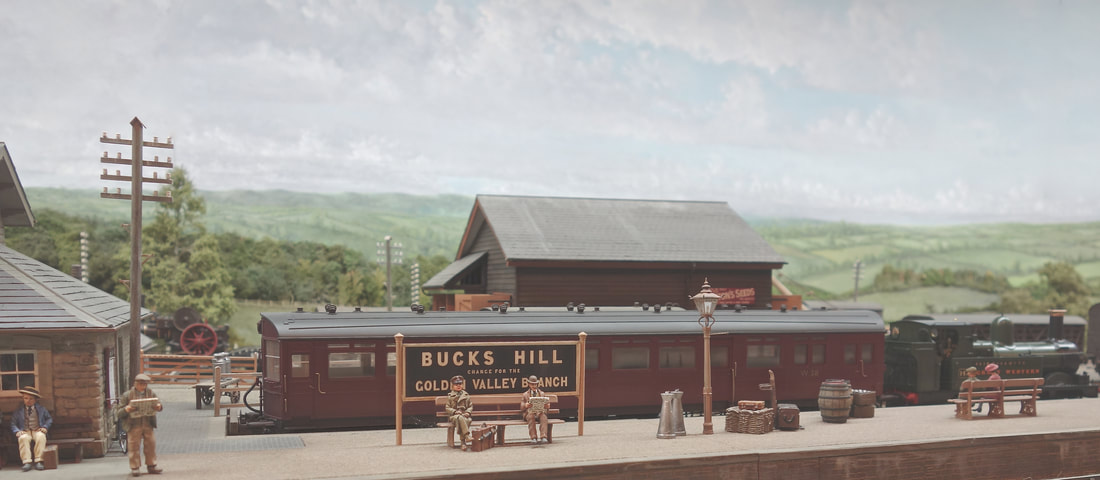
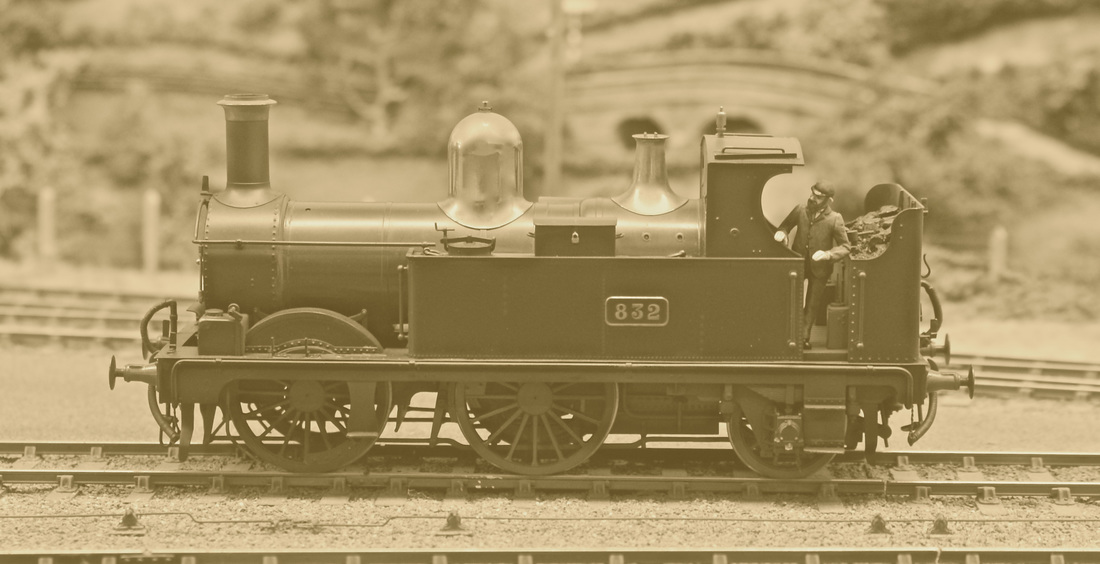
Auto trailer No W38 in lake livery rests in the Golden Valley platform, accompanied by a 517 class 0-4-2T
11th February 2018
A few pics from recent running days. The City class 4-4-0 is coming along nicely now and I have been attending trade shows with the Lee Marsh model co.
I will post a few more of the recently released locos into the Lee gallery page, but for regular updates on progress, delivery and new models in development, check out Lee's latest news page.
https://www.leemarshmodelco.com/blogs/news
I will post a few more of the recently released locos into the Lee gallery page, but for regular updates on progress, delivery and new models in development, check out Lee's latest news page.
https://www.leemarshmodelco.com/blogs/news
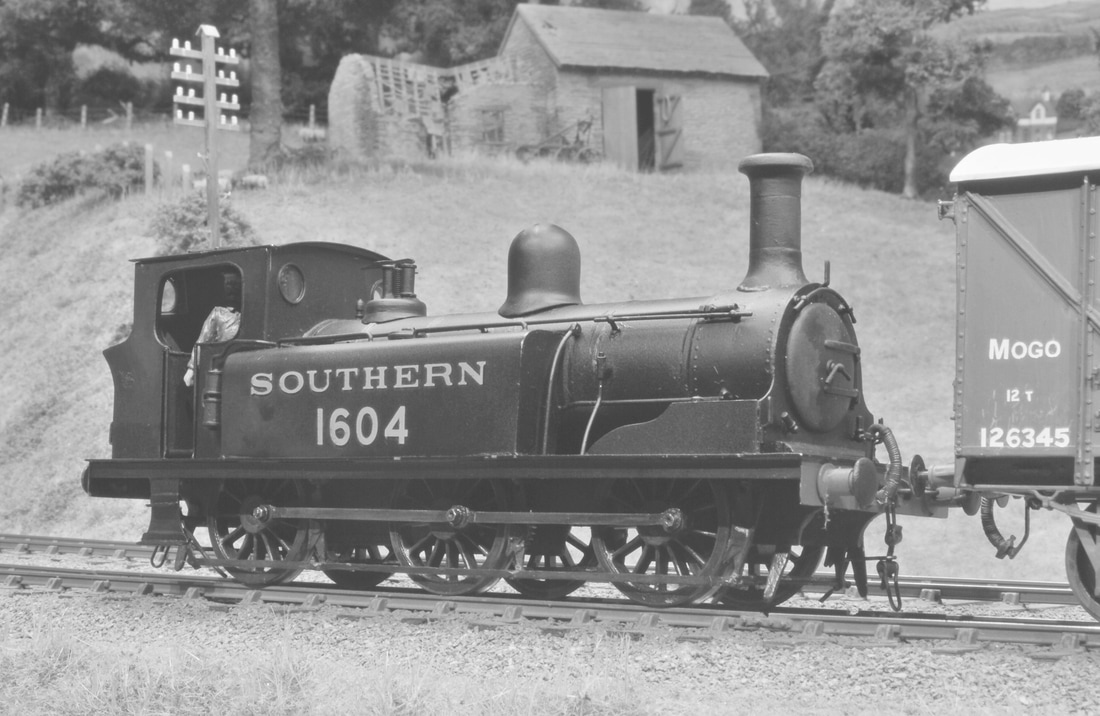
Kevin Robertson's Lee Marsh '517' class 0-4-2T backs onto a tanks wagon in the branch line siding.
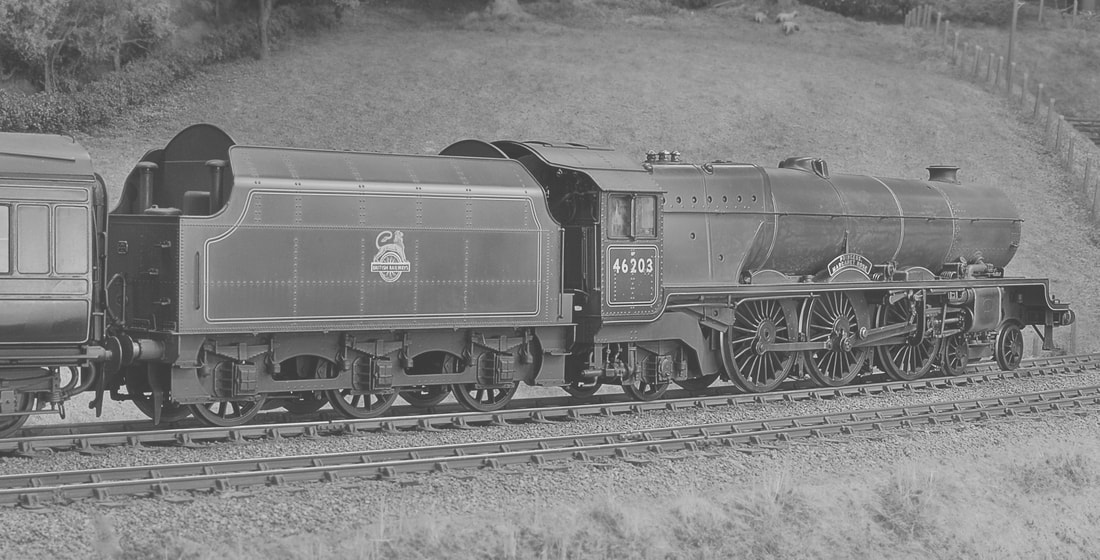
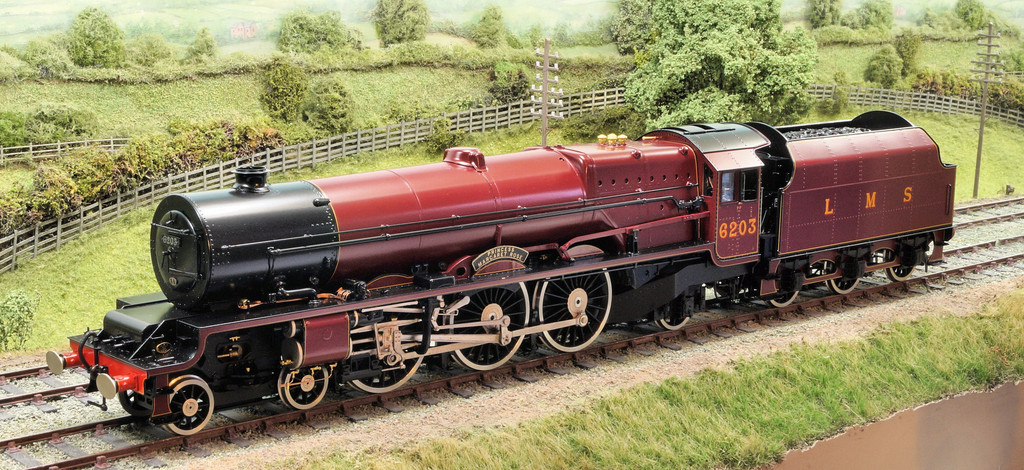
A Lee Marsh Princess Royal class Pacific No 46203 'Princess Margaret Rose' in B.R. blue livery takes an express past Ewyas Harold on it's way to Bucks Hill. The locomotive was built at Crewe in 1935, and fortunately still survives today. Richard Chetland

No 2017 waits in the down loop for a local passenger train to pass by. This is a Tony Reynalds build, which occasionally runs on the Golden Valley line
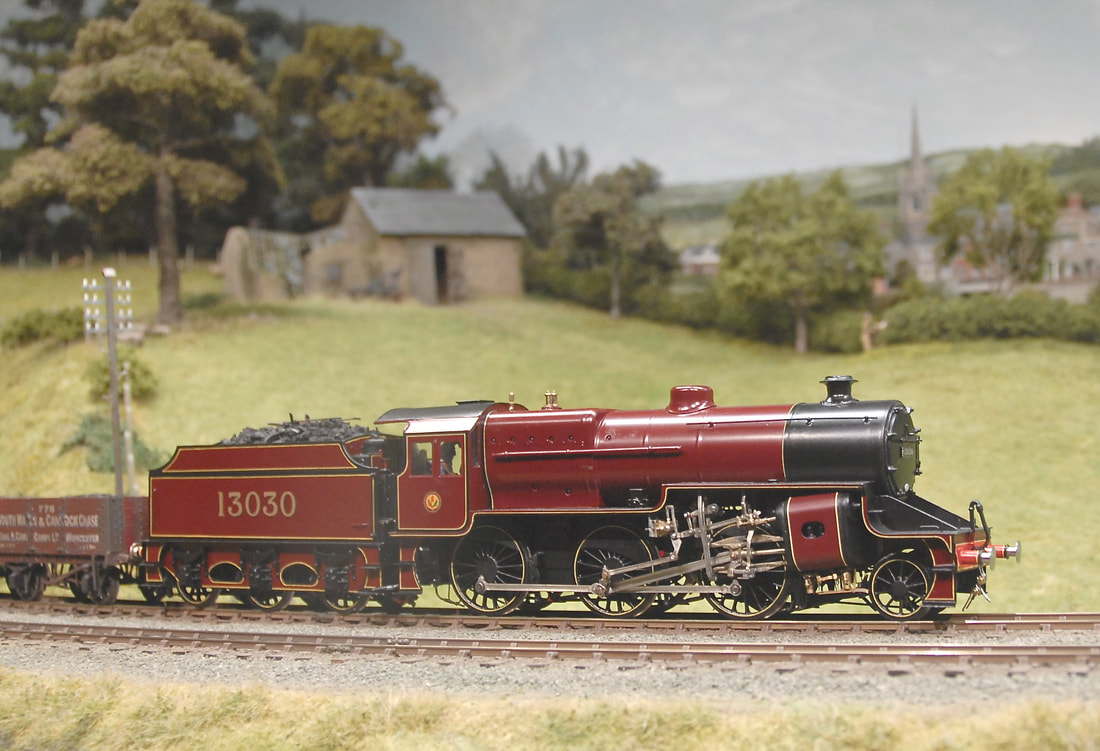
Jack Anziani always brings something along, and at the latest session there were a couple of lake liveried L.M.S. recent builds. Both will receive their weathering soon, but this view shows Hughes 'Crab' 2-6-0 No 13030 straight from the paint shop!
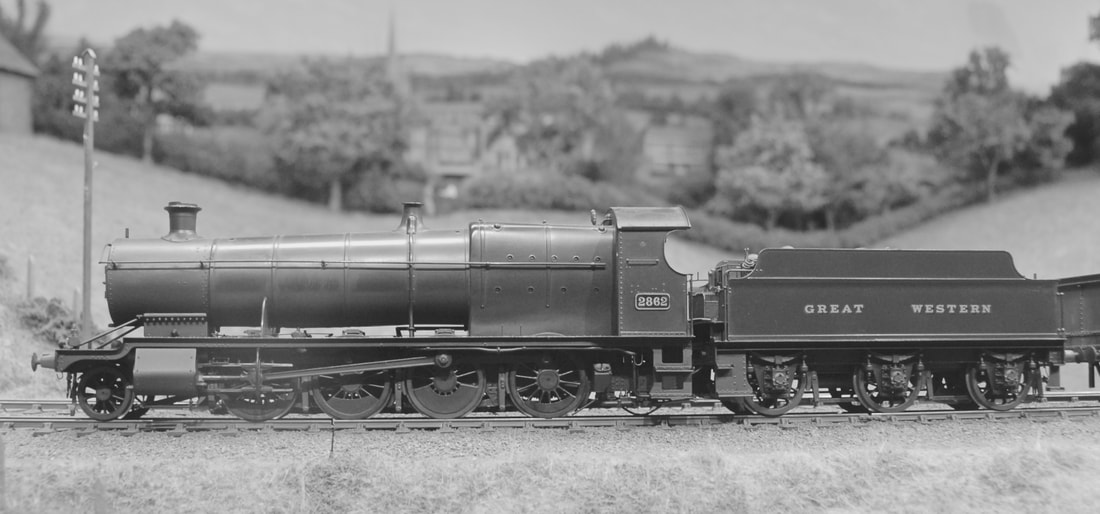
G.W.R. No 2862 passes Ewyas Harold with very long rake of coal empties.
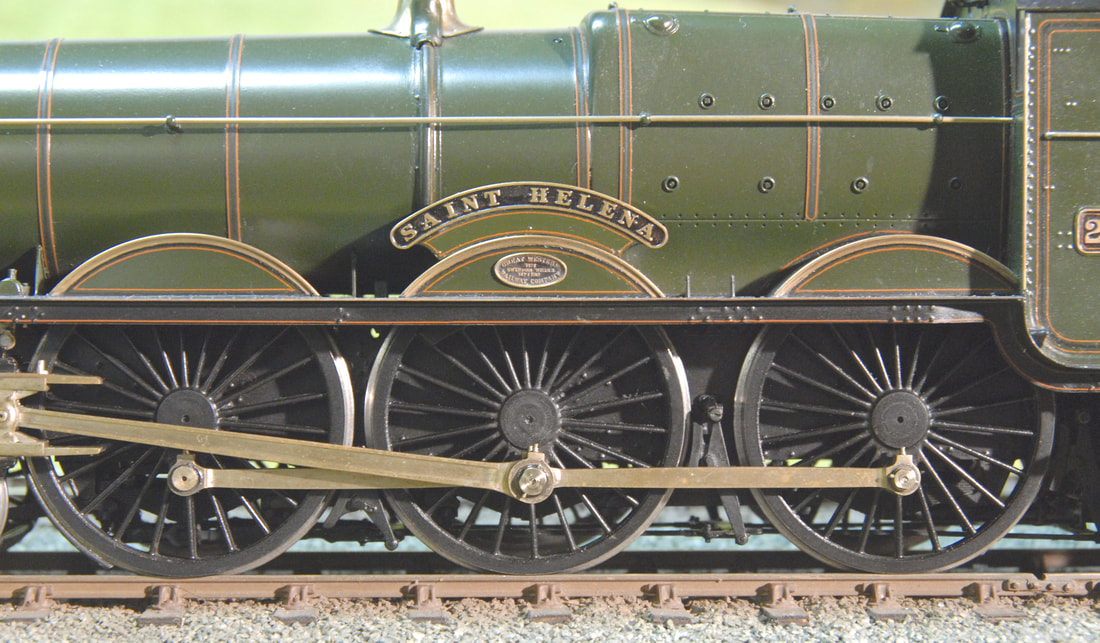
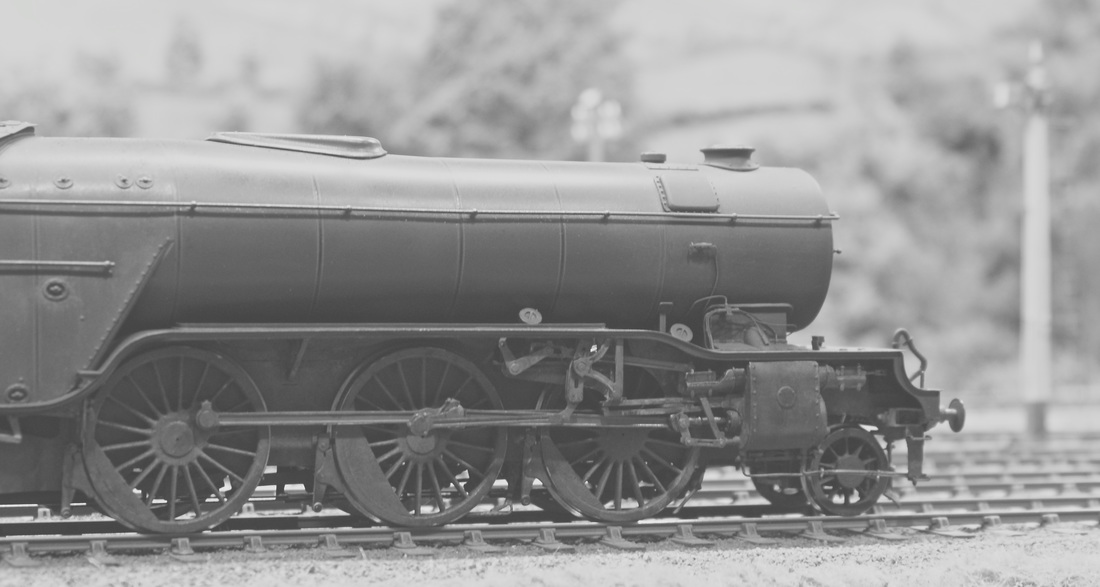
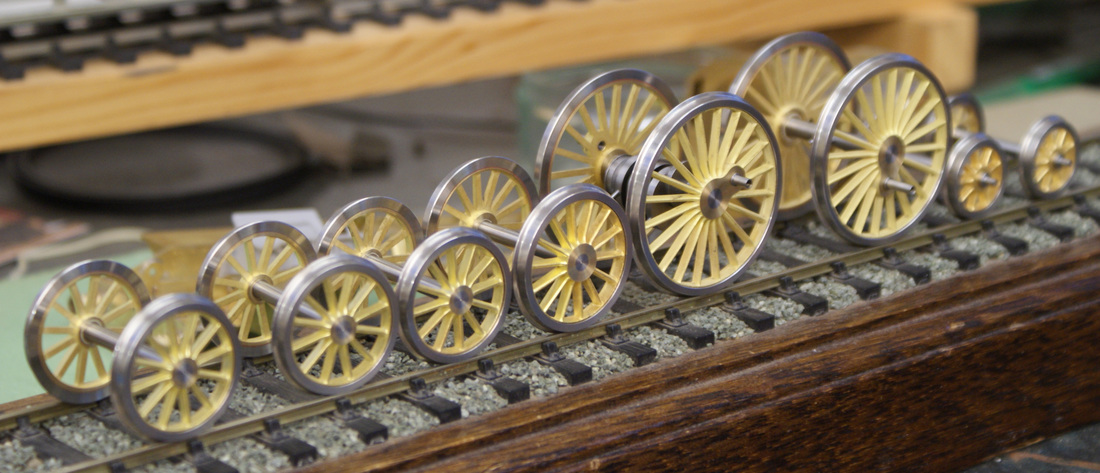
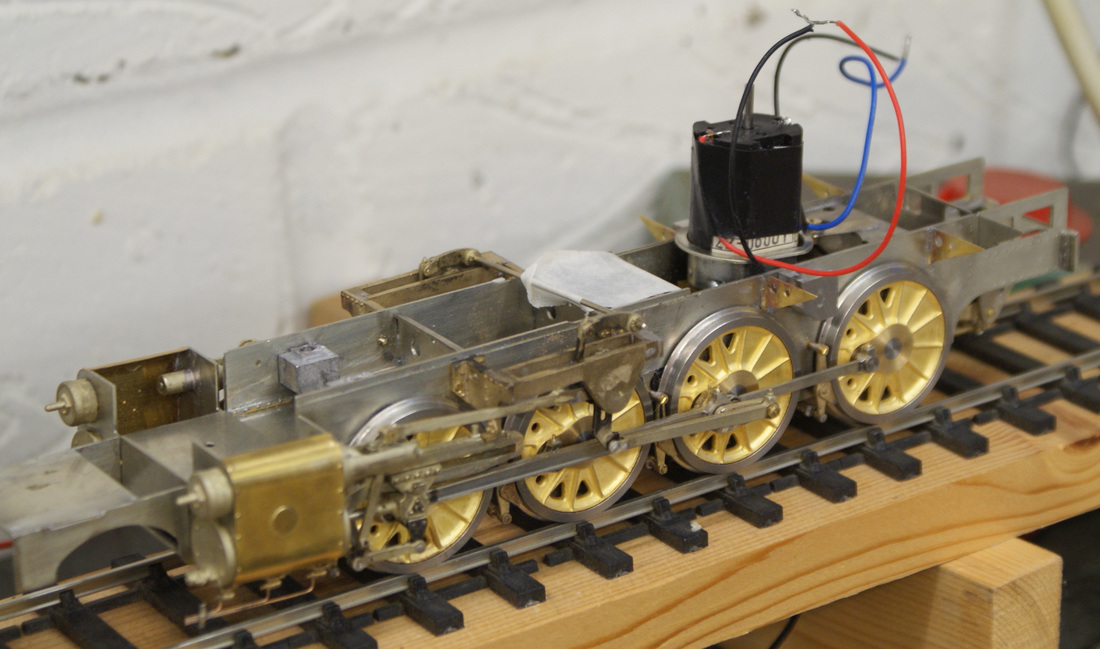
Driving wheels of G.W.R. 'Saint Helena'..
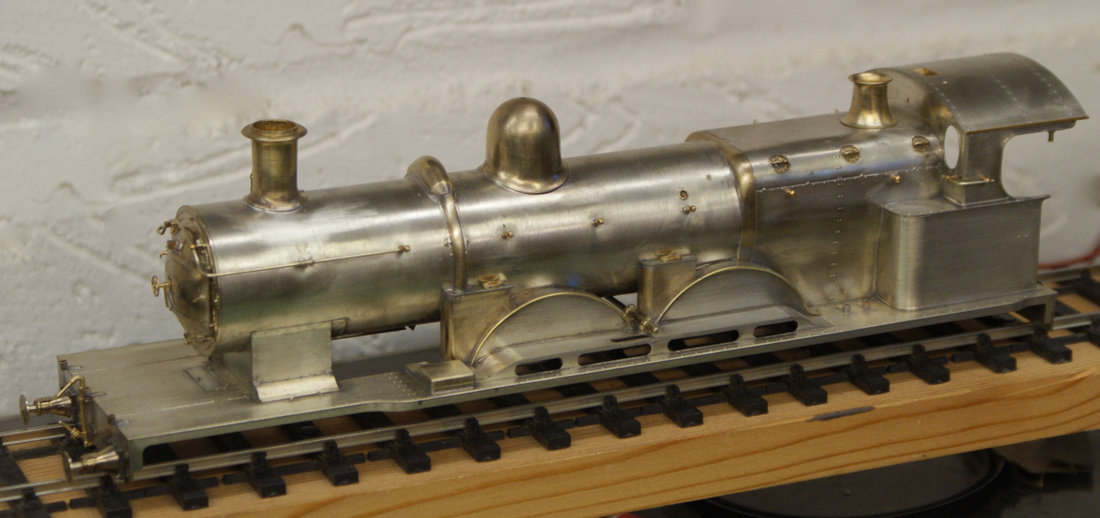
Please visit the 'Saint Project to keep up with the nearly finished 'Lady of Legend at Didcot.

Lee Marsh L.M.S. Stanier Jubilee No5595 'Kolhapur'

Un named Brittania Pacific No70047. Richard Chetland.
Close up of a Tony Reynalds A4, with individual fasteners on all components. Check out the castle nut retaining the crosshead pin!
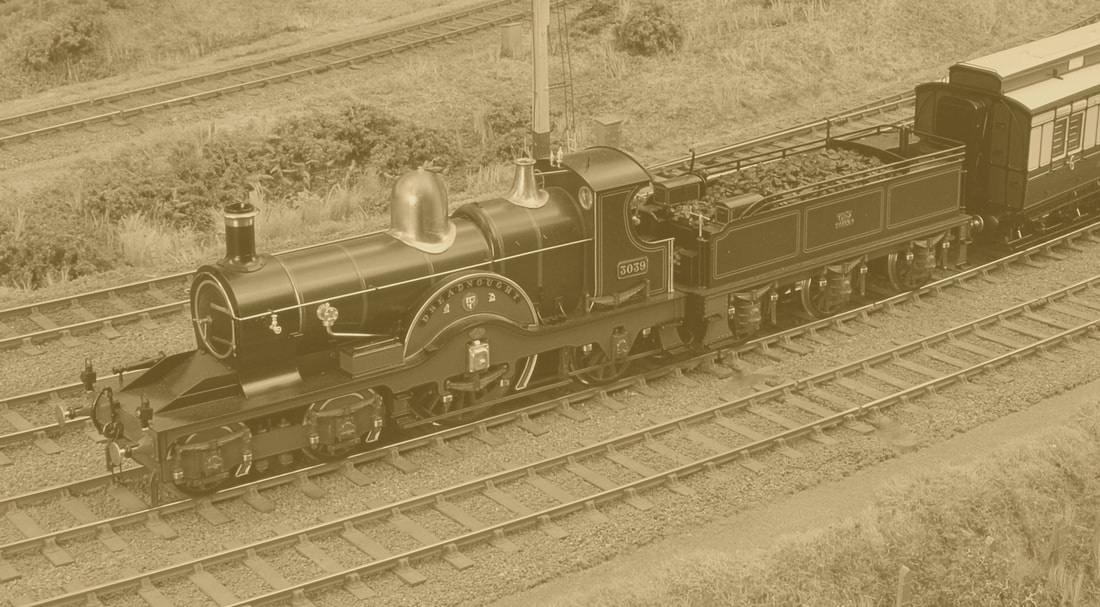
Lee Marsh Dean Achilles class 'Dreadnought with appropriate Victorian Clerestories. Richard Chetland.
10th August 2017
A few pics from recent running days with the usual loco portraits, as well as some people and painting views.
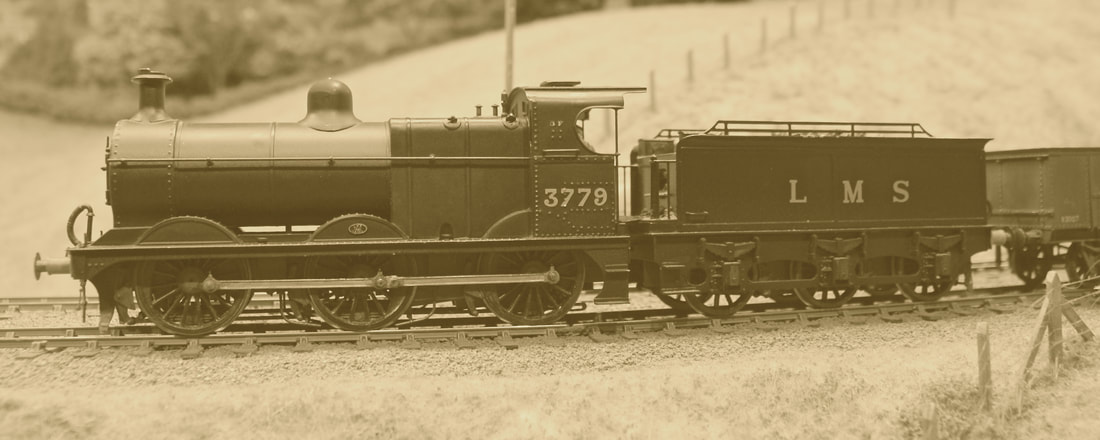
Paul Glover's No 3779, an ex Midland Johnson 3F is an Aberayon locomotive, delivered recently by Nigel Smith. It's seen here trying a heavy coal train.
Potting shed interior with visiting dignitaries
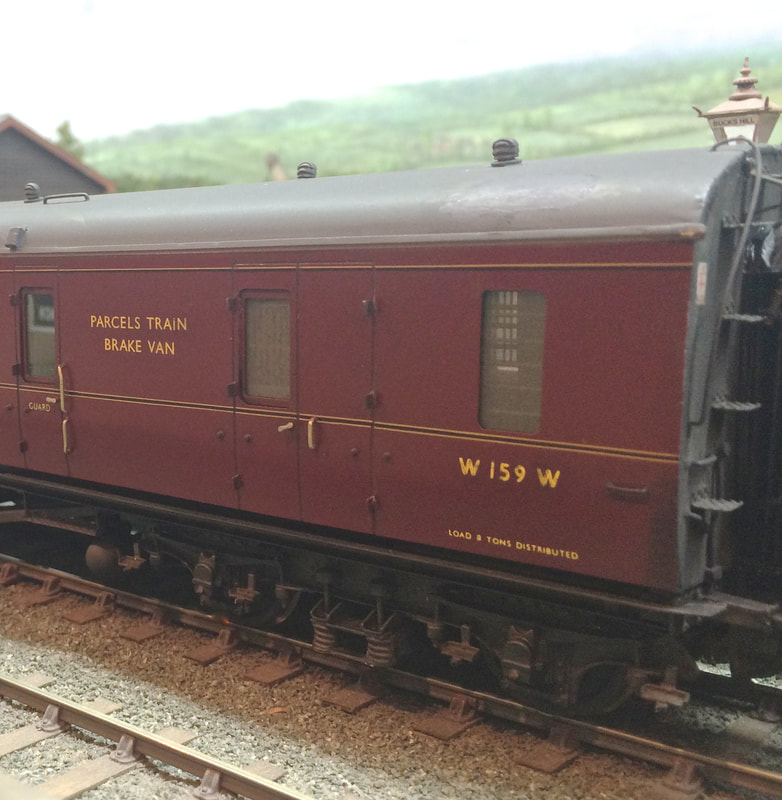
W159W rests at Bucks Hill.
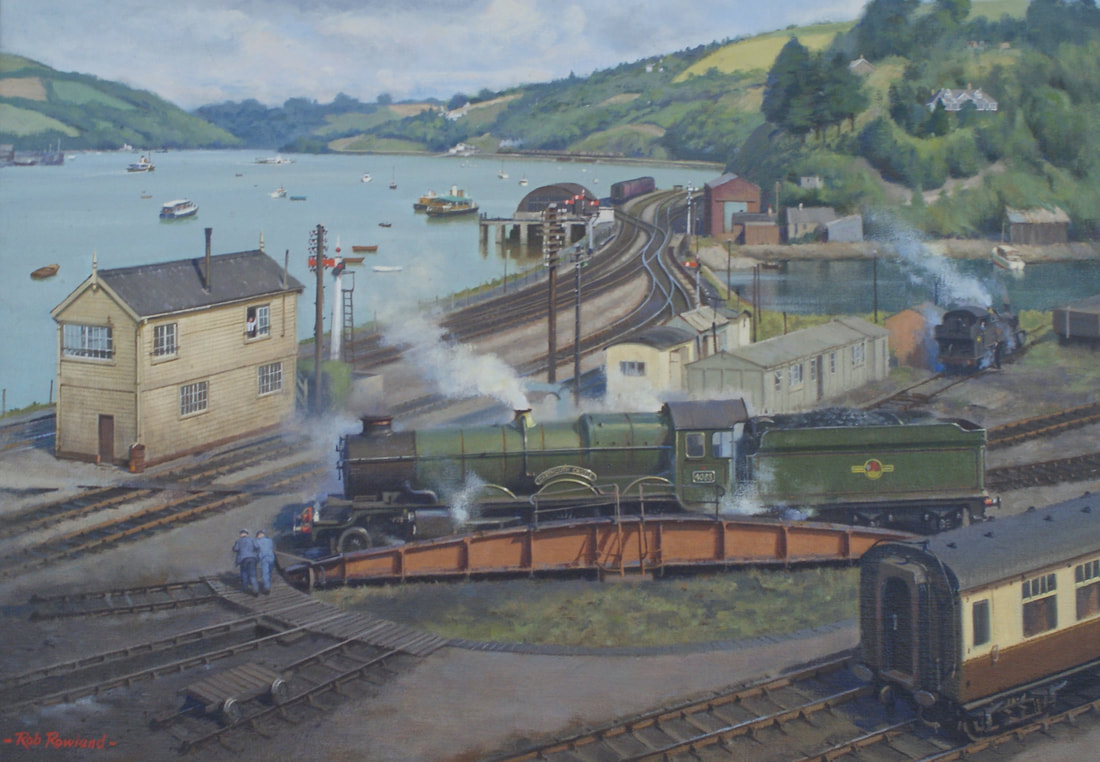
Kingswear turntable in the British Railways era in a painting by Rob Rowland. The River Dart with its lovely wooded valley and pleasure boats appears in the background.
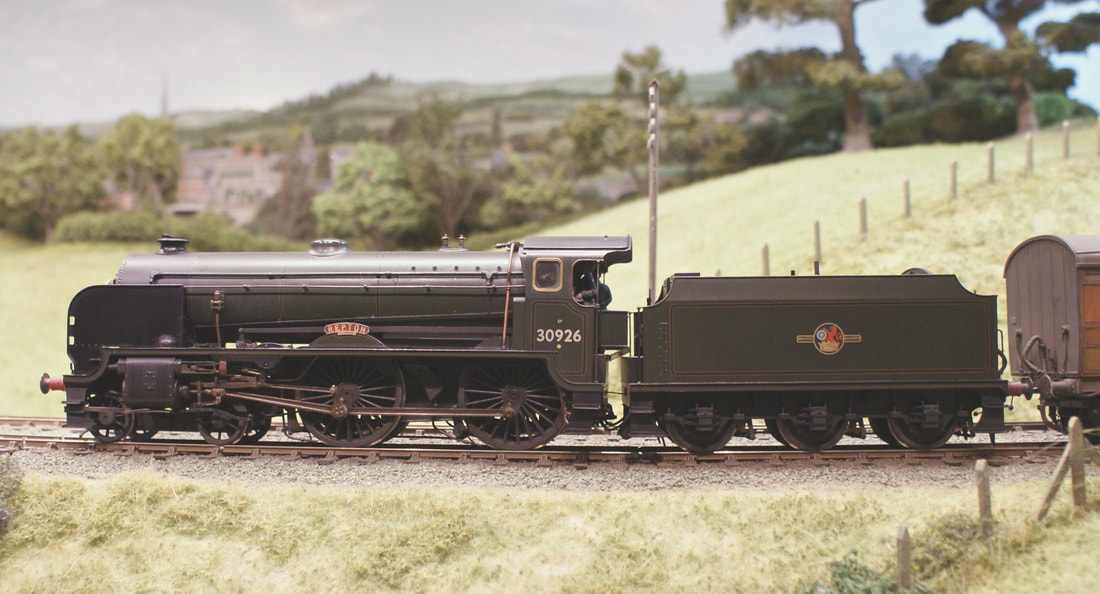
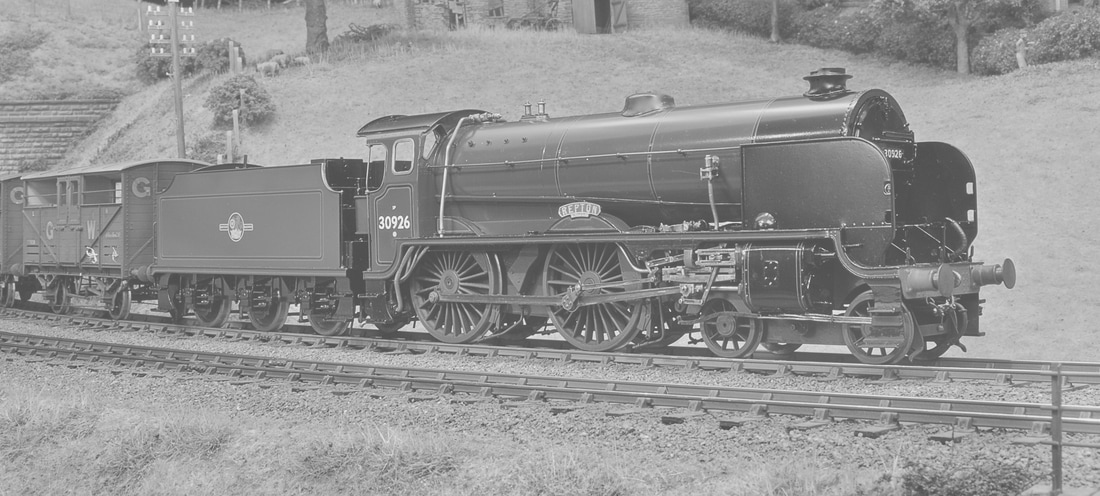
Ian Rathbone's Maunsell Schools Class 4-4-0 No 30926 'Repton'.
A North British Warship, more details on this soon.
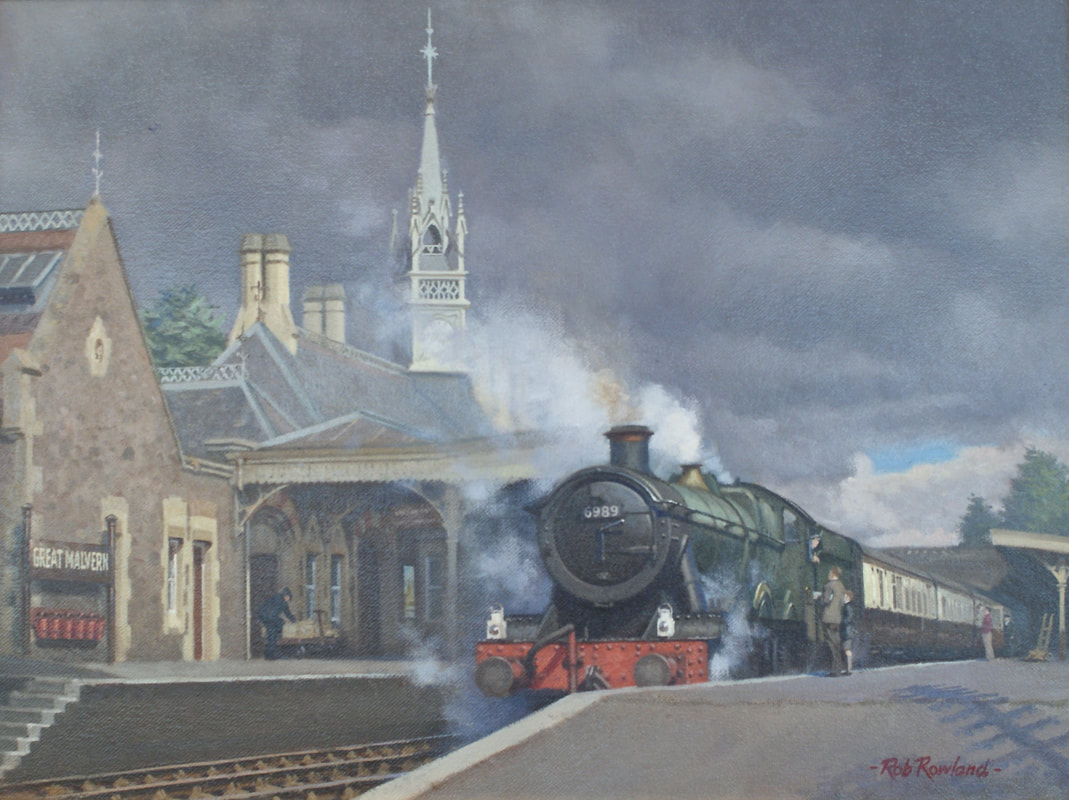
Heavy rainclouds gather over Great Malvern Station in this painting by Rob Rowland. A society is now making good progress towards the eventual aim of re-instating the missing spire.
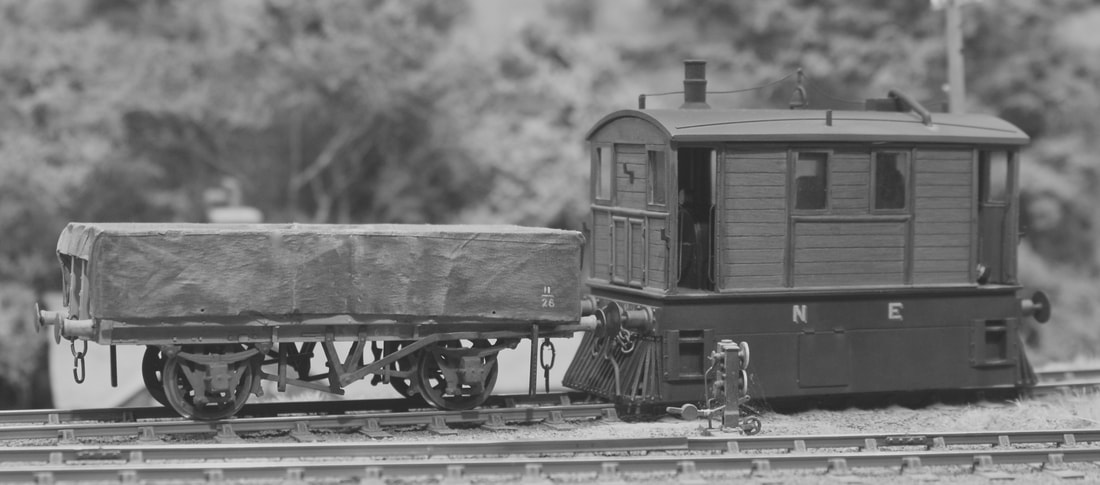
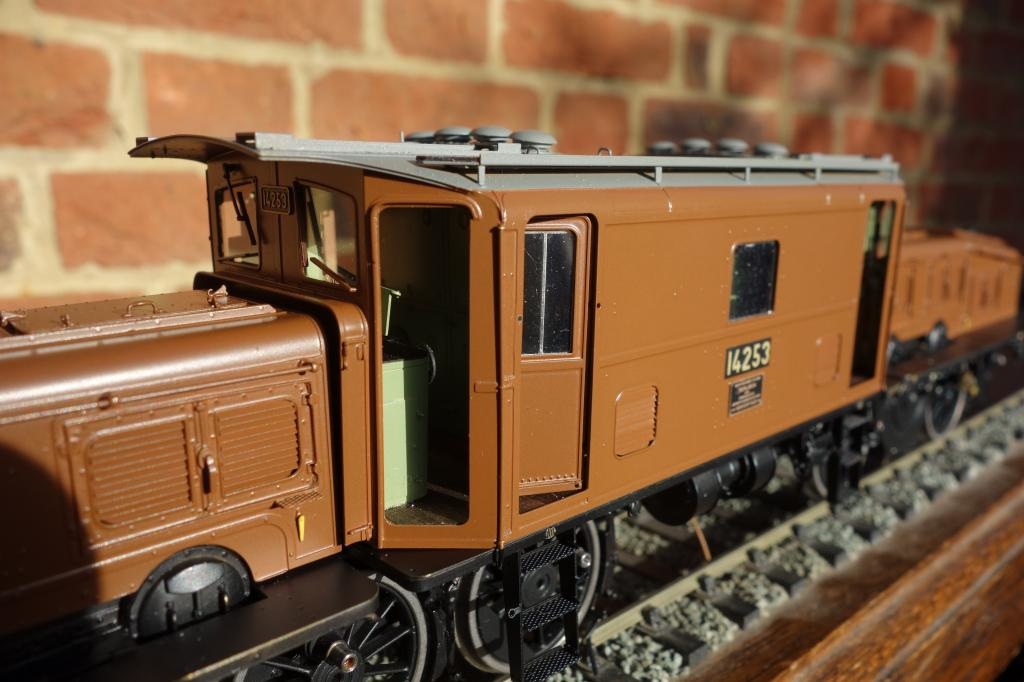
This Wisbech & Upwell L.N.E.R. Worsdell J70 class tramway locomotive looked good on the single line.
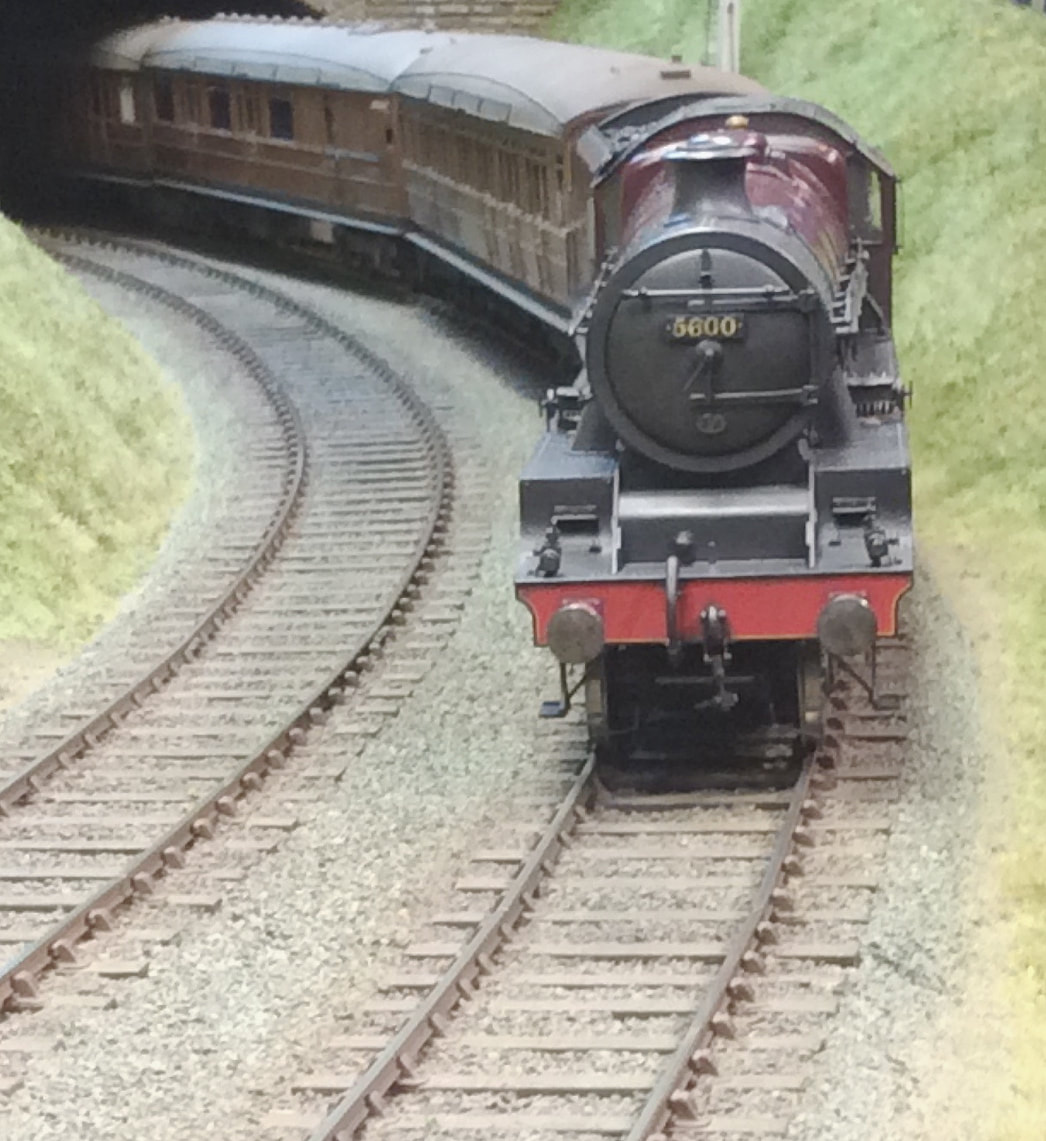
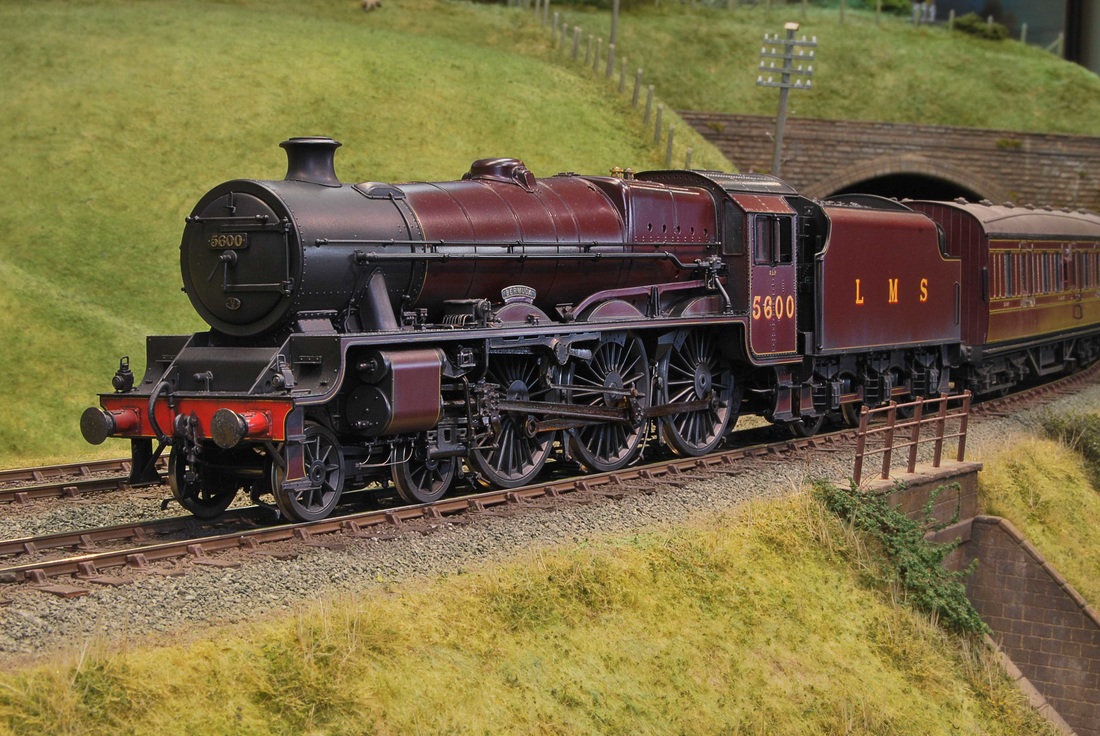
Lee Marsh L.M.S Stanier Jubilee 4-6-0 No 5600 'Bermuda' at Ewyas Harold
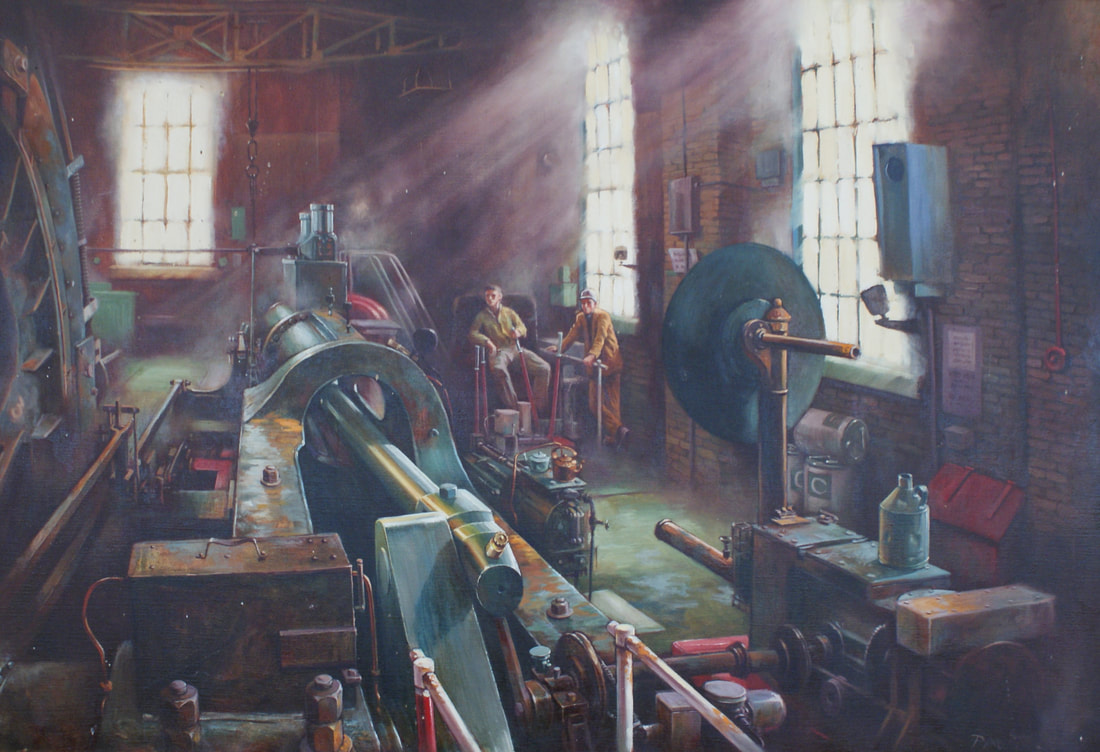
This steam pump house interior is from a collection of old paintings that preserve a detailed record of how industry appeared some eighty years ago.
Jack Anziani has built quite a few locomotives recently, including this lovely ex Midland Railway Deeley compound 4-4-0.
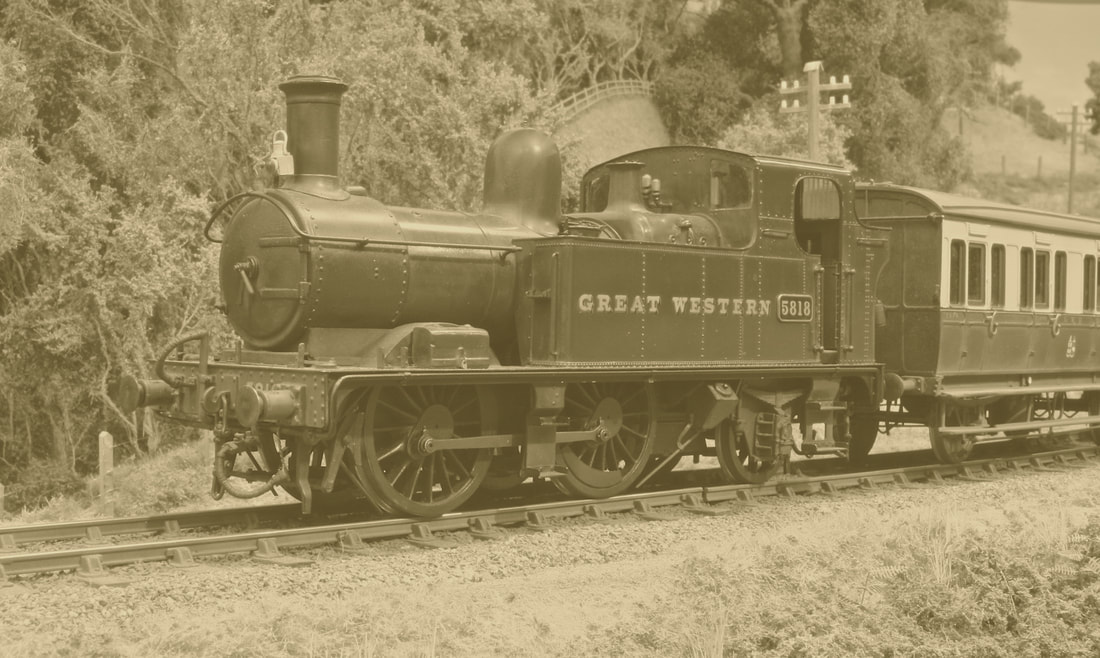
No 5818 is one of the branch line regulars.
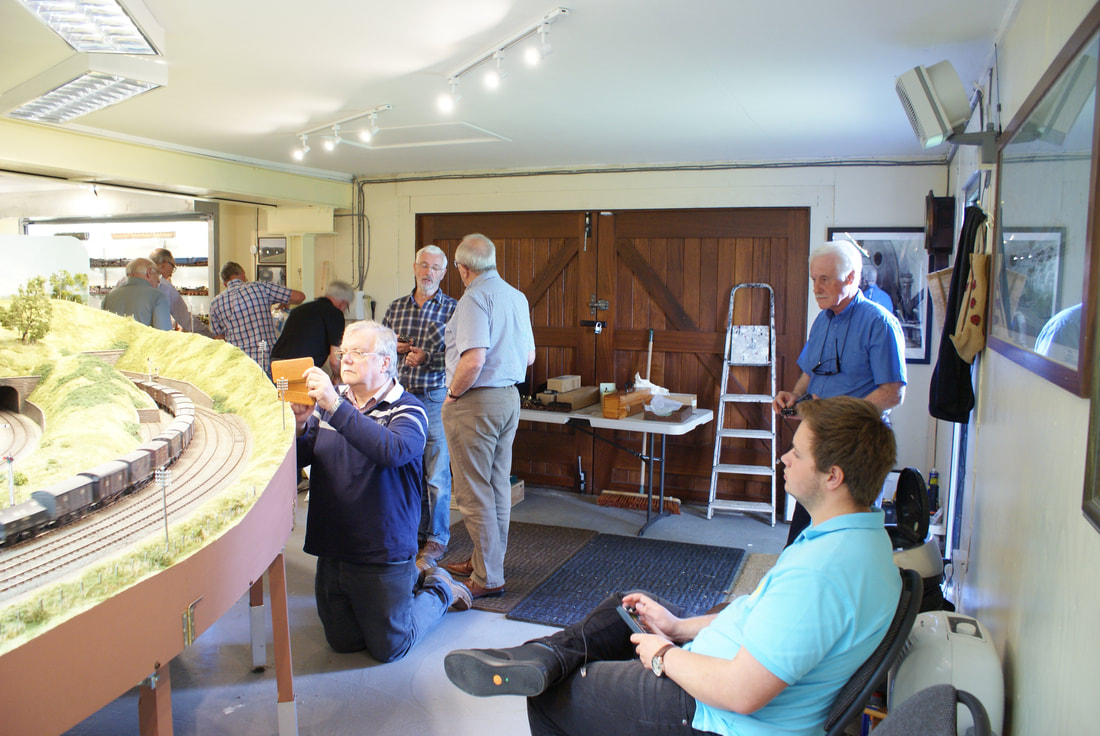
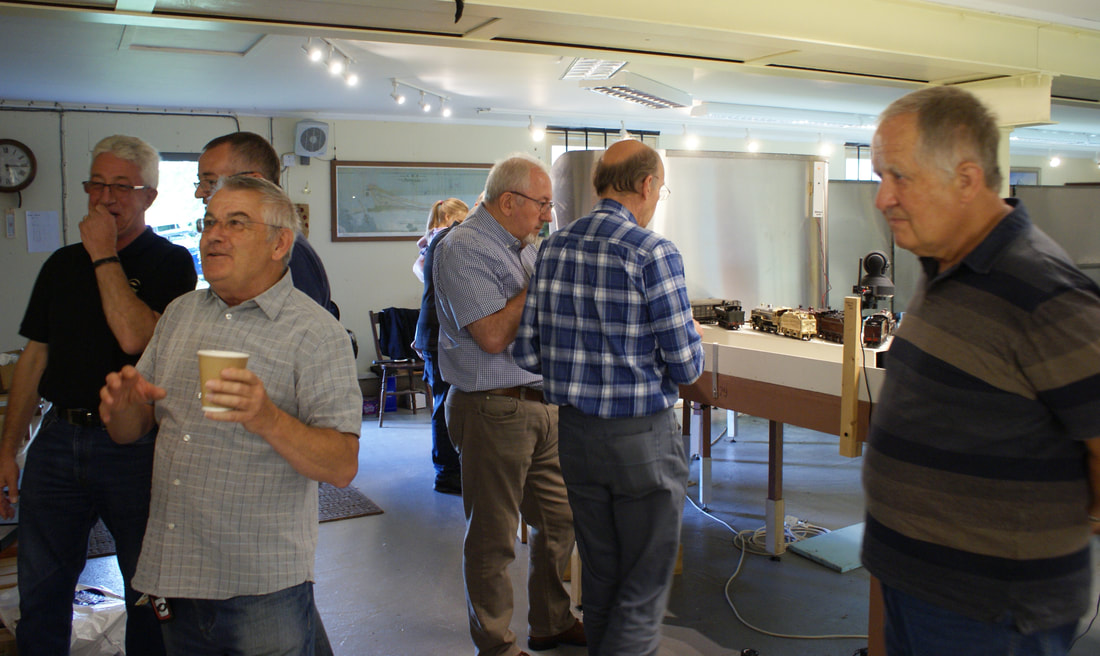
Plenty of opportunity for taking photos and time for a good chinwag.
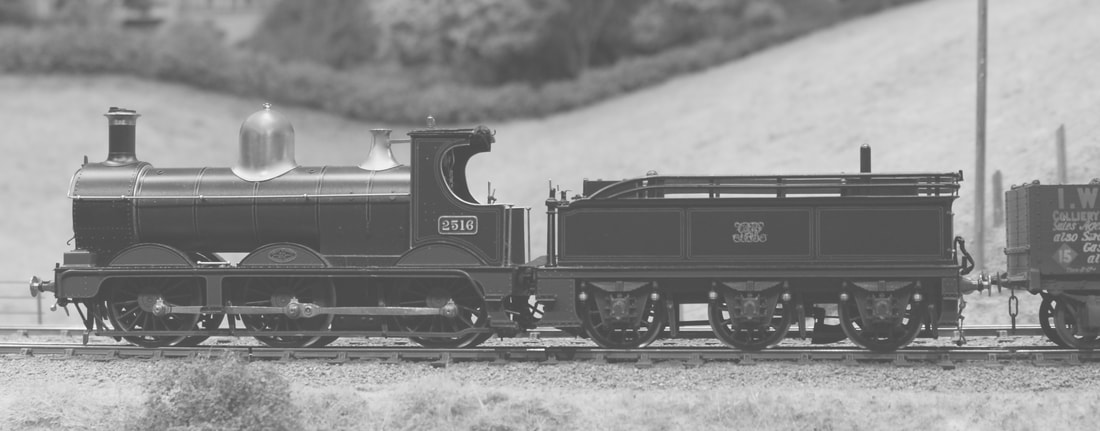
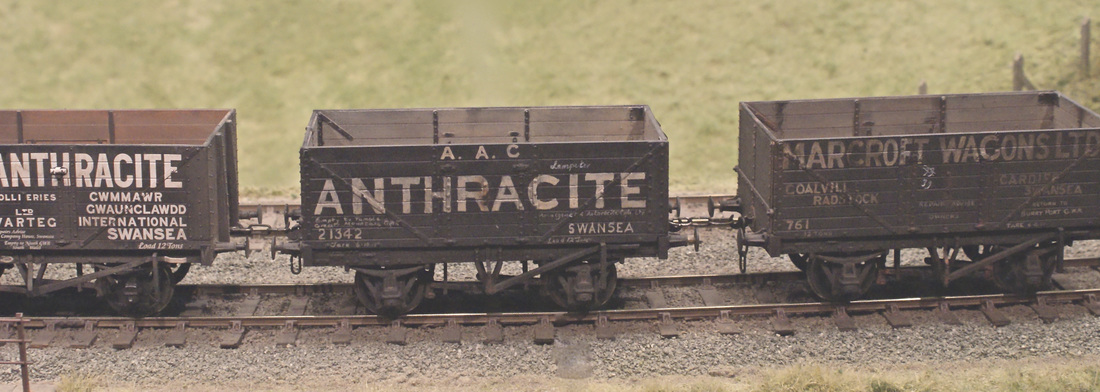
Kevin Robertson’s G.W.R. Dean Goods No 2516 in monogram livery on a down coal train at Ewyas Harold.
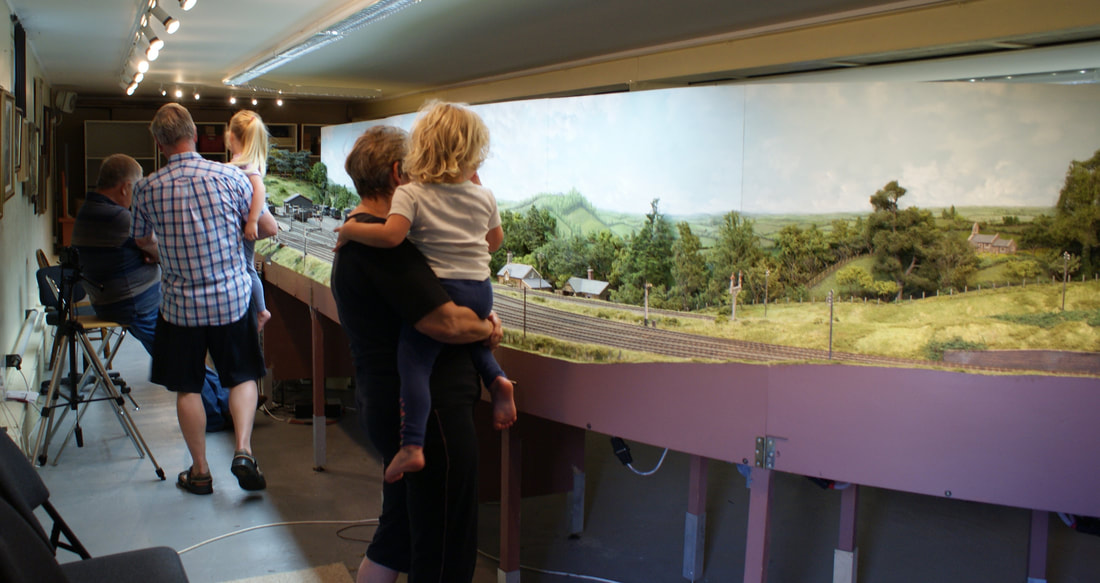
It's mostly old geezers at Bucks Hill, but occasionally there are younger viewers as well.
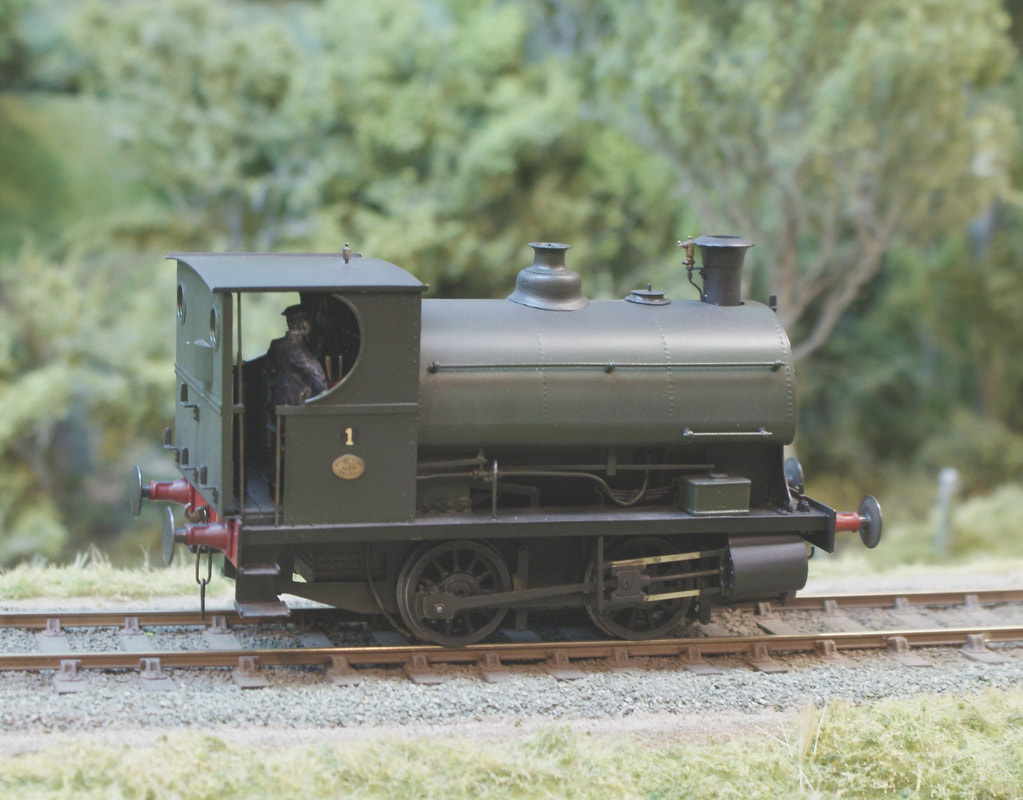
A variety of industrial and tramway locomotives run on the Golden valley branch line, and Ian Rathbone brought this Peckett 0-4-0ST along. BR No. 1 was actually named 'Hercules' (with a nameplate on the LHS only). The ex industrial was taken on by BR in 1948 and sent to Swindon for overhaul, where although painted in GWR livery, it was never officially a GW engine.
23rd May 2017
A quick update, showing some of the recent visiting locomotives.
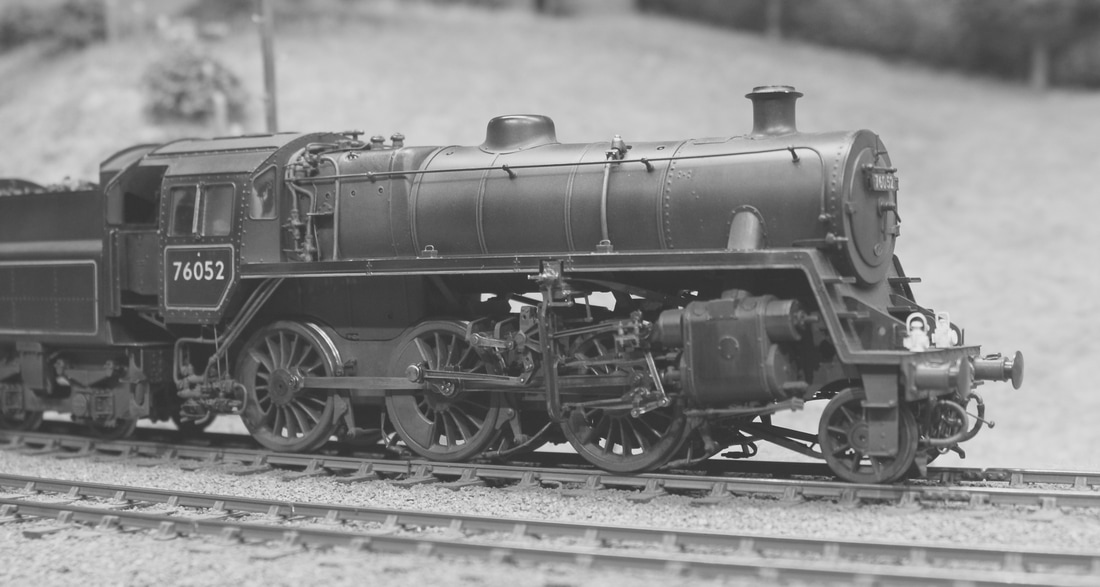
Phil Gomm's Standard Mogul No 76052.
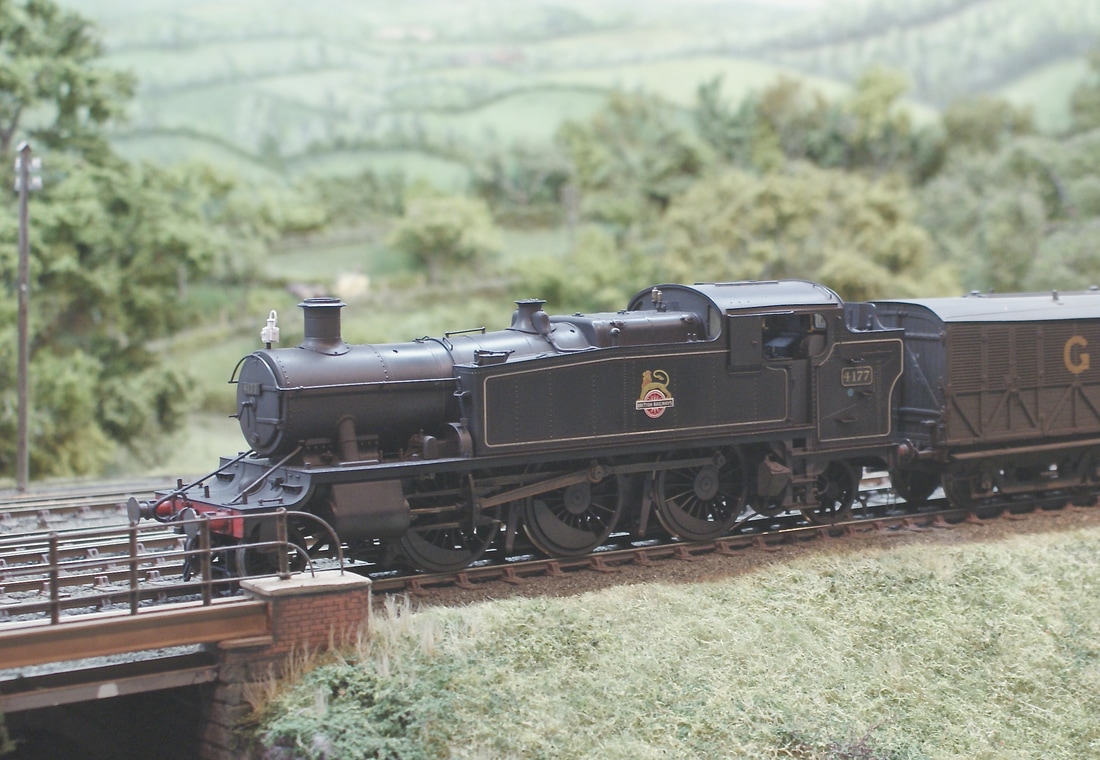
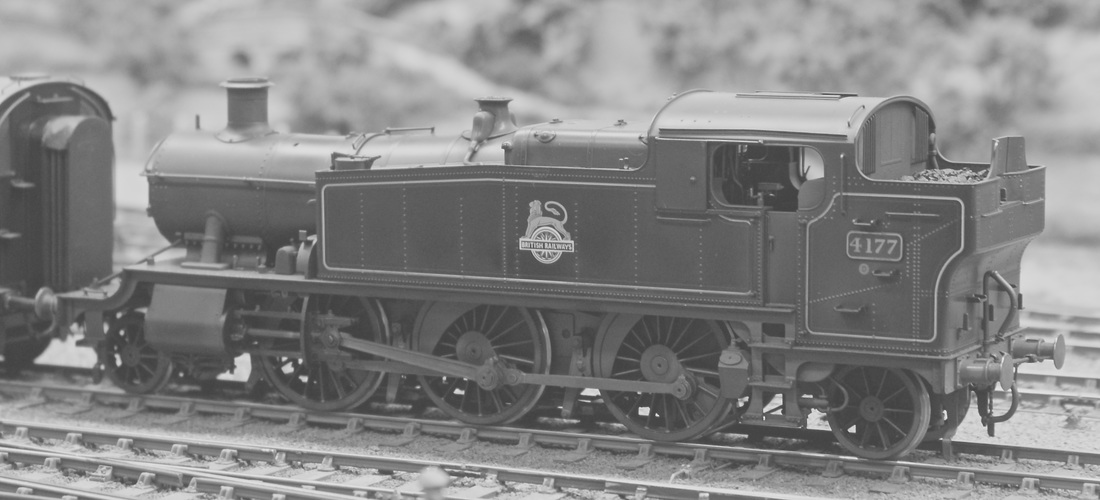
Ex G.W.R. Prairie No 4177 is held in the down loop.
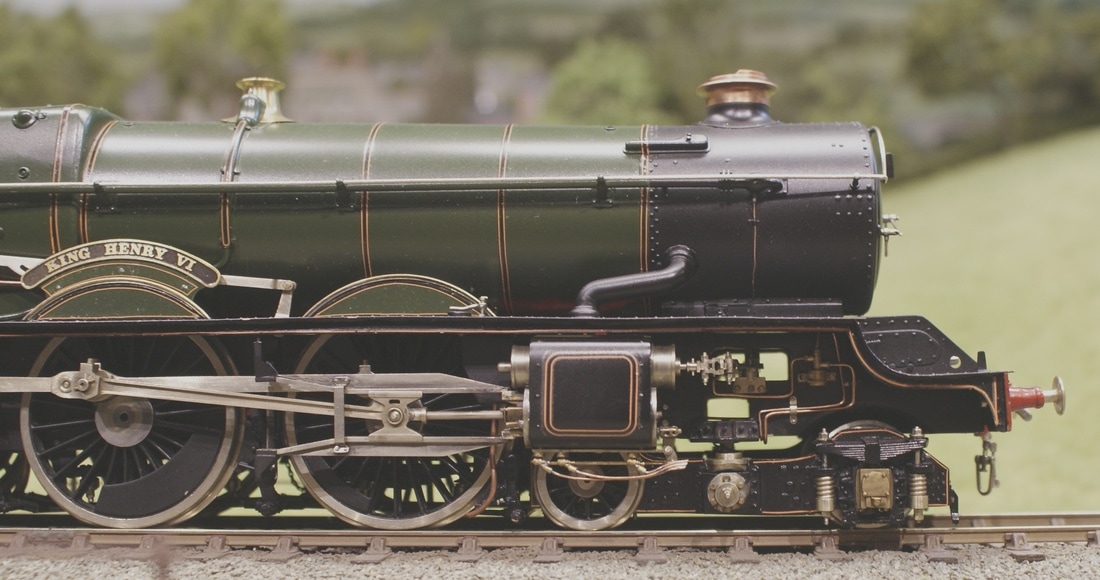
Kevin Robertson's amazing Beeson 'King Henry VI'
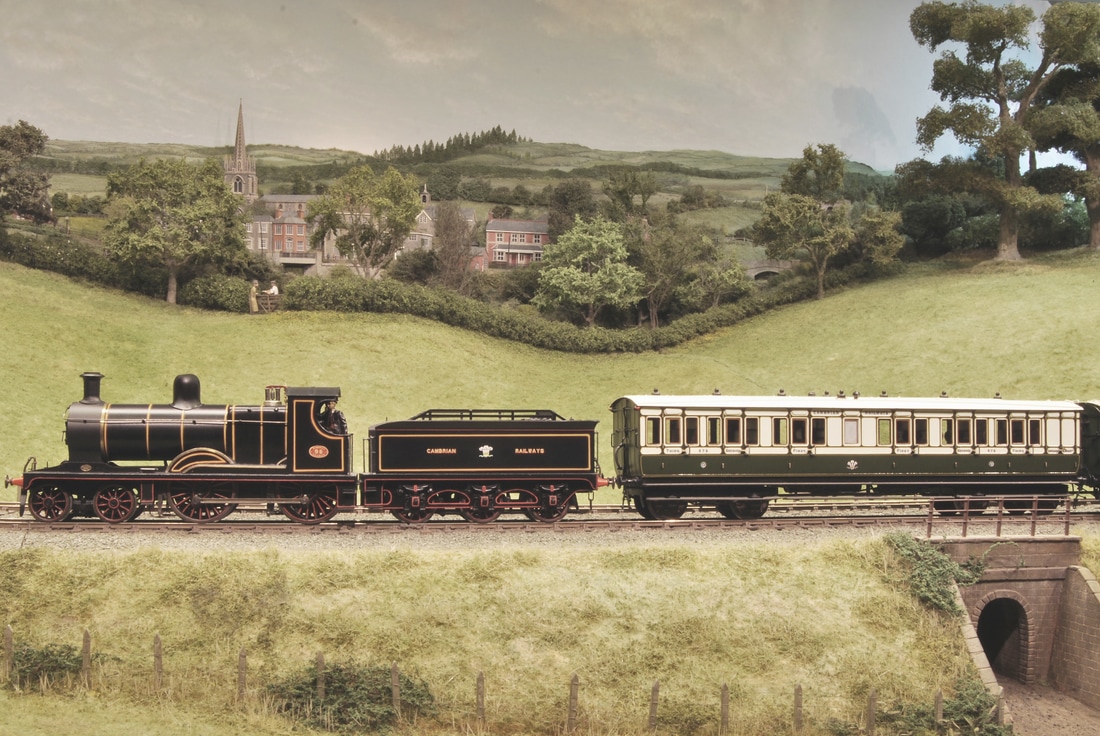
Richard Abbey brought this lovely Cambrian Railways large Belpaire 4-4-0 No 98 built by Stephenson & Co in 1904. (The batch of 5 were actually the last new locos purchased by the Cambrian) The model was scratch built, then painted and lined by Bob Buckland. The first carriage is a Cambrian Railways 45′ non corridor Lug/Lav/Tri composite No 283. The model was built by Peter Dawson using Trevor Charlton sides and painted by Dave Studley.
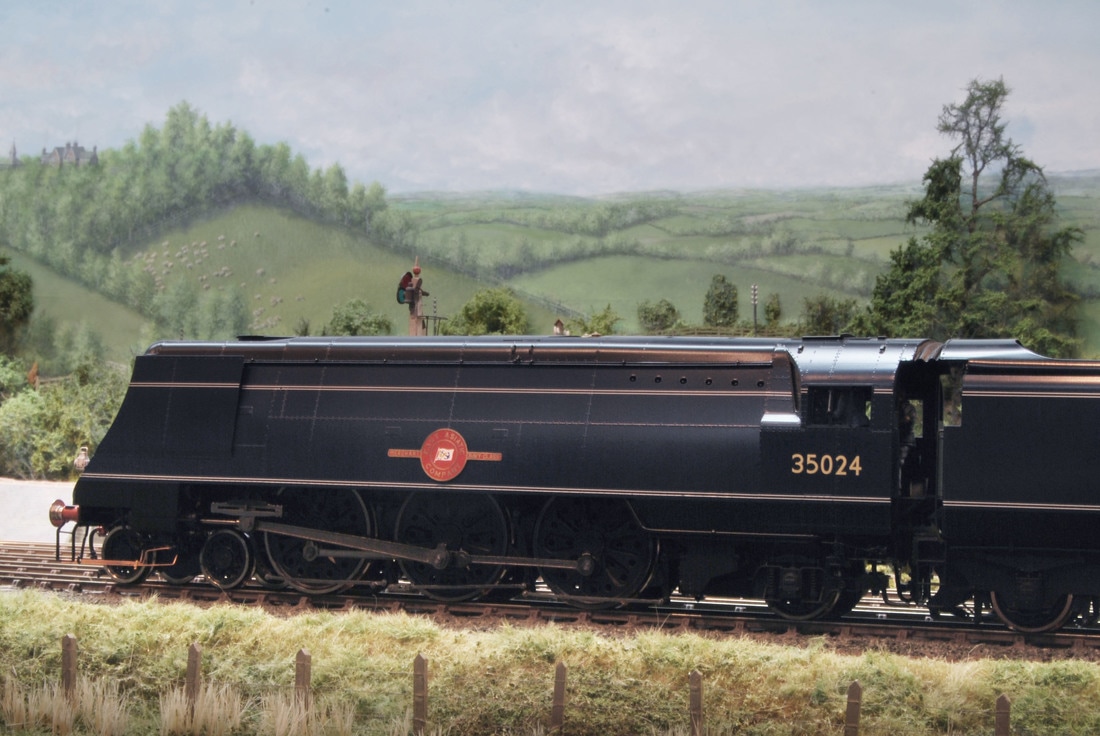
Pristine Bulleid Merchant Navy No 35024 'East Asiatic Company' in B.R.blue
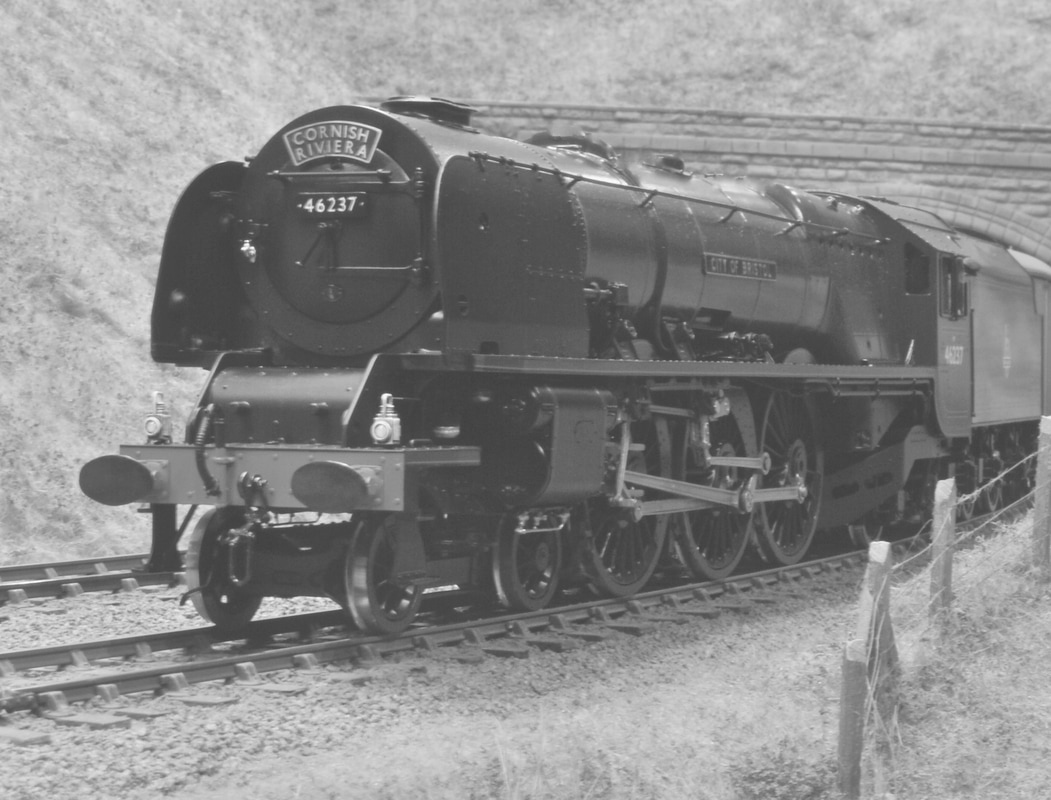
In early B.R. Green livery, Stanier Coronation class pacific No 46237 ‘City of Bristol’ heads a down train. (The locomotive was finished at Crewe in August 1939, with streamlined casing). Richard Chetland.
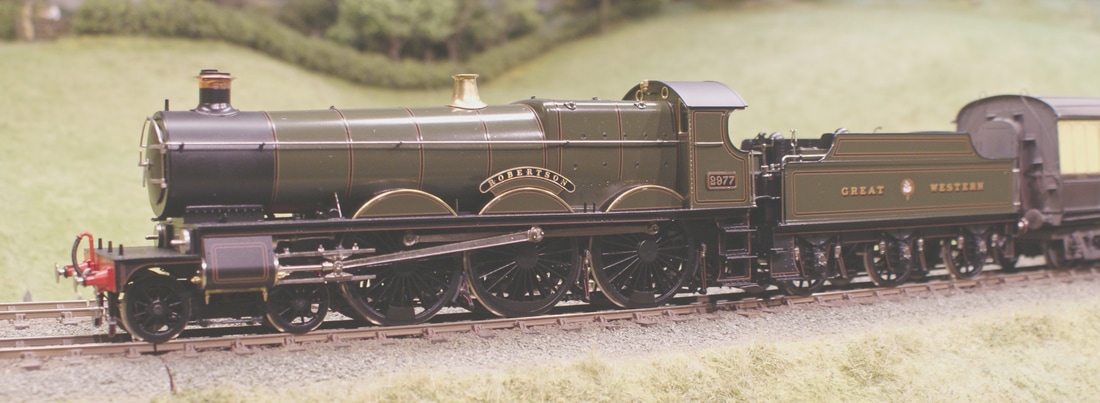
Kevin Robertson's Masterpiece Saint class 4-6-0 No 2977 'Robertson' maintains a family tradition
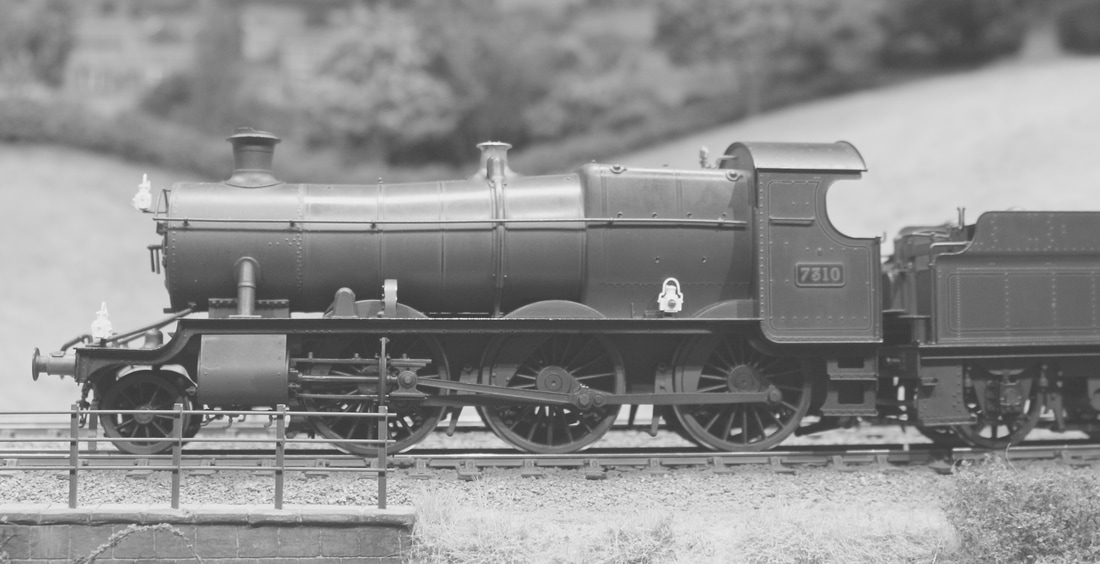
Nigel Smith brought several locos along for testing, including this excellent and sure footed ex G.W.R. 73xx mogul no 7310. Here it manages one of the longest rakes of open wagons round the down line.
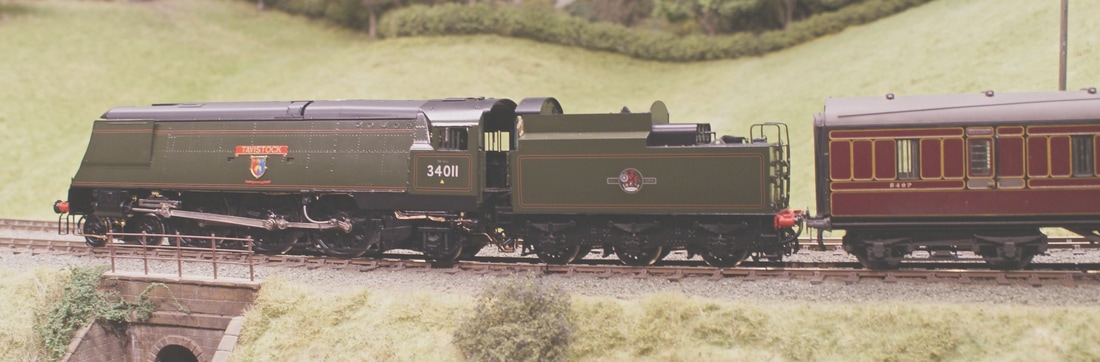
Shades of the Somerset & Dorset here as ex Southern Bullied, now B.R, No34011 'Tavistock passes Ewyas Harold
James Aitken brought this ex London Chatham & Dover Railway ‘T’ class locomotive along. The 0-6-0T was built at Longhedge works in the 1880s, passing to the South Eastern and Chatham railway in 1899 before being taken into the Southern Railway stud at the grouping. Richard Chetland
Nigel Smith is sorting this Martin Finney Southern 4-4-0 for Jonathan Marcus with just a little more adhesion weight. The kit was made and painted by the talented Chris Wesson.
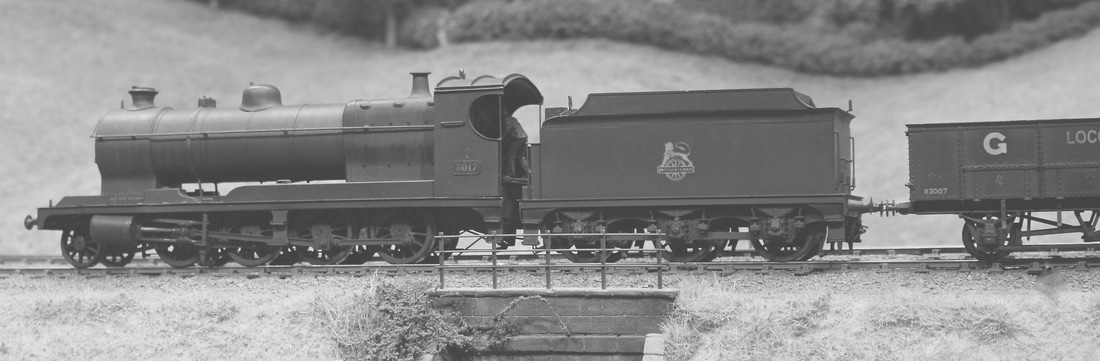
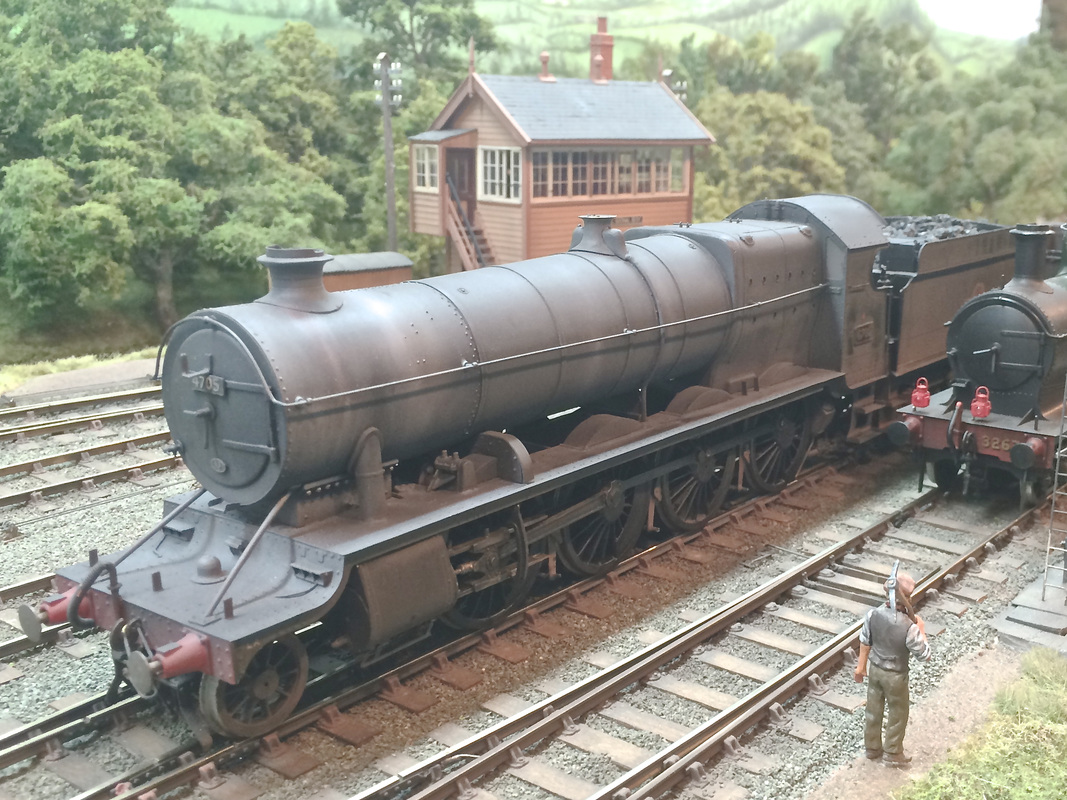
Ian Rathbone's Swindon version of Robinson's famous 8K 2-8-0s No 3017 wears early B.R. black.
14th February 2017
A few pictures from the recent gathering, with some Richard Chetland photos capturing just some of the visiting stock on the main lines.
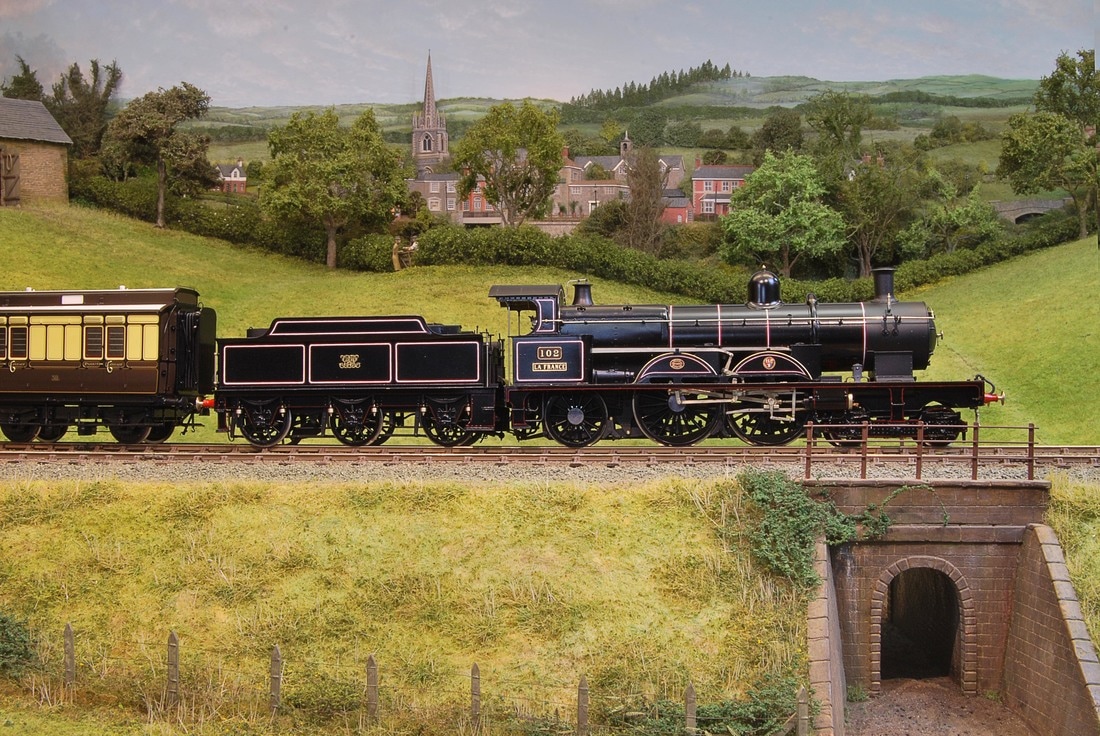
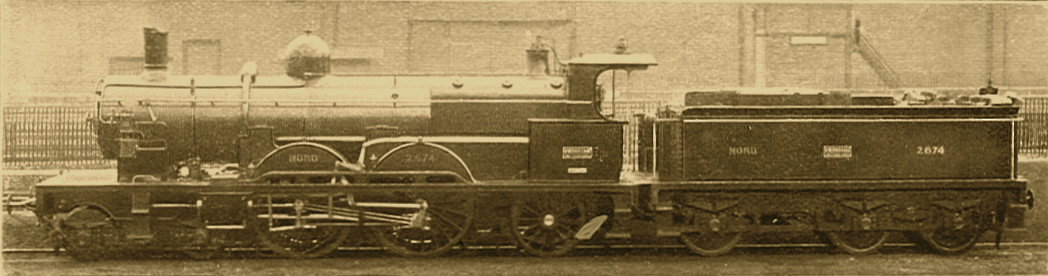
G.W.R. De-Glehn compound No 102 ‘La France'. The Atlantic wears the early lined black livery, rendered by Alan Brackenborough, seen here at Ewyas Harold, heading a set of five Lee Marsh clerestory coaches.
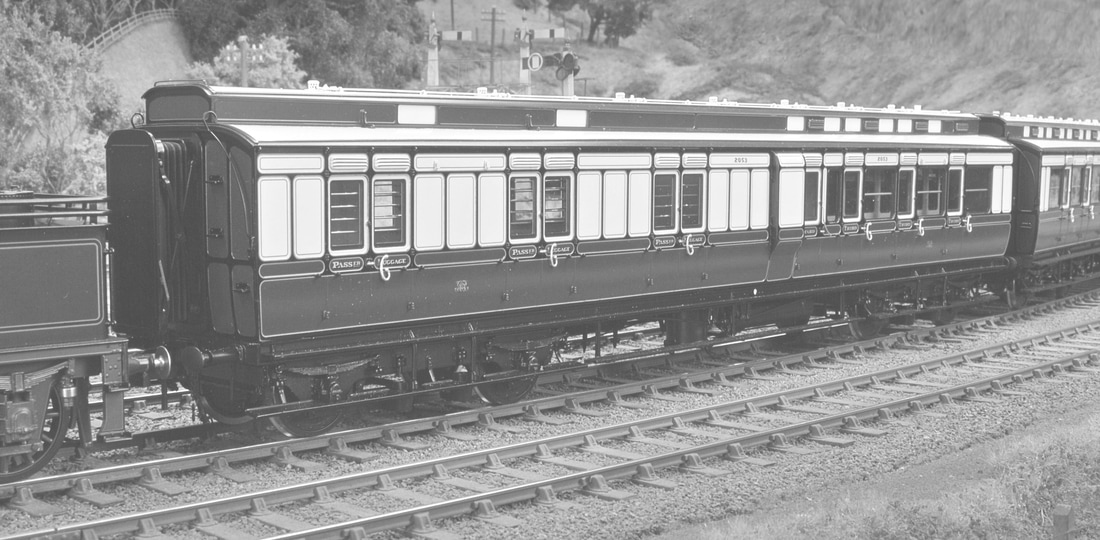
The Lee Marsh Model Co D20 Dean Clerestory Brake in the previous shot is No 2053, seen here in the 1898 fully lined early condition, directly behind the tender of an Achilles class locomotive. These superb vehicles come with fully detailed underframes and interiors.
Do please open the link for availability... Lee Marsh Model Co
Ex G.W.R. 43xx Mogul No 4377 with up coal empties. Built at Swindon in 1919, the 85C Hereford loco is shown in lightly weathered early BR unlined goods black.
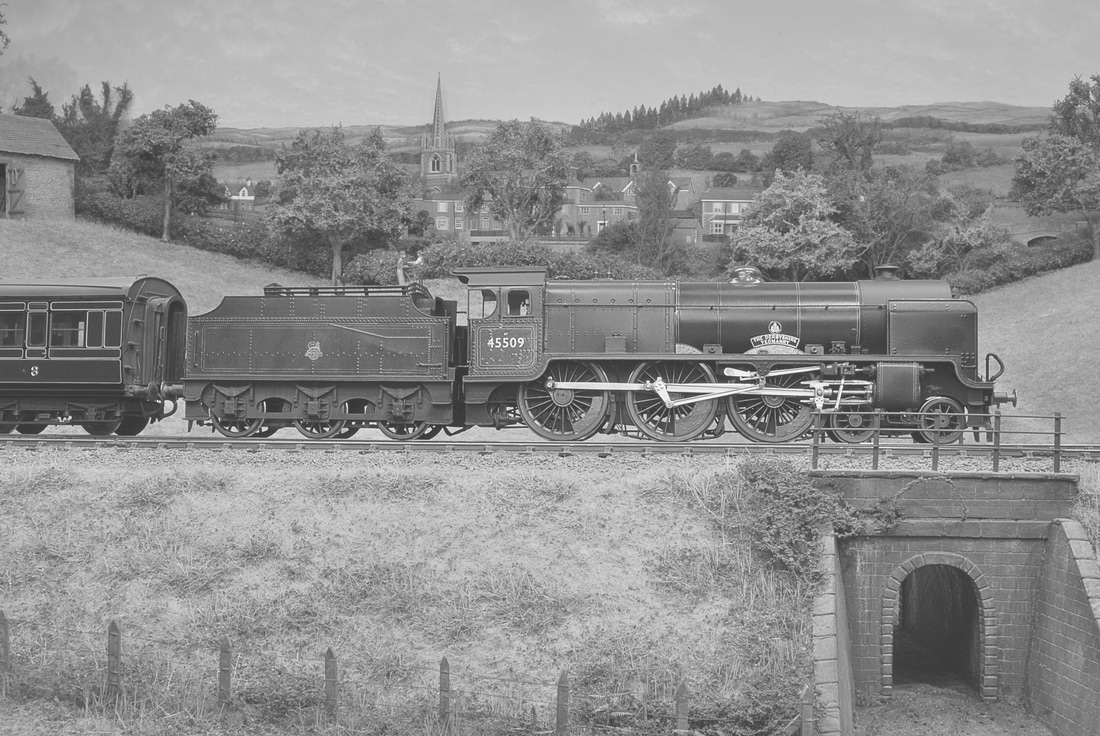
Fowler three cylinder Patriot No 45509 in BR Brunswick Green heads an up corridor rake. 'The Derbyshire Yeomanry' was built in 1932.
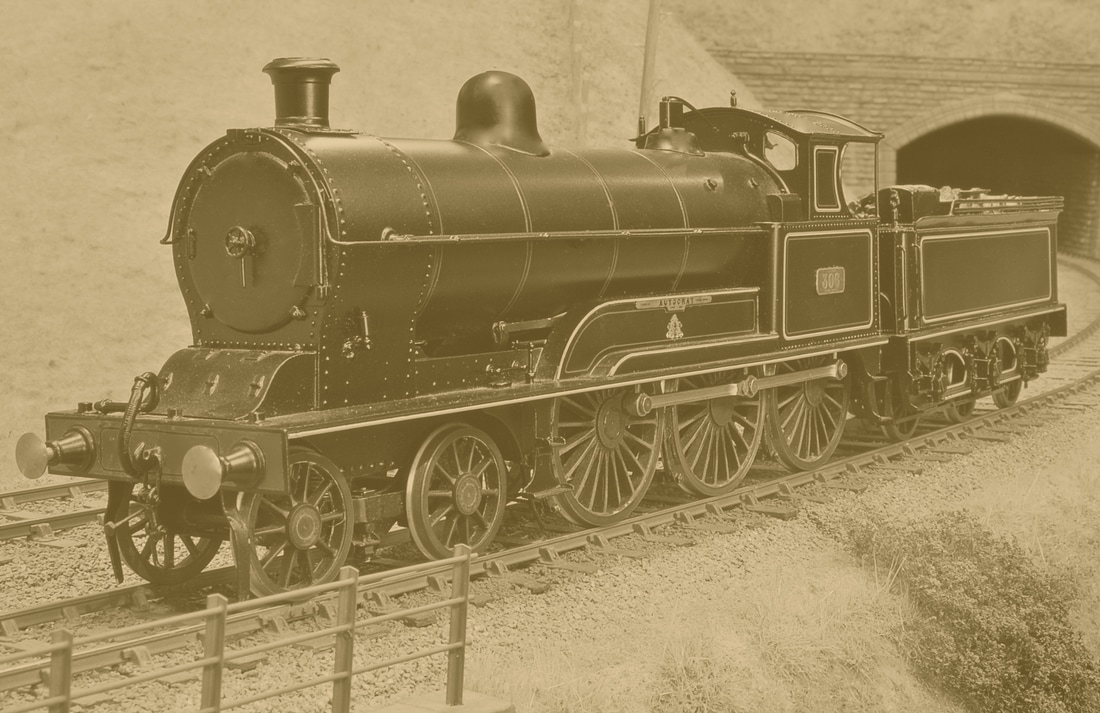
This L.N.W.R. George Whale ‘Experiment’ class 4-6-0 was built at Crewe in 1905 as an extended version of the Precursor class 4-4-0s. This one is the second of 105 members of the class, No 306 ‘Autocrat’. It needs a bit of work, so Mike Morris is going to sort out a few running problems. Richard Chetland.
Ian Rathbone tried out this late BR liveried ‘Schools’ class Maunsell 4-4-0 ‘Repton’ Richard Chetland
29th January 2017
A few pictures by Richard Chetland of some of the visiting locomotives. I will soon be adding some more of Lee's recent work as soon as the pictures come through.
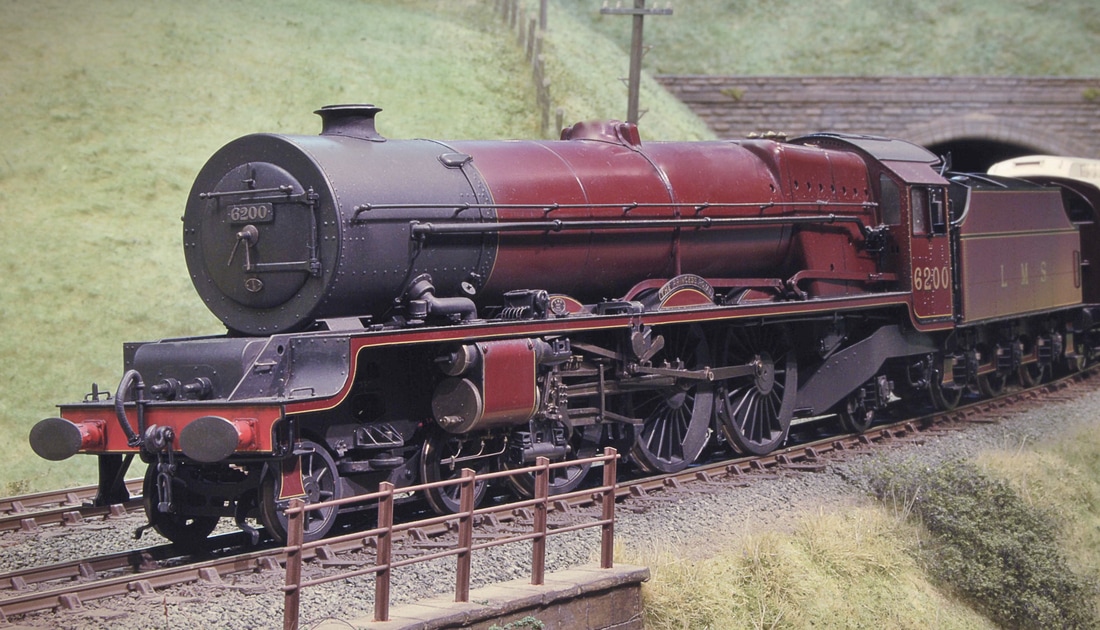
Stanier Pacific No 6200 ‘The Princess Royal’ in weathered L.M.S. lake. Richard Chetland.
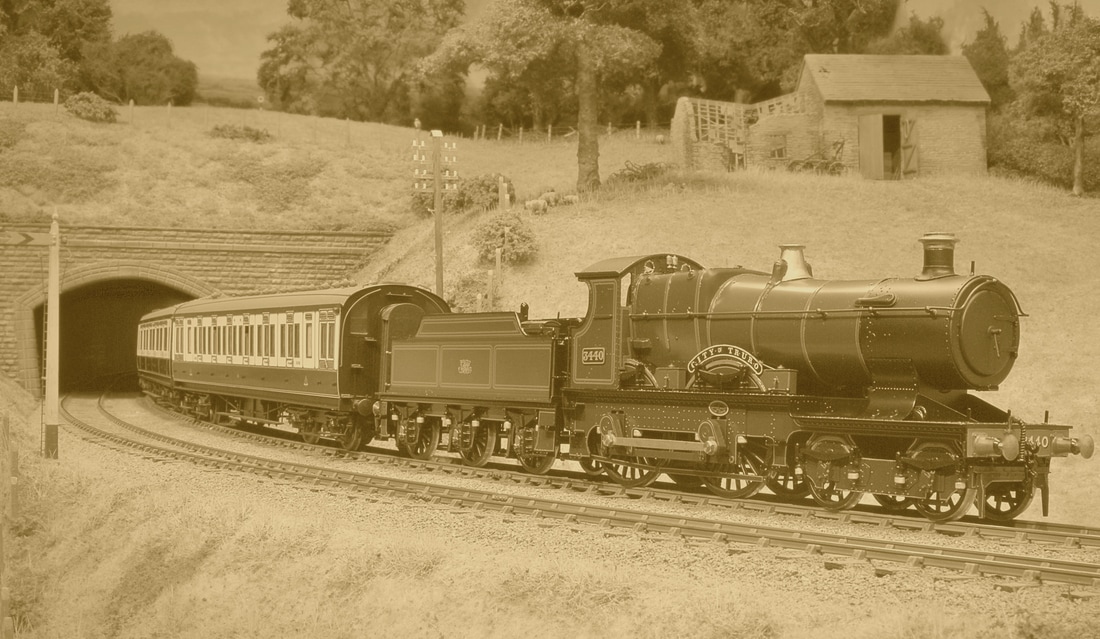
Len Bunn brought this fine Brassmasters ‘City of Truro’ along in monogram livery, and it took out a rake of L.N.W.R. Carriages on the up main. Richard Chetland.
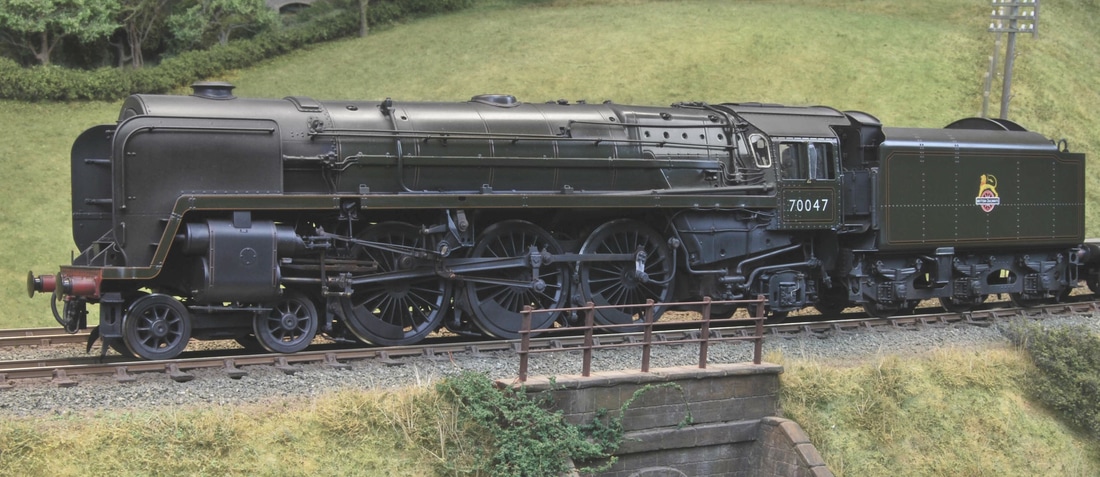
Un-named Brittania Pacific No 70047 rounds the down main, leaning slightly on the curve. The model is by Masterpiece Models, and it has been at Bucks Hill for a while now. A recent weathering by Fred Lewis of Welsh Wizard loco works has taken the shine off, and the reduced reflections and highlights allowed the shot to come out well. Richard Chetland.

G.W.R. Churchward 2-8-0 No 2862 heads a long train of coal empties. Richard Chetland
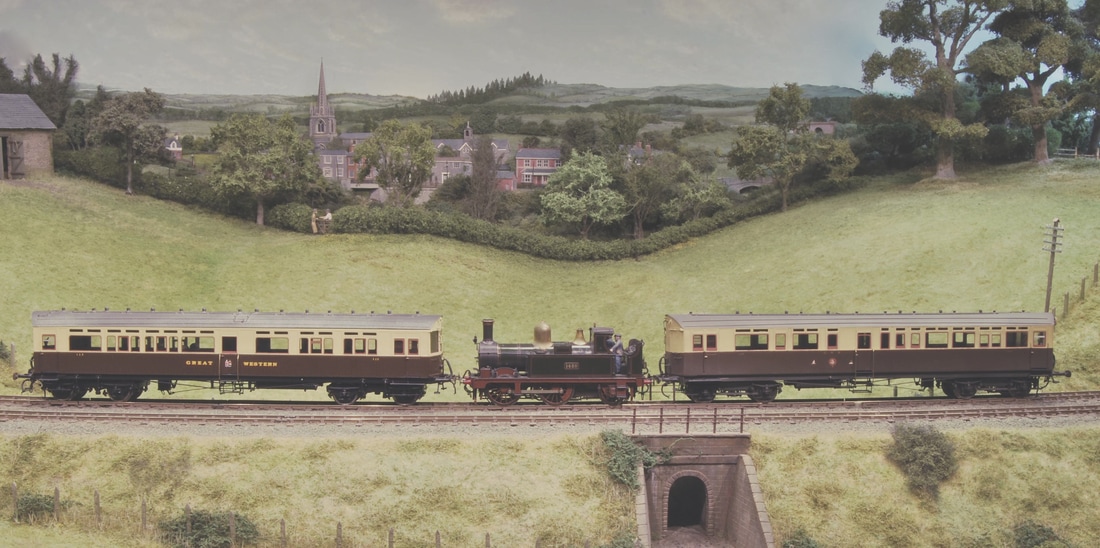
It’s hardly ever possible to catch a whole train in a Bucks Hill photo, but Richard moved the tripod back a bit for this new pair of G.W.R. Auto trailers and their 517 Class tank locomotive.
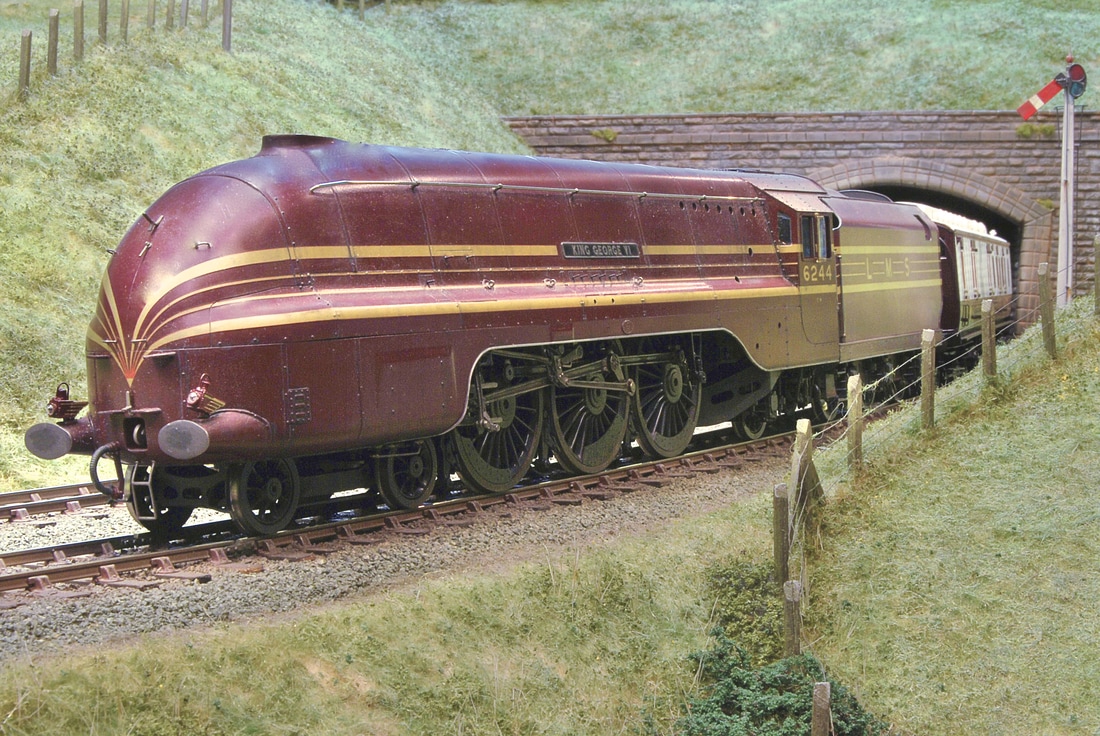
L.M.S. Coronation class Streamlined pacific No 6244 ‘King George VI’ had originally been ‘City of Leeds’ until 1941, when it was patriotically re-named. The streamlined casings with their ‘speed whisker’ lining were removed in 1946/7 bringing the class back to conventional appearance, but fitted with smoke deflectors. Richard Chetland.
7th December 2016
A few build pictures of the Finney M7, and a few more from the last running sessions.
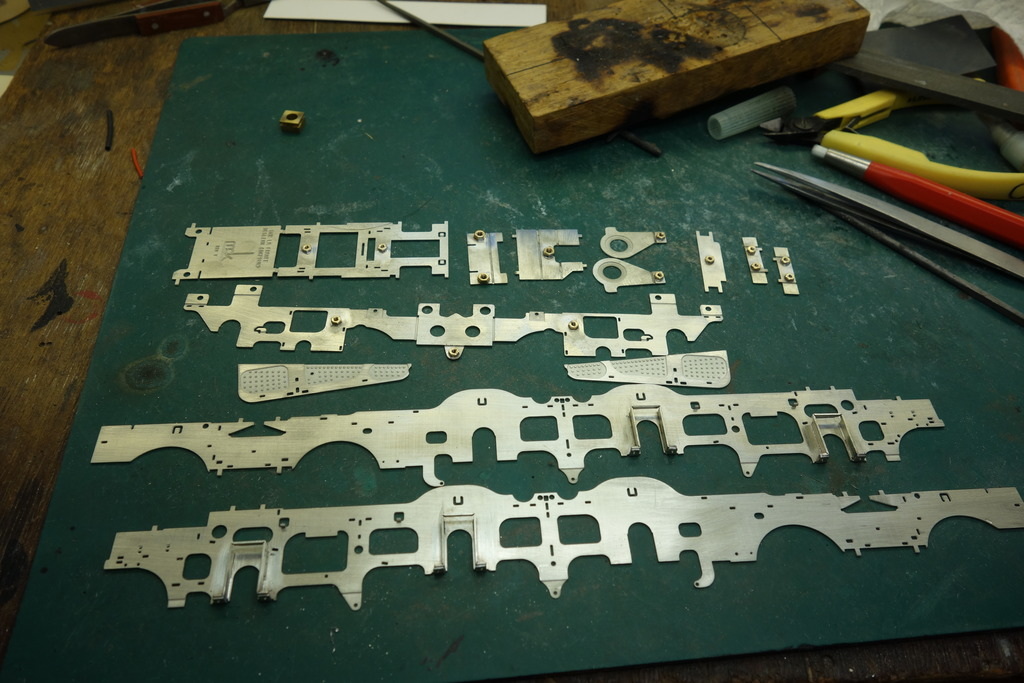
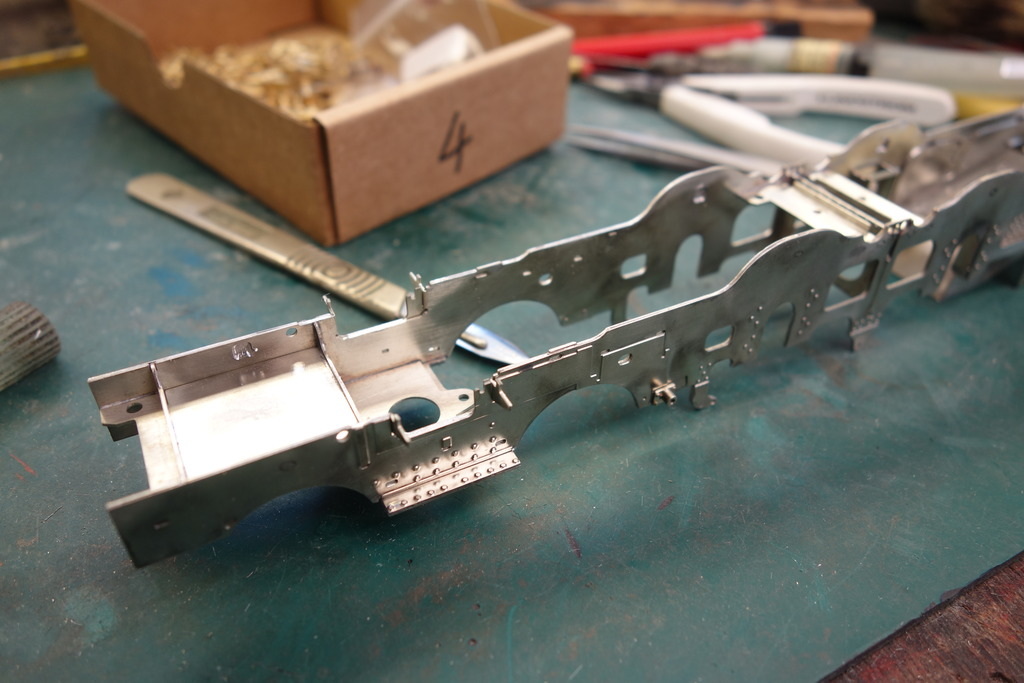
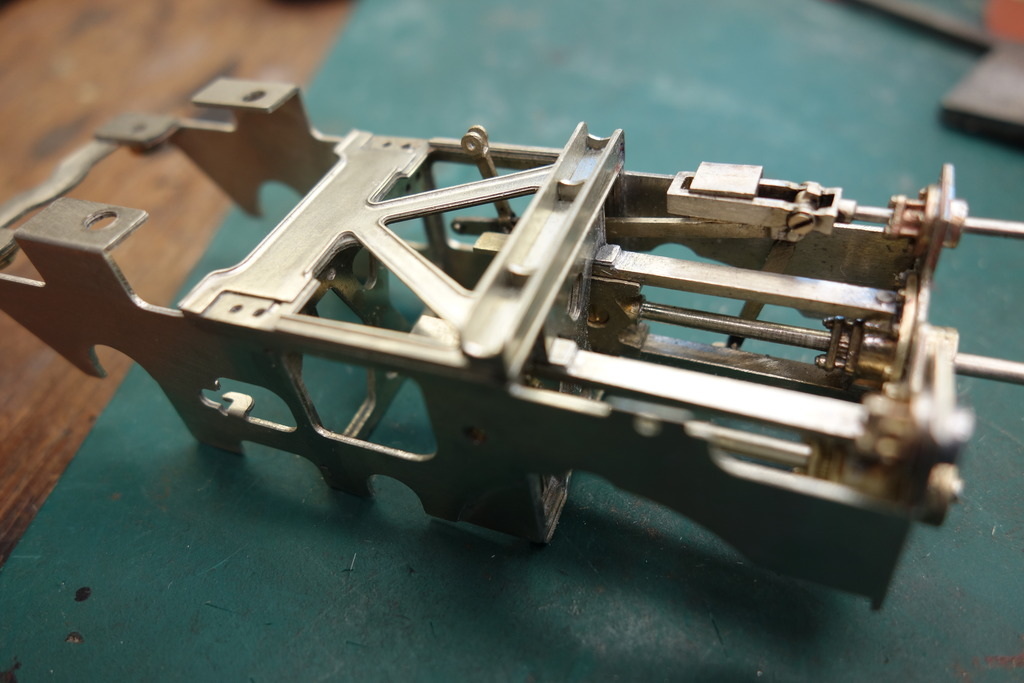
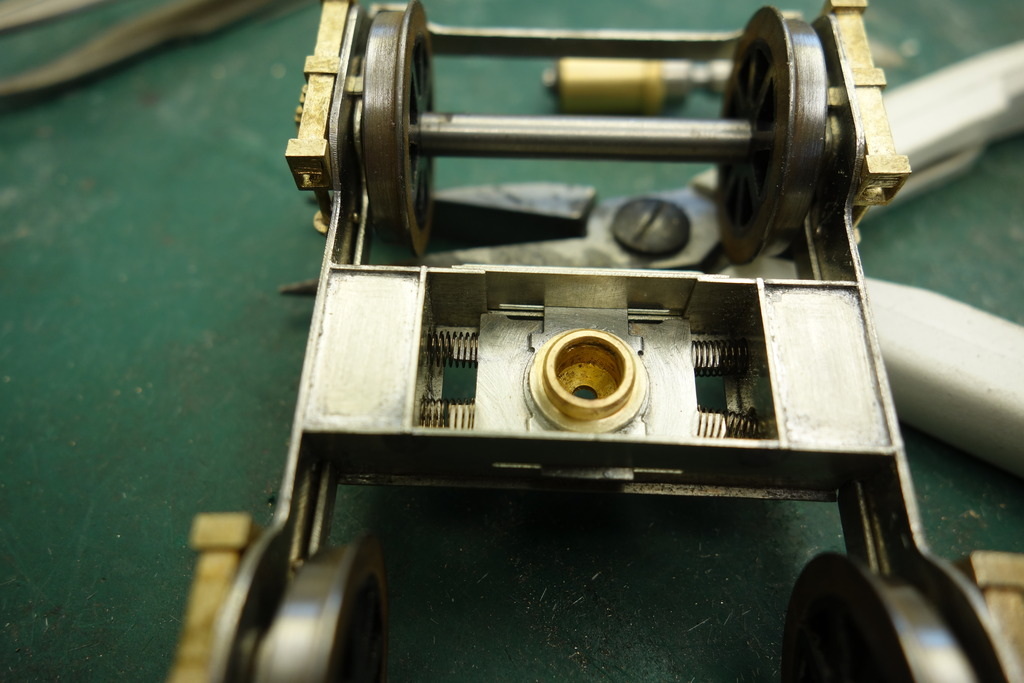
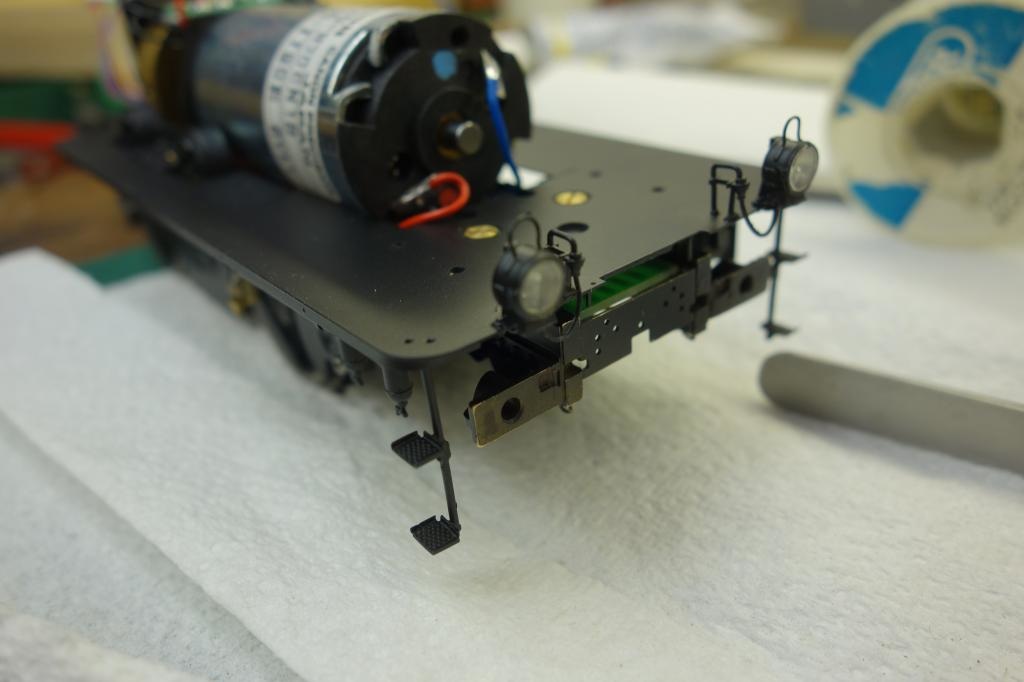
Chassis with ashpan, steps and bogie frame.
Superstructure build up with characteristic wheel and crankpin splashers done.
Tank sides & tops with lift lugs. Pump pipework and cab aperture beading.
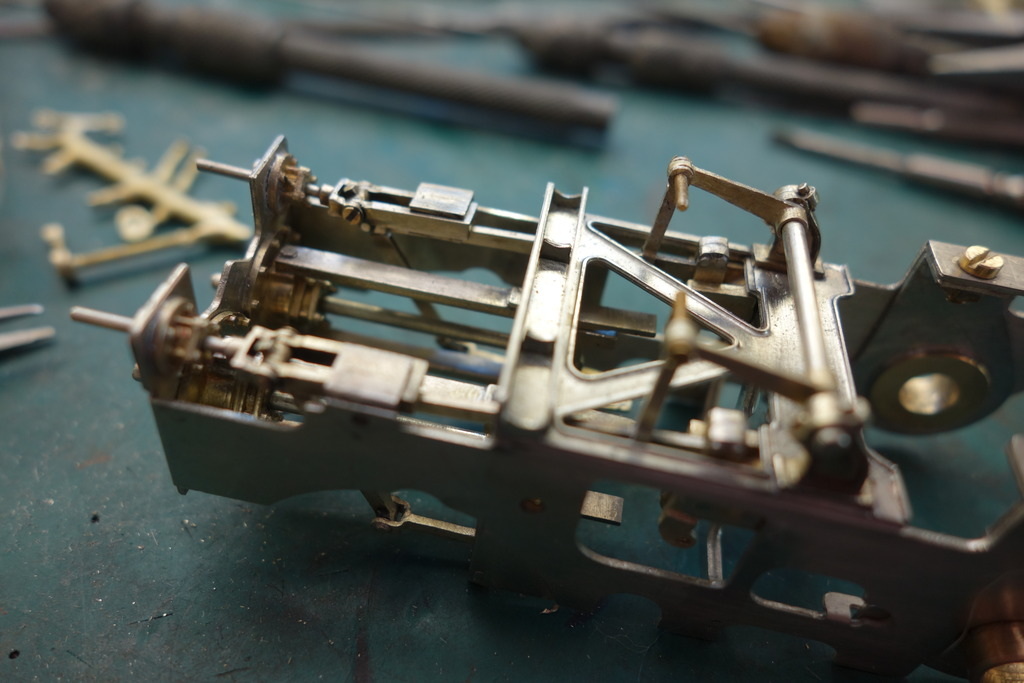
Bunker sides and beginning the cab interior.
James Aitken's unfitted M7.
Lee Marsh Jubilee No 5600 'Bermuda' with L.M.S. rake. R.Chetland.
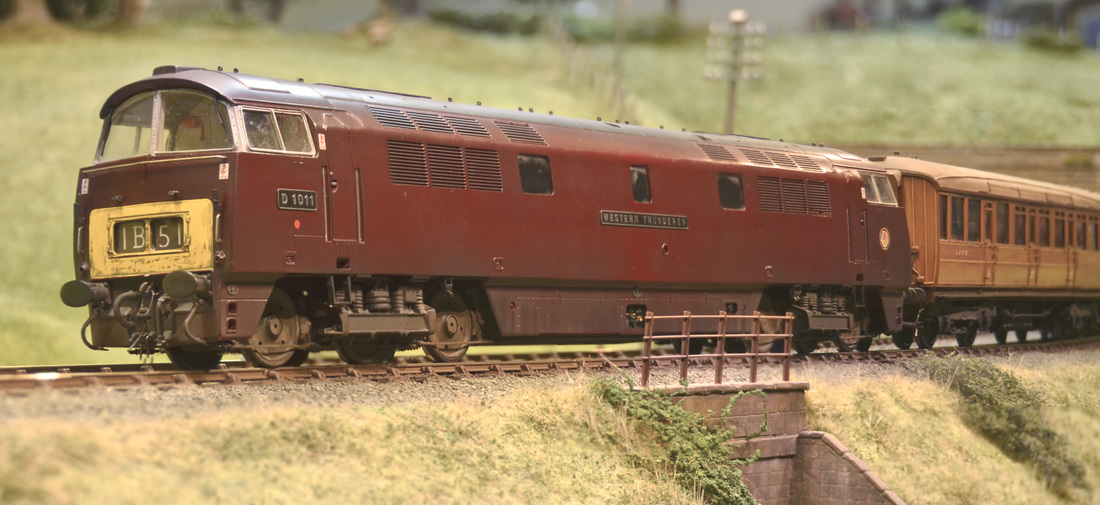
Nigel Smith's D1011 'Western Thunderer'. R.Chetland.
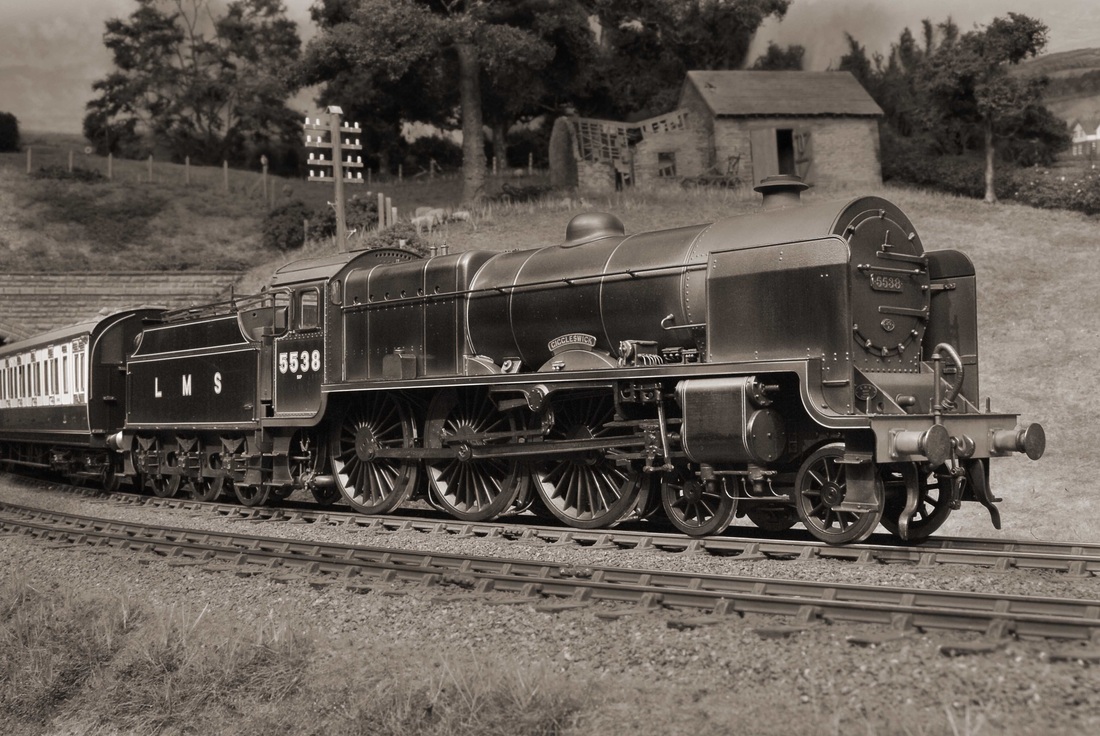
Patriot No 5538 'Giggleswick' with Wolverton Ex L.N.W.R bogie stock. R.Chetland.
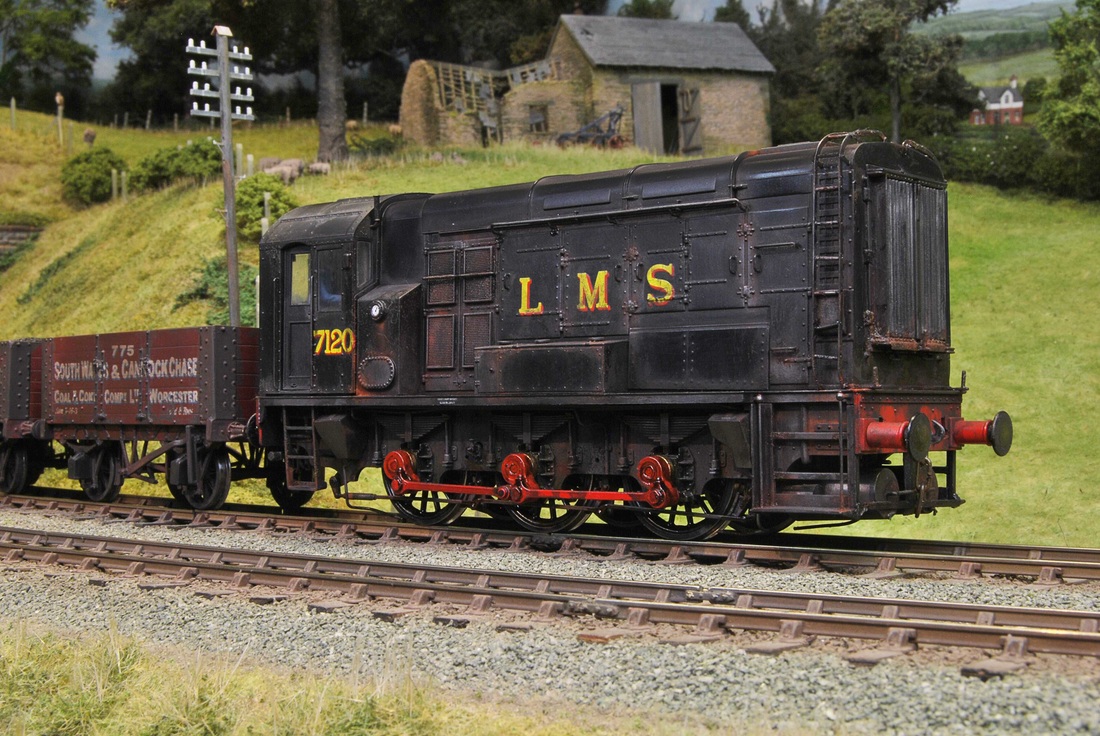
L.M.S. Diesel electric No 7120 was brought along by Jack Anziani. R.Chetland.
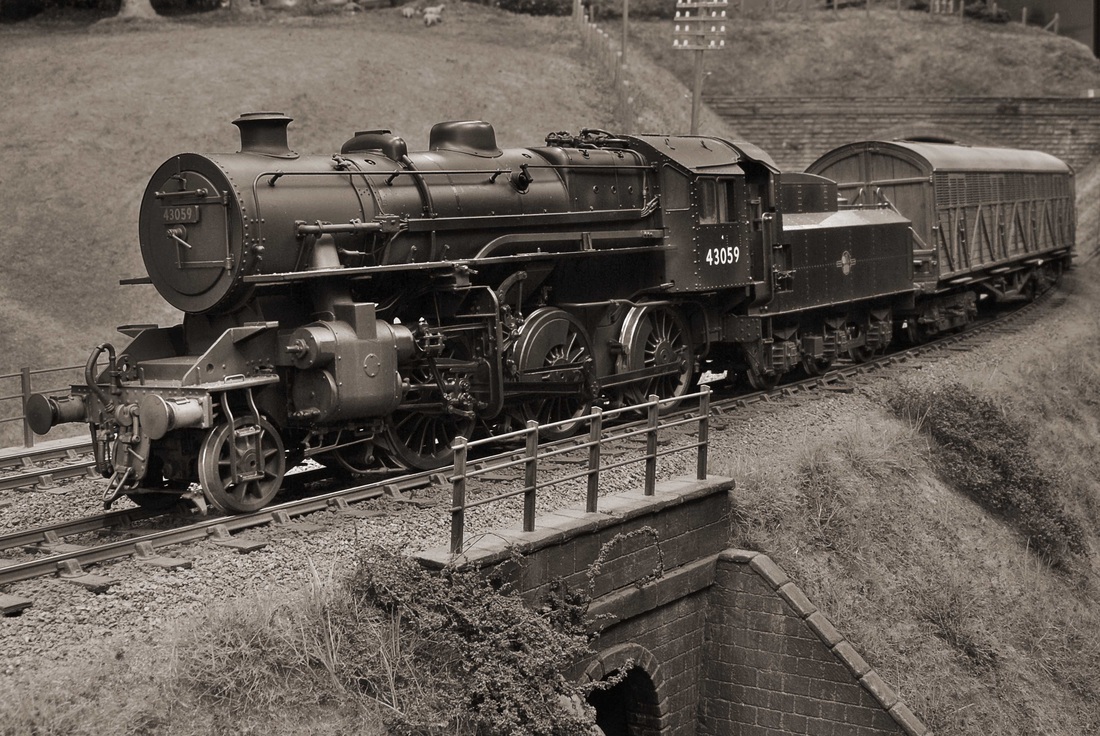
Ivatt Class 4 mogul No 43059. An M.O.K kit, recently weathered. R.Chetland.
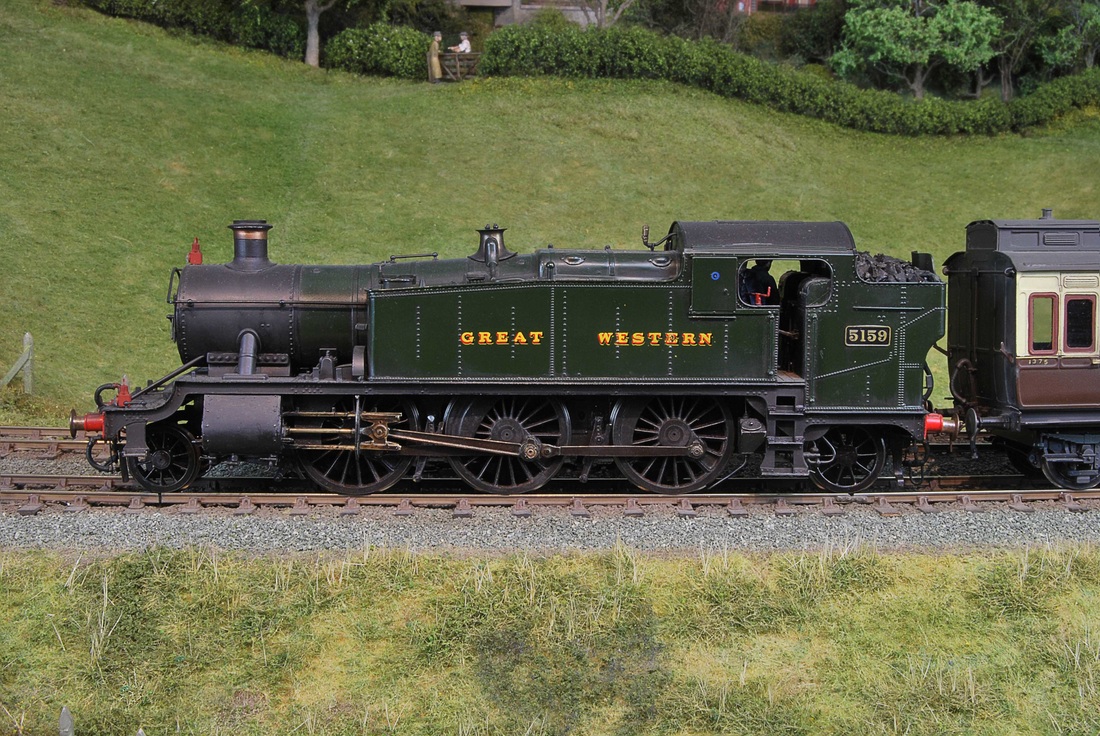
Large Prairie No 5159 on local stopper, heading west. R.Chetland.
Jonathan Marcus's BR liveried V2 running light, tender first, is held in the down loop.
27th October 2016
Apologies for not updating here for a bit. I will put up a few pics from the last few running sessions, and do a quick workshop round up next time. There is a project away from the layout at the moment that I have a few hours in, so I'll start with a picture of a similar model. It's a live steam Aster Castle in gauge I. A wonderful beast it is and I'll take some more progress shots over the next few weeks.
Kingswear Castle is fitted with the original elegant tall single chimney.
The design follows Aster's King class release, but has a number of updates and modifications that help running wear. A well maintained & cleaned locomotive will give trouble free running.
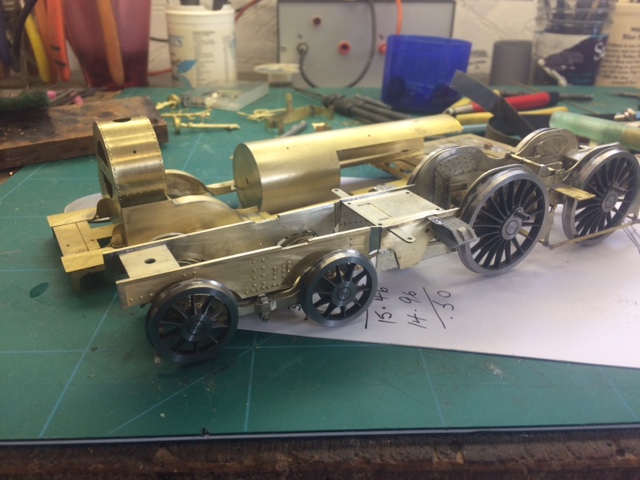
This is James Aitken's Drummond M7, but I am working on my own Finney kit at the moment, and I will get a few more pictures of the completed chassis up here soon. It will have the Westinghouse auto train equipment fitted as well as the usual inside motion and crank axle detailing.
Chassis with overlays, running plate, splasher & smokebox also done

Borrowed from John Edwards for reference.
An L.M.S. Fowler 2-6-2T with a rusty smokebox and in need of a general clean. Jack Anziani brought one of his many new builds along and gave it a trial run.
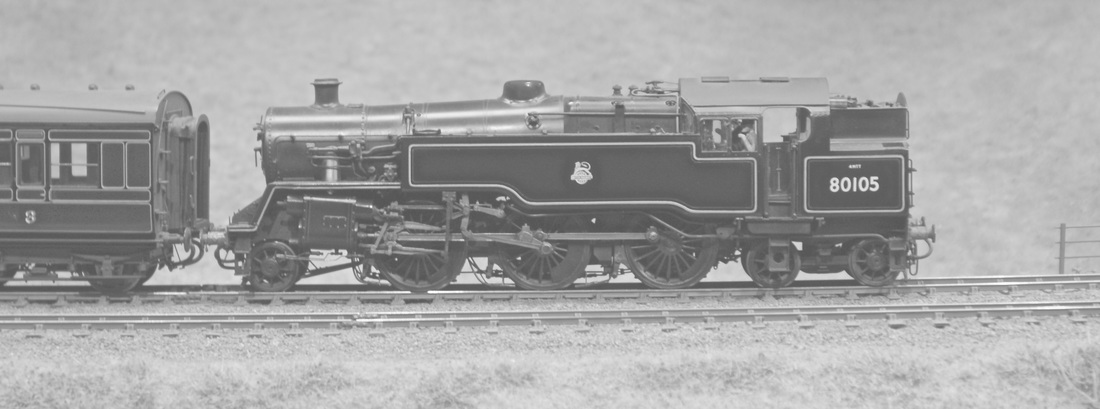
80105 is one of the smoothest runners
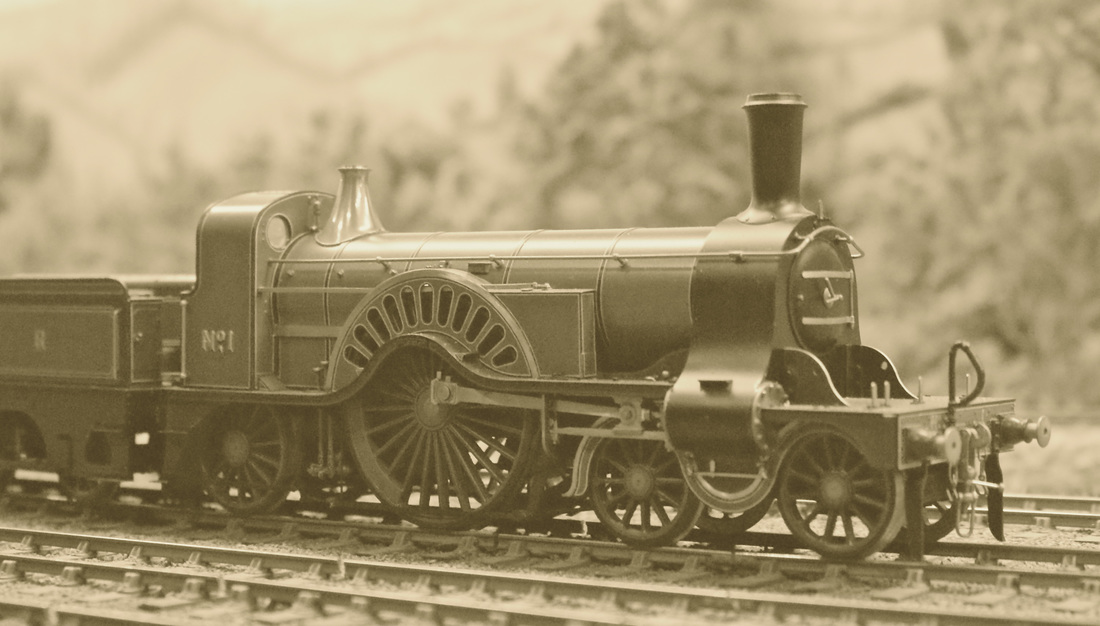
A short request run from G.N.R. No 1 and its teak six wheelers.
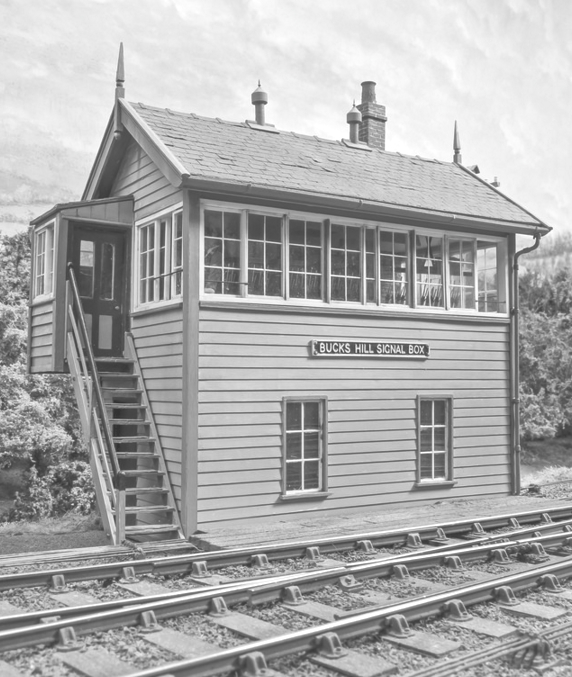
B/W of the timber signal box
Powerful front end study of Jubilee 'Bermuda'

28th July 2016
Quite a few visitors took a run on the layout at the last gathering. A pair of Jubilees have now come back from weathering, and I will probably drop the De-Glehn Atlantic off to Brack when we go to Telford.
James Aitken brought this Drummond M7 for a turn, and this will soon become a regular runner on the Princes Risborough club's Okehampton layout. These capable side tank locos were developments from the Adams T1 class.
Large Prairie takes an up local away from a station stop.
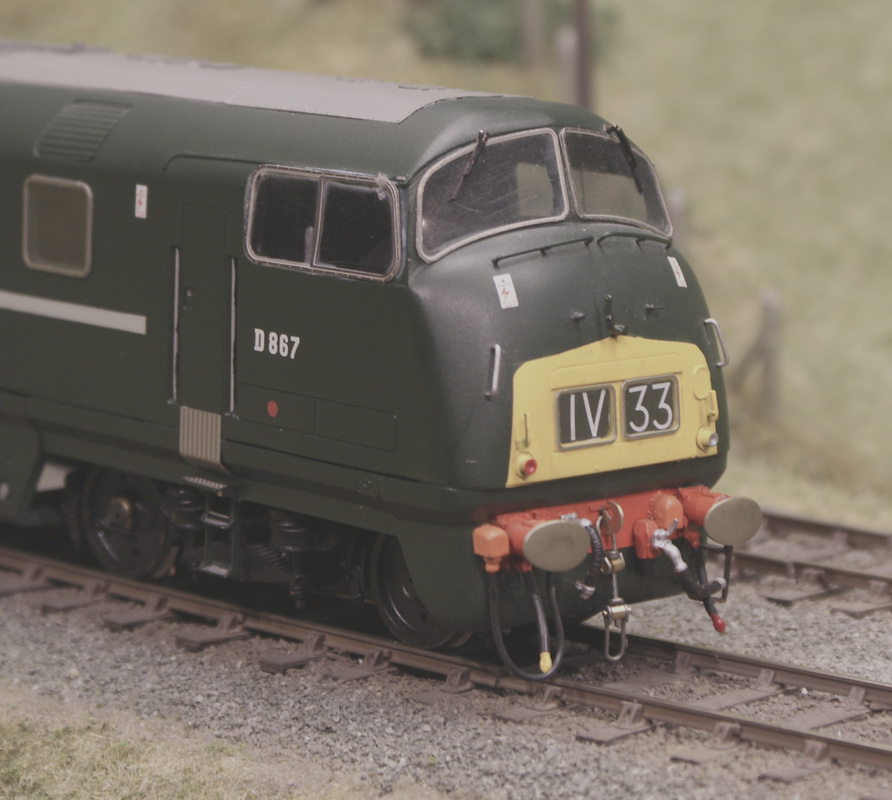
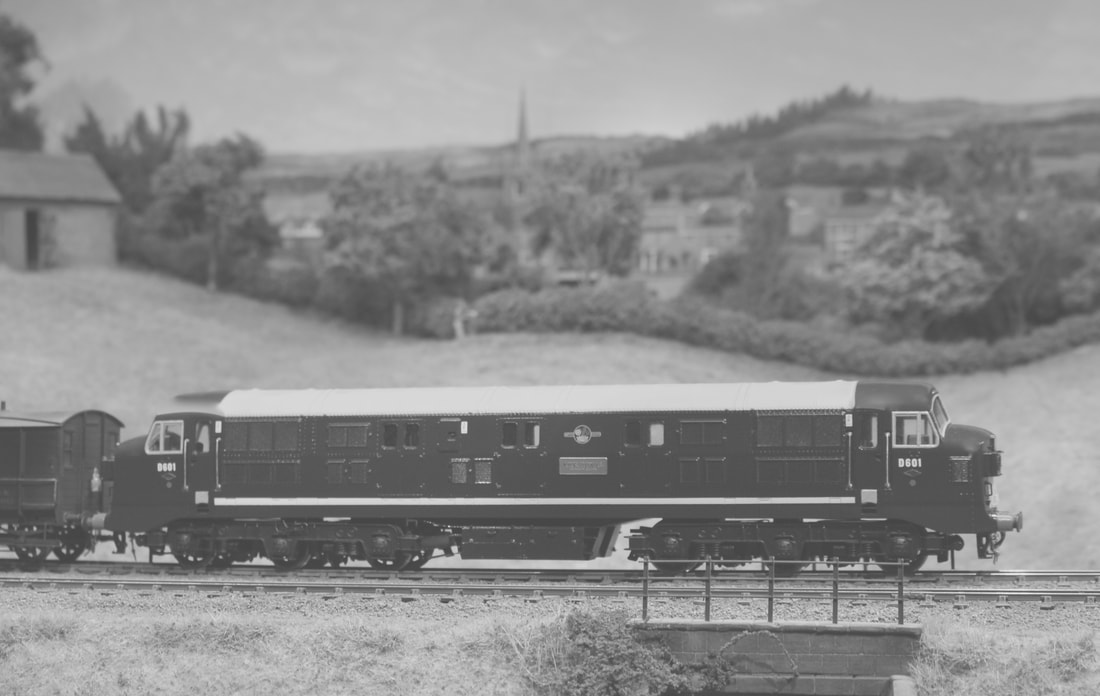
Mike Morris wanted to try out this Class 42 'Warship', and it ran without any problems, D867'Zenith' came from the second Swindon batch in early 1961, using a design adapted from the German V200 class. Twin 1135HP Maybach type engines drove Mekydro hydraulic transmissions all built under licence over here.
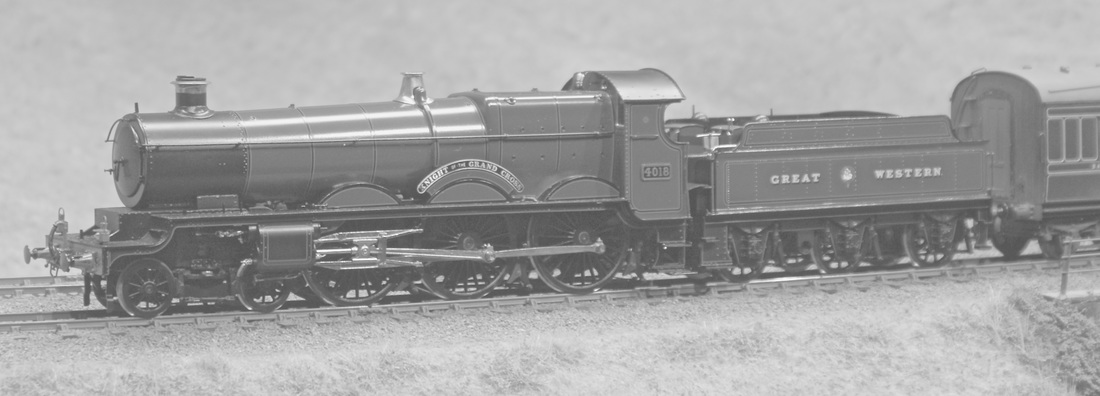
Jim Gander has quite a few in his collection, but he tried out this pristine Churchward 'Star' No 4018 'Knight of the Grand Cross'. Lot 173 of 1908 was the second build batch to produce the 73 total members and these featured a slightly improved bogie design.
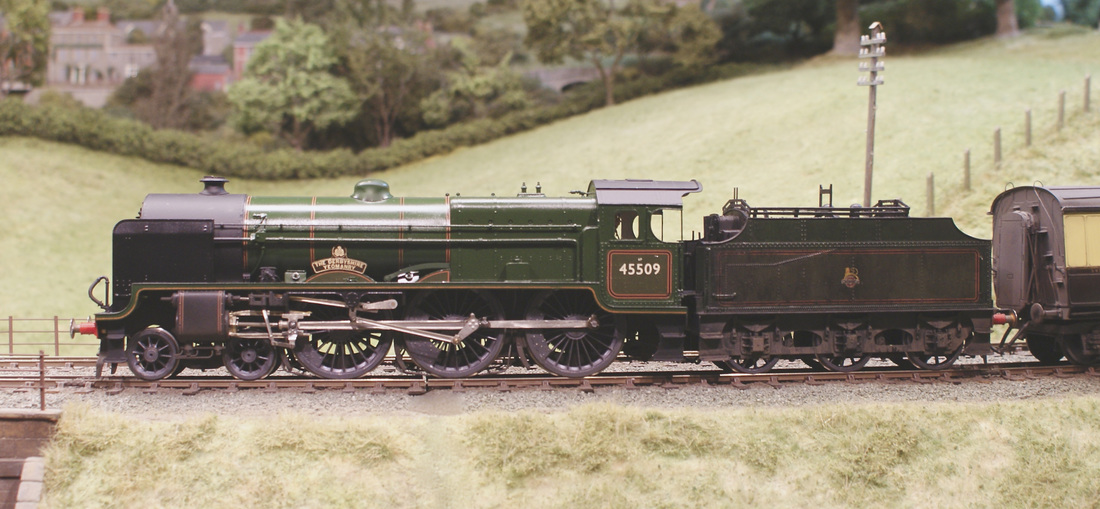
Dave Broclkehurst brought his BR green Patriot No 45509 'The Derbyshire Yeomanry' for a try. The actual loco wasn't especially popular with the shed staff at Willesden who eventually saw it transferred to Derby for general overhaul with an allocation to the nearby running shed. Unlike the original, Dave's version runs fine with a fairly quiet sound adjustment.
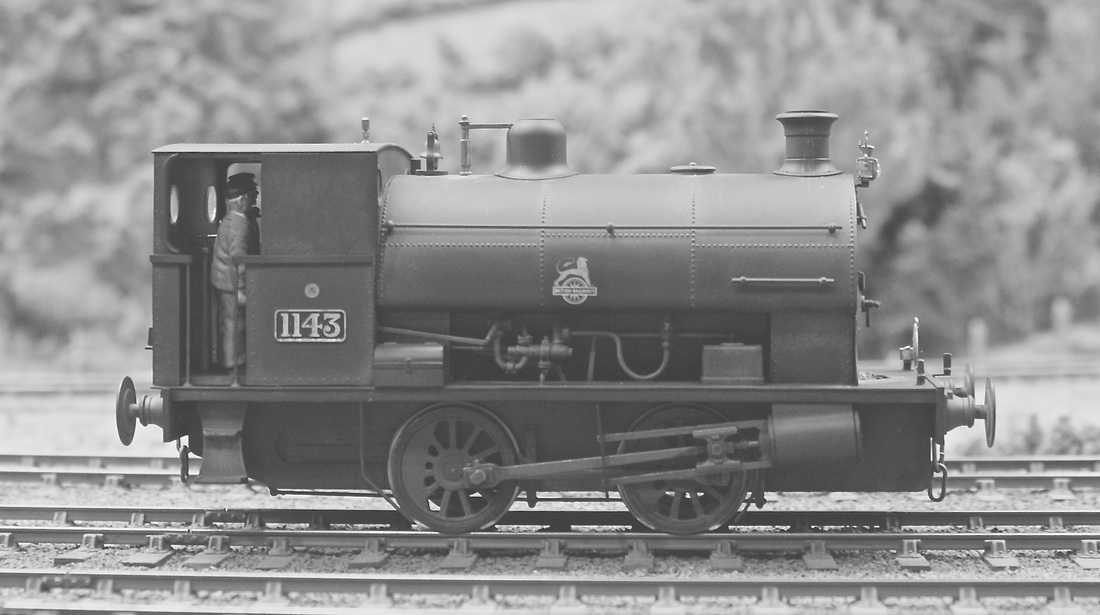
Nigel and Owen Smith's Peckett was quite loud (in a nice way) and it barked up and down the branch line for most of the afternoon. The ex Swansea Harbour Trust No 12 saddle tank was built in1908 and taken in by Swindon in the thirties, to serve right into late BR days as seen here.
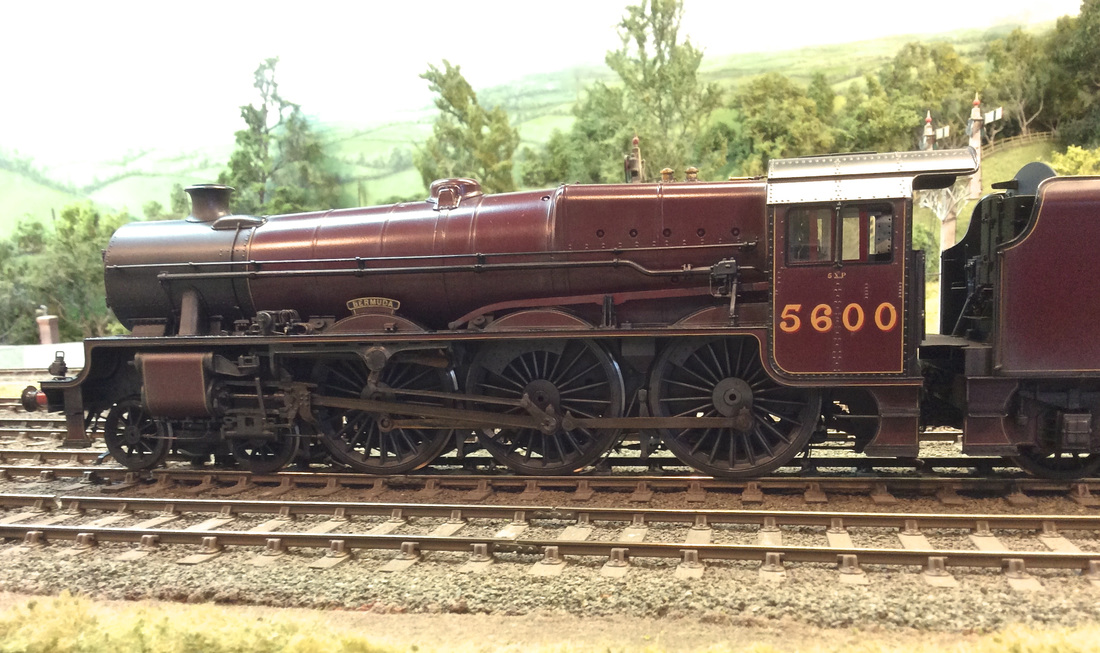
L.M.S. No 5600 'Bermuda' has now been weathered by Fred Lewis (see links page) . I am currently sorting out a few pictures for Lee's upcoming catalogue ad this might be a good one to include. Photo by Richard Chetland.
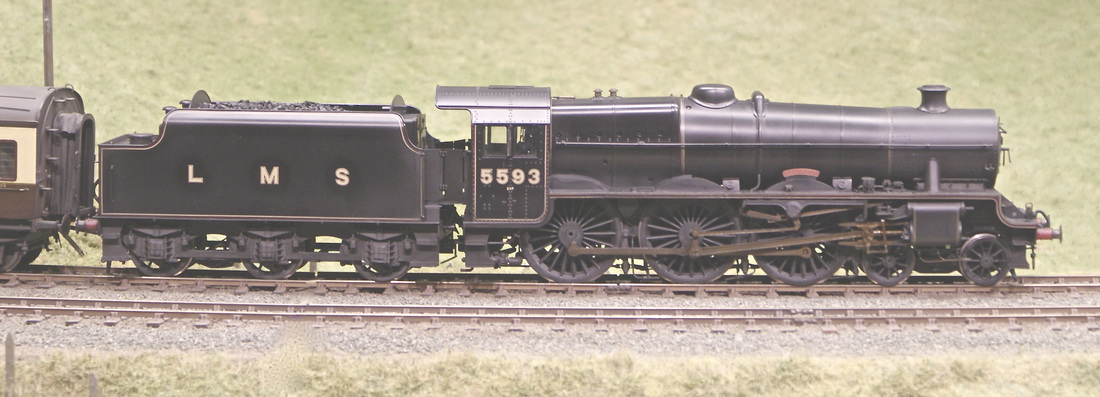
Fred has also done No 5593 'Kolhapur', and they look good shedded together.
13th June 2016
A small gathering over the weekend, with a few visiting locos taking turns and a bit of a catch up chat.
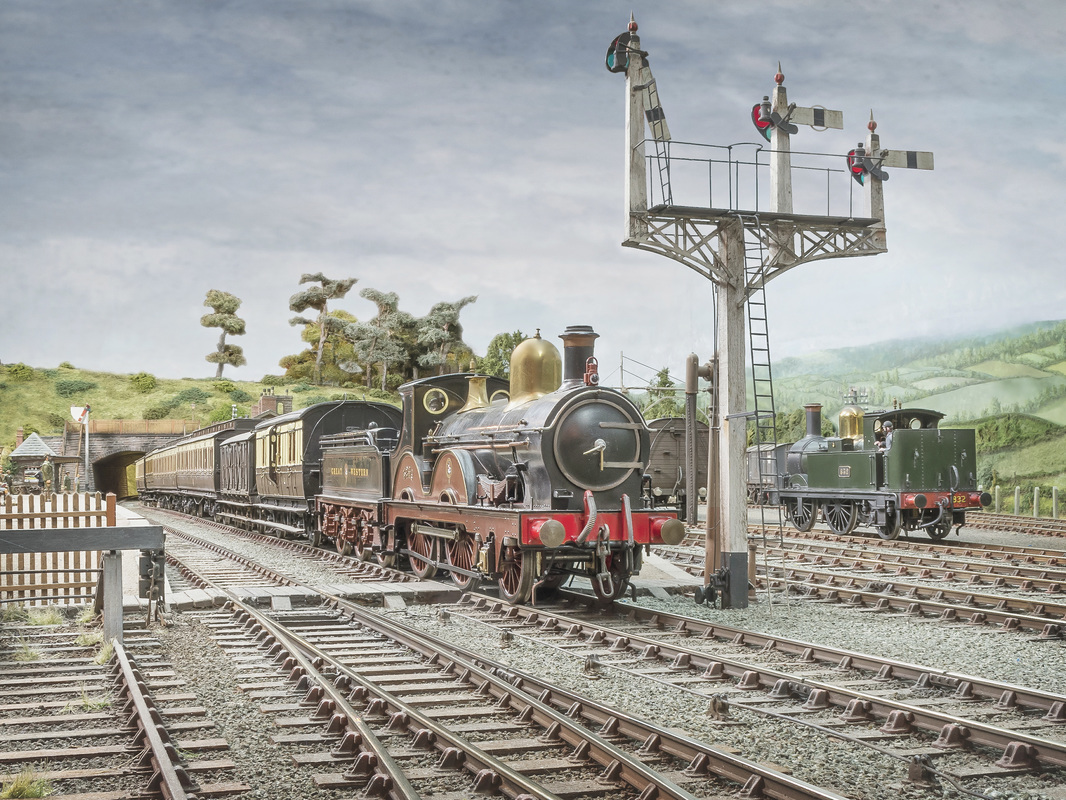
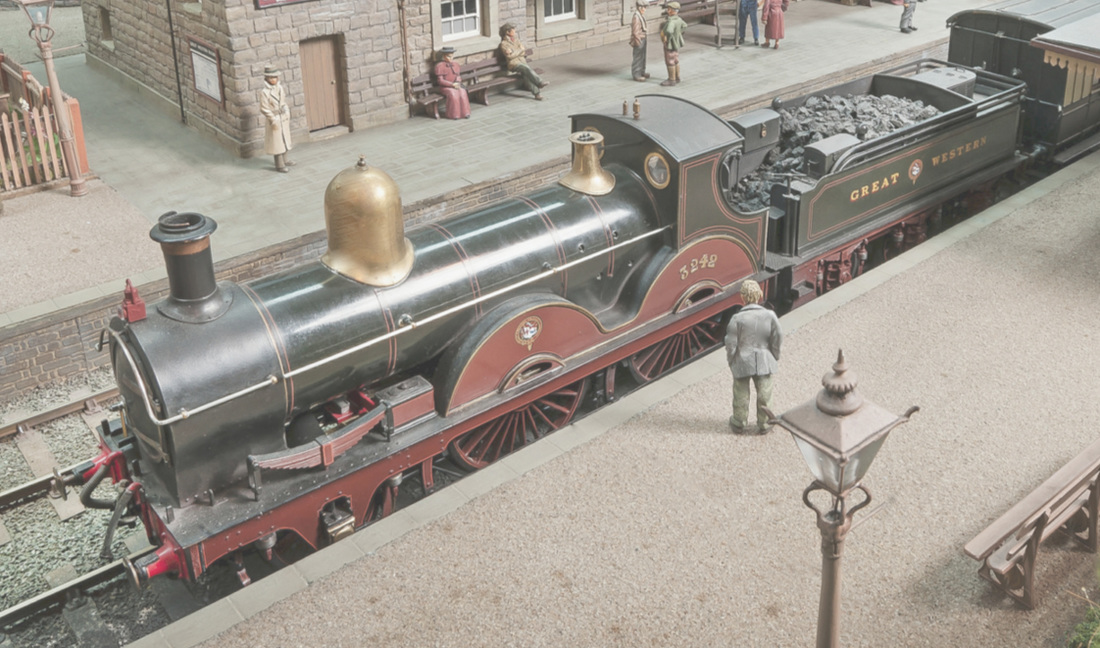
From Model Rail's Edwardian period feature, another of Chris Nevard's scale height views with regular No 3242 on the up main, and the old branch line engine waiting behind.
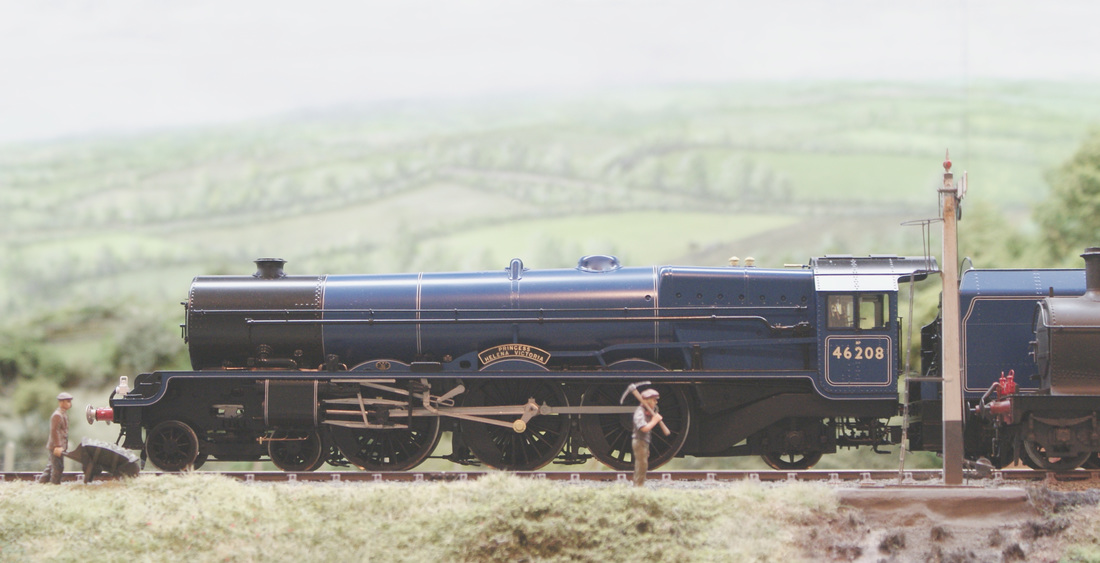
Alex Brown's Marsh Lizzie No 46208 'Princess Helena Victoria'
Ian Rathbone brought this GWR Robinson ROD 2-8-0.
24th May 2016
Some more interesting visitors to Bucks Hill, and a couple of new builds. I will get full captions written as soon as I can, and don't forget the 'Art of Modelling' feature coming out in the next day or two.
One of the brilliant Chris Nevard pictures in the feature.
A 47xx "night owl " from a Finney kit. Unknown origin build, now owned by Jack Anziani
A Castle built by by Phil Gomm from a Malcolm Mitchell kit, with AGH wheels and a Hawksworth tender. This is a running turn prior to painting.
A train of milk tankers, also by Phil Gomm pulled by a Finney Hall.
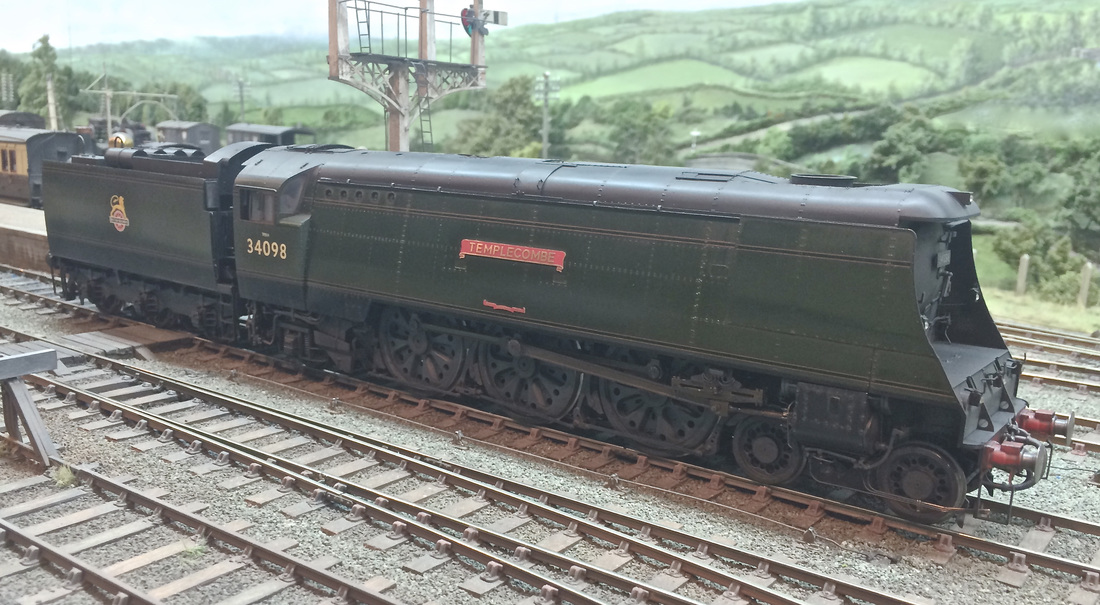
West Country Pacific 34098 'Templecombe' made by me from a Finney kit. It has an ABC motor/gearbox, and was painted by Ian Rathbone with weathering by Fred Lewis.
Made by Geoff Holt from a David Andrews kit this elegant Robinson 4-6-0 is one of two that featured in his book, the other being a scratch built example. He was 84 when he built it. Painted by Alan Brackenborough and now safely in Jack Anziani's collection.
My latest item of rolling stock, a 62' 6" Mess and tool van built from a Blacksmith kit. It uses CPL couplings, grab handles and buffers. Painted and weathered by me.
Phil Gomm's Martin Finney Hall.
6th May 2016
I will be adding stuff to all the pages over the next couple of weeks, because after a few mentions in the O Gauge guild, magazines and other websites, the level of interest has increased substantially.
The MOK De-Glehn Compound Atlantic is practically ready for painting now, and the chassis runs well but it's a bit too soon to video it in one piece because some of the valve gear has to pivot from the reverser crank above the running plate (as seen between the splashers).
The Nord version is available from MOK as well (see link below). What appears to be a top feed in front of the dome is actually an lagged external steam pipe.
It was mocked up with Slaters, but the chassis now has brass Harris type wheelsets.
Back to 1903 as a new De-Glehn takes to the rails. No 102 'La France' actually spent the first couple of years painted black, but this one will be going straight into lined green.

This fairly recent addition to the stud is a BR Class 4MT 2-6-4T, and it's also an MOK build. The original survives at the Bo'ness & Kinneil Railway near Linlithgow on the southern shore of the Firth of Forth.
http://www.bkrailway.co.uk/
http://www.bkrailway.co.uk/
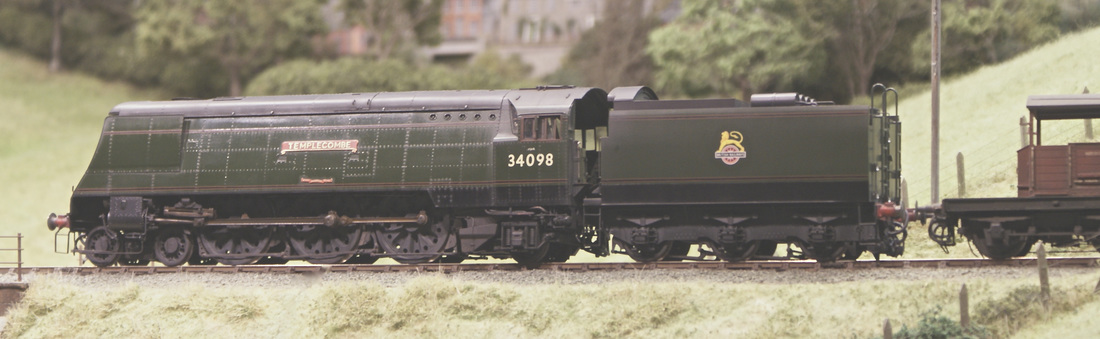
Unrebuilt West Country No 34098 'Templecombe' rounds the end curve with a Southern bogie brake van. This has just come back from a weathering by Fred Lewis at the Welsh wizard loco works. The loco never wore Southern livery coming out of Brighton Works at the end of 1949.

Whether you prefer Flying Pig, Doodle Bug or Mucky Duck, most will agree that these utilitarian moguls were not the prettiest design. It's my build of the MOK Ivatt L.M.S. Class 4 kit, seen here as 43059, which was built along with the other 162 in the first few years of BR. Fred Lewis has weathered this one for me as well, and you can find his gallery in the links page.
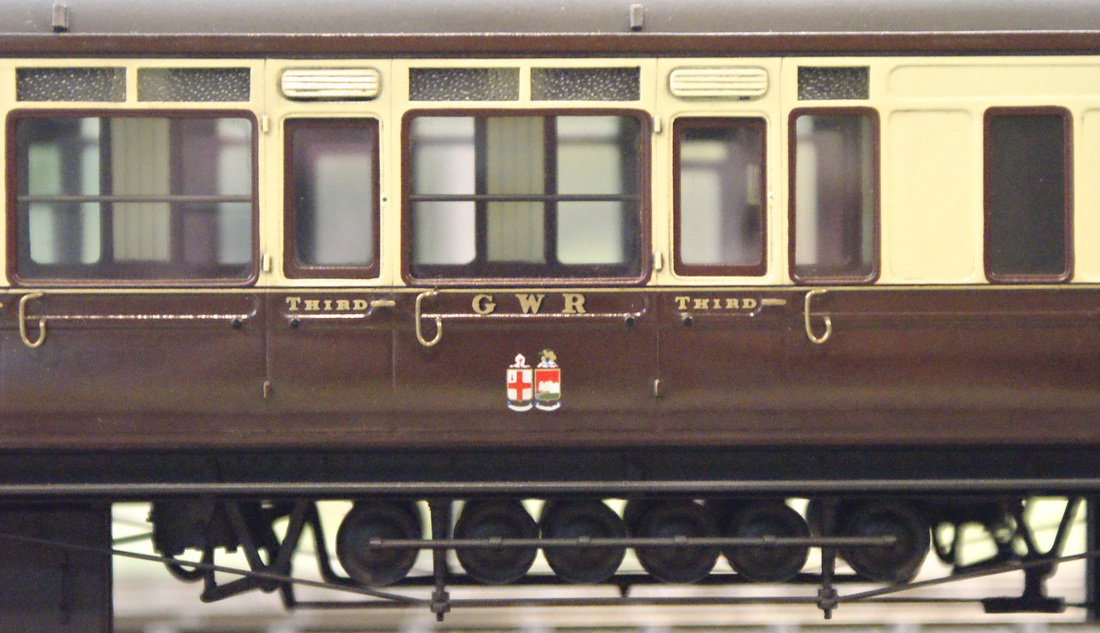
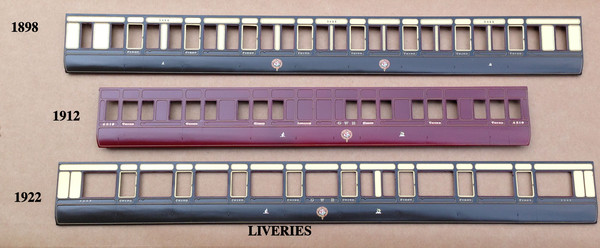
There are still a great many portraits and details of the G.W.R. carriages, so that will be the next page to get attention. This is Dreadnought corridor third No 3659 in the later thirties livery. A set of Dean bogie clerestories will soon be coming from Lee and we can then make a longer Edwardian train for the main line.
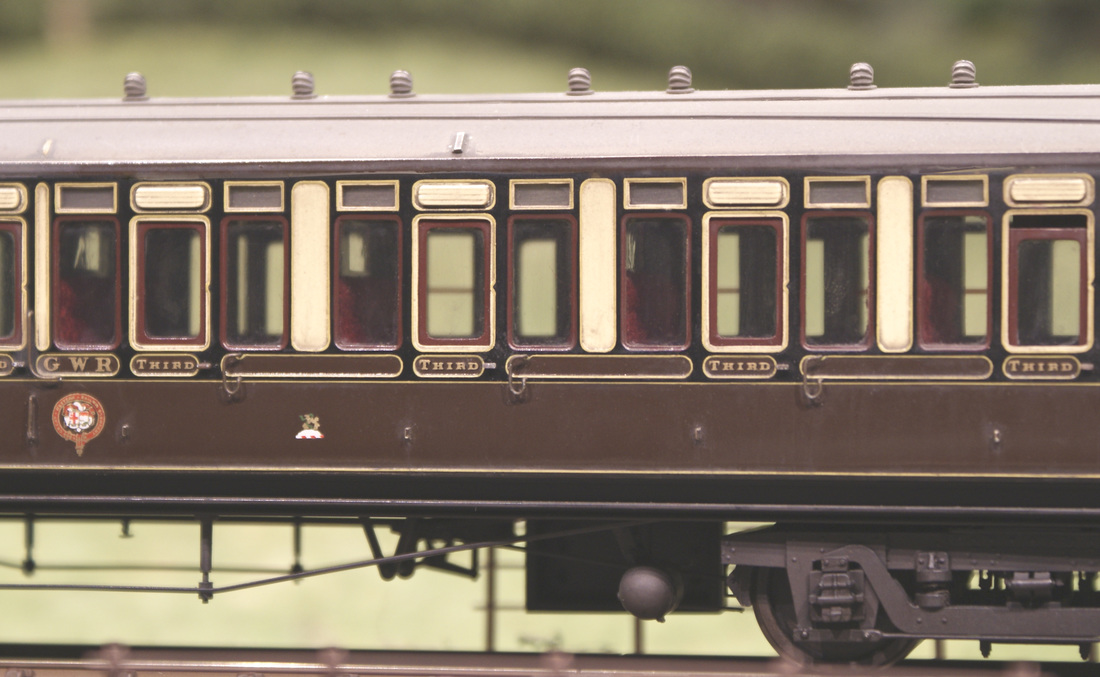
Churchward Toplight Corridor Brake third No 3542 in the early garter crest livery.
The backhead of the JLTRT dub dee 2-8-0 is done. This pic shows it without the regulator handle.
This photo has now appeared in the May issue of Model Rail magazine which concentrates on stations as its theme. It's one of a series of pictures using some of the Edwardian stock, staged using period reference, with double headed combinations and mixed trains. Chris then chose the viewing angles, and the special edition will come out on the 26th of this month. I hope you like the set ....... Original by Chris Nevard
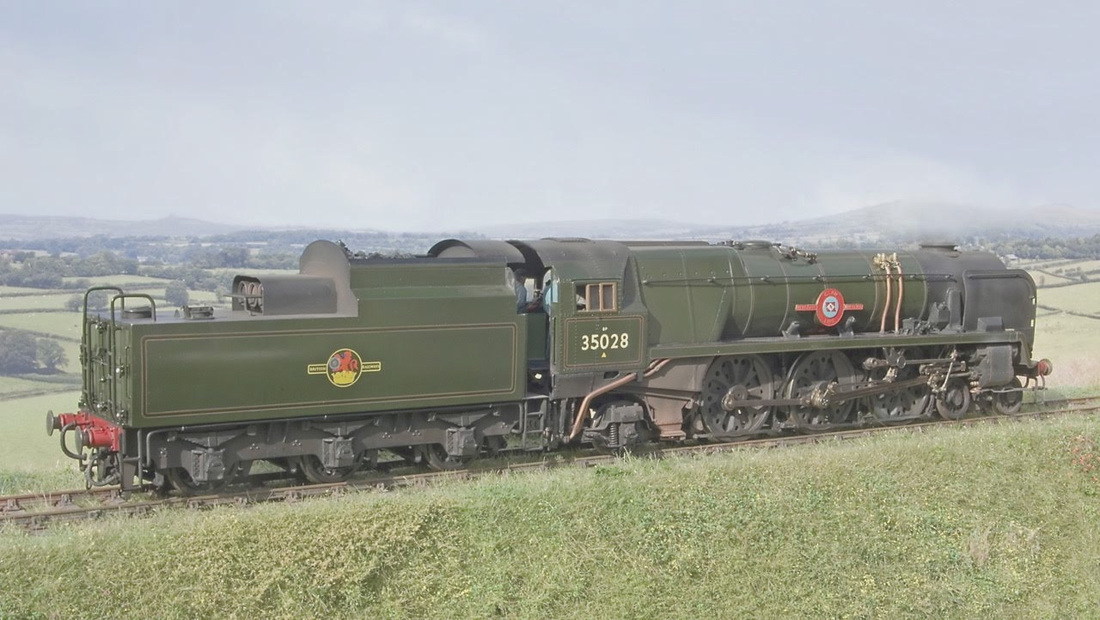
Martyn has made a fabulous job of my rebuilt MN No 35028 'Clan Line' and his latest work can be seen via the links page, where many of Bucks Hill's regular runners do appear in the older gallery archives. He is also building a new layout, so that will definitely be one to look out for.
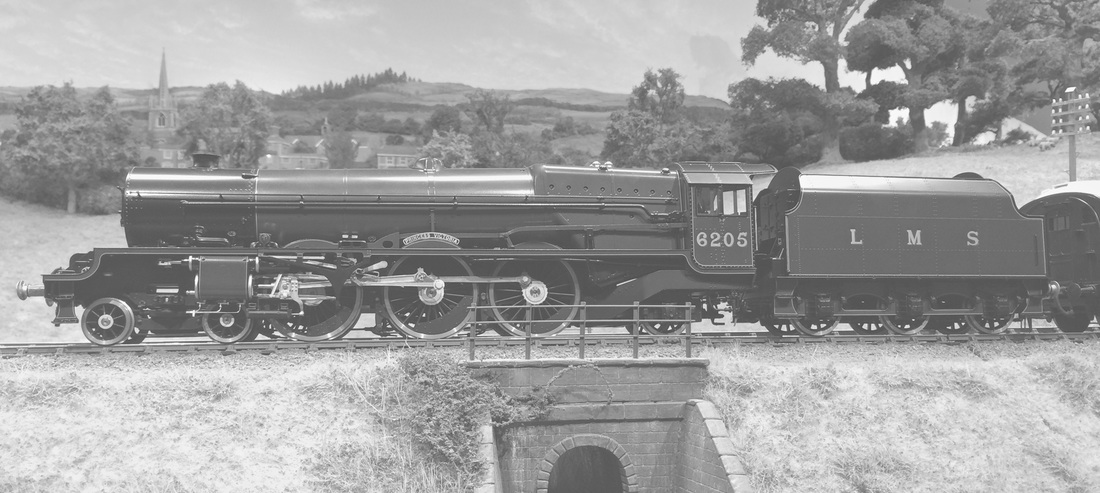
A number of Lee Marsh Stanier Princess Royals have now visited and they are quite happy with the heavy passenger rakes, mine is coming soon in the lined black livery. Have a look at the project page of Lee's website from the links page, and you can see how the different variants and liveries are produced. Here No 6205 ‘Princess Victoria’ passes Ewyas Harold with a L.M.S. passenger train. The pristine locomotive is seen in it’s mid 1930s condition, wearing the lake livery.

This Dean ‘Kruger’ was built by Simon Hill, with the customary level of detail that he always includes. From the more lofty viewpoints, the reciprocating rods working between the frames are quite visible on these. 2602 was the prototype for the 2-6-0s and was built in 1899, but none of them lasted very long, due to a series of reliability problems including the long 28″ internal crank throws giving trouble with axle breakages.
Most of the projects are additions to the collection, with workshop time on kits and quite possibly a few scratch builds coming up like a 'County' tank for instance, but even though the layout is done, new visitors still take an interest in the scenic work and the backscene. There might be another article from Railway Modeller using digital panoramas as a basis for landscape projections, and this overlay shows how Bucks Hill's Ewyas Harold section fits in.
Another job that needs doing away from the Great Western stock is to photograph the other carriages, and while there isn't room to do every one, it's definitely time for some more detail views. We can do a session of bringing the rakes out onto the layout on a non running day.
17th February 2016
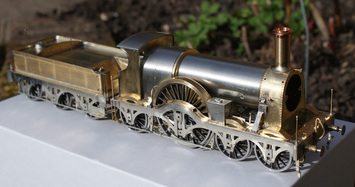
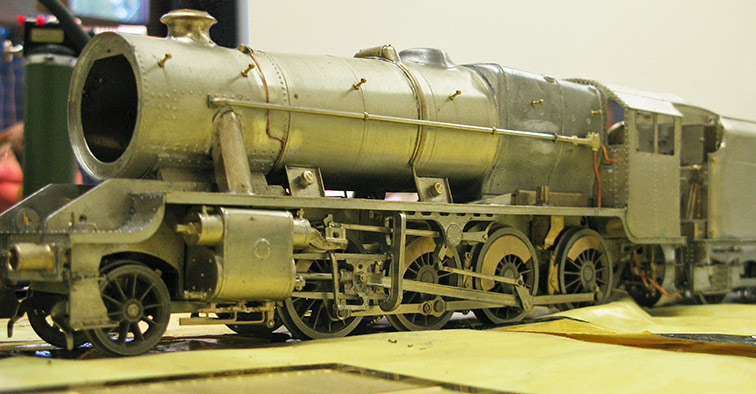
The Bristol show went well again, and I picked up the broad gauge 'Rover" from Brack. He has excelled with this one, so I'll let the pictures give you some idea. Martin Finney designed the kit to be broken down into sections for painting which given the livery is a godsend. This system avoids a lot of difficult masking.
The wheelsets for the De-Glehn Atlantic are here so I can now make progress.......
The crank pins are fitted....
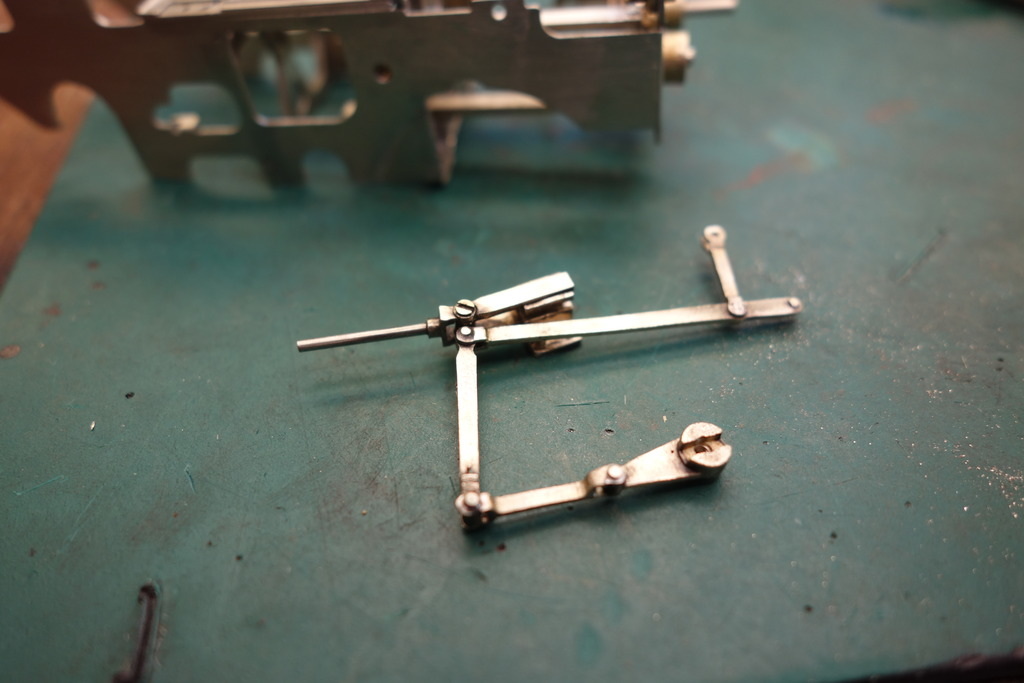
The inside motion will be apparent from this angle.
The WD 2-8-0 also has it's wheels now so it's also ready for the next step...
Cylinder wrappers are done, valve gear, brake hangers and motor..
29th January 2016
The next project could well be a City Class 4-4-0 from a Martin Finney kit. It's an obvious missing link so why not have a go.
Chris Nevard has taken a set of staged photos for Model Rail Magazine. They will be ready soon, but it's too early to know when they will appear, at some time later this year is all we know.

The subjects will be from the G.W.R. Edwardian period to make a bit of a change.
We will be attending the Bristol show at the weekend, and I will be bringing some of the M.O.K. kits along, as well as keeping Lee company on his stand. I'm looking forward to picking up the newly painted components of the Rover 4-2-2 from Alan Brackenborough, (needs a slightly wider stock box).

I have reserved a set of Lee Marsh clerestory carriages in the early livery, but bear in mind there are options for later periods, rake couplings and passengers as well.
Original photo; Steve Flint/Railway Modeller
There are now many livery variants of the Princess Royal limited run, and one has already taken the heavy L.M.S. Royal train around Bucks Hill (see the movie page for a better look). Photo; Lee Marsh Model Co
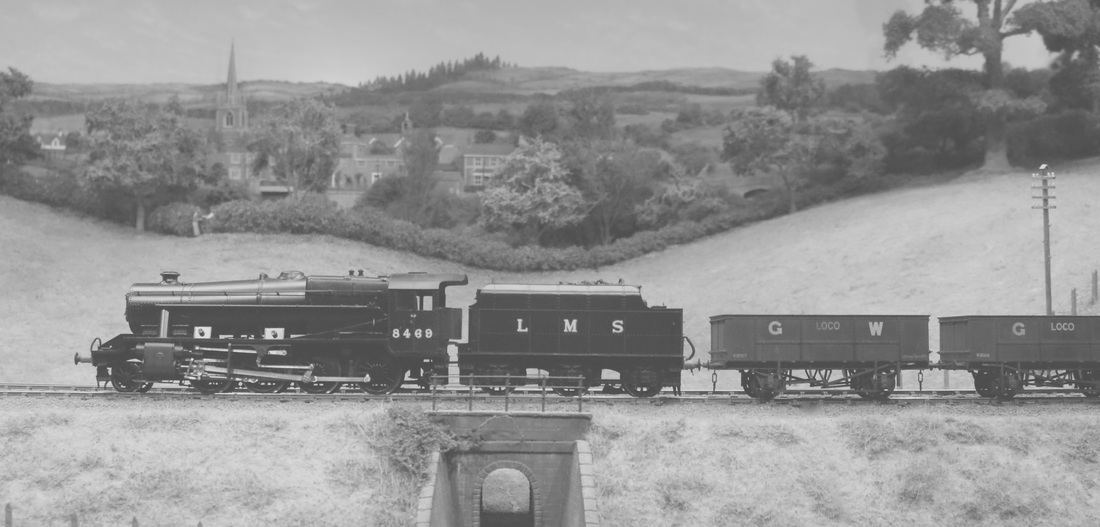
This was at a recent running session and I'm pleased with the M.O.K. 8F, It's very smooth and just needs a crew and a bit of weathering now, a normal 'in service' goods look, nothing too much. It's done in unlined black as L.M.S No 8469, and it just needs a few finishing touches. I'll include a portrait in the 'Regulars' page when that's done.
16th December 2015
Quite a bit going on at the mo, so here's a catch up....

Now the Reading show is over, I can get a bit more done on the De-Glehn Atlantic, until the next show at Bristol University anyway!
Some new pictures have been included in both 'Visitors' and 'Goods stock', so please re-visit these pages to see the latest additions.
Some of the goods stock is brush written and I'll put in a few portraits from time to time.

I now have crews for the Lee Marsh bogie single, and the Armstrong 4-4-0, moulded to fit by Andy Stadden.
A gathering took place yesterday, with a good turnout and a host of visiting locomotives practically queueing up to run. A most enjoyable get together, well worthy of a few pics.....
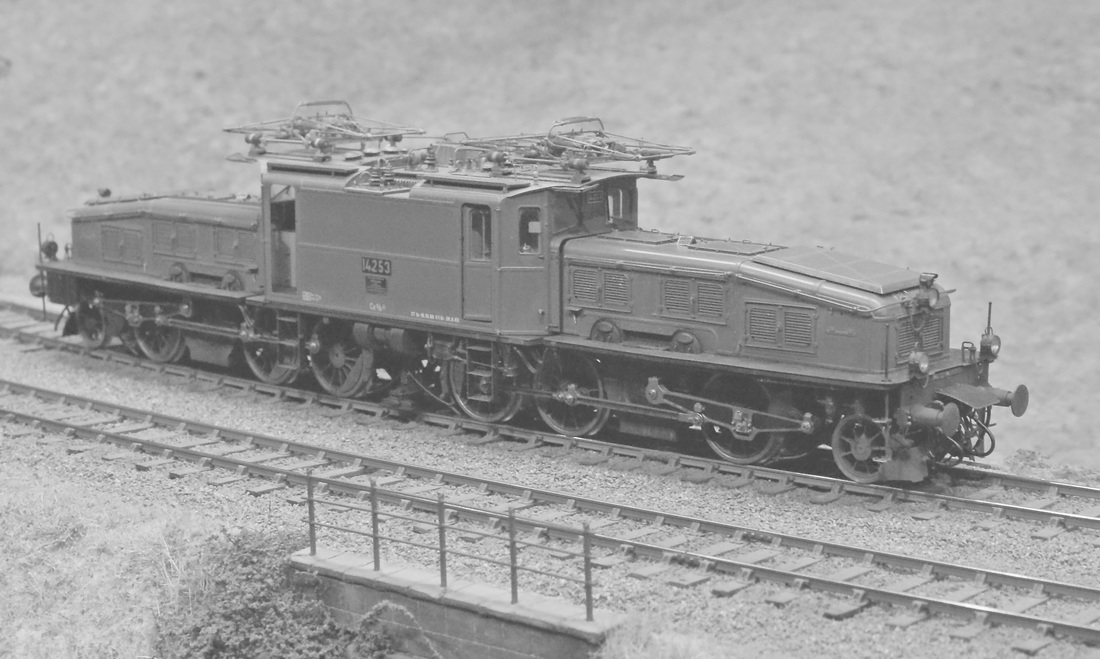
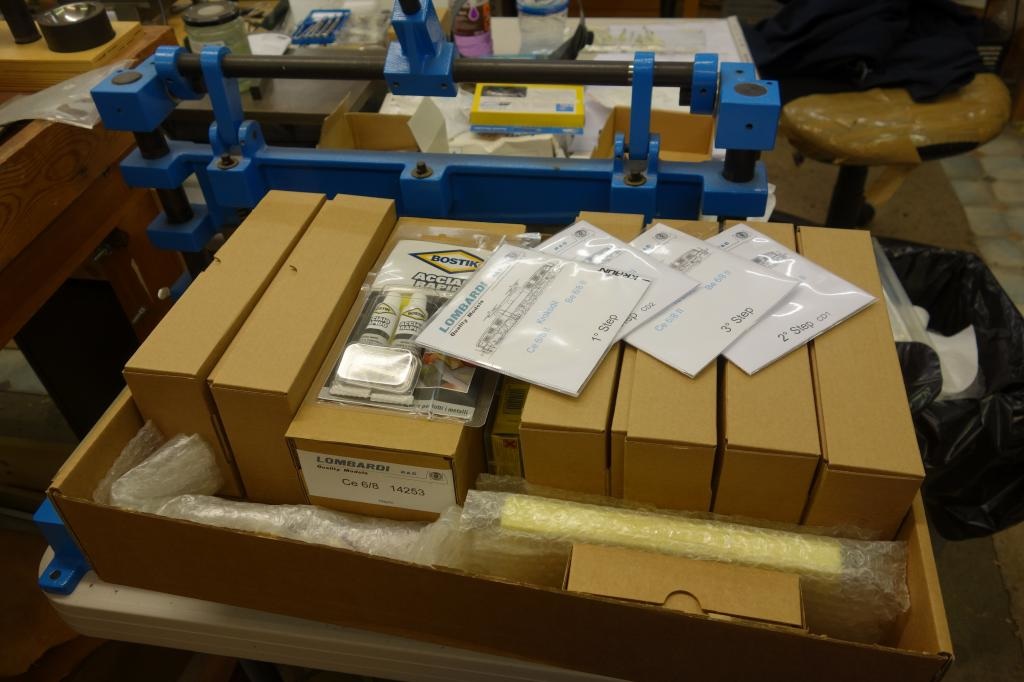
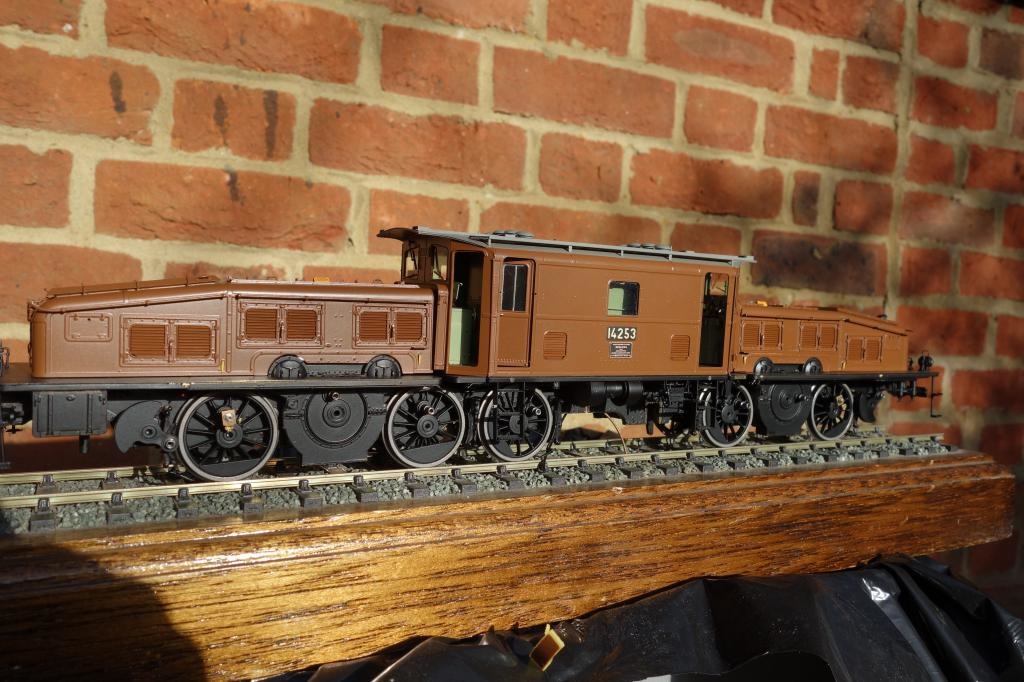
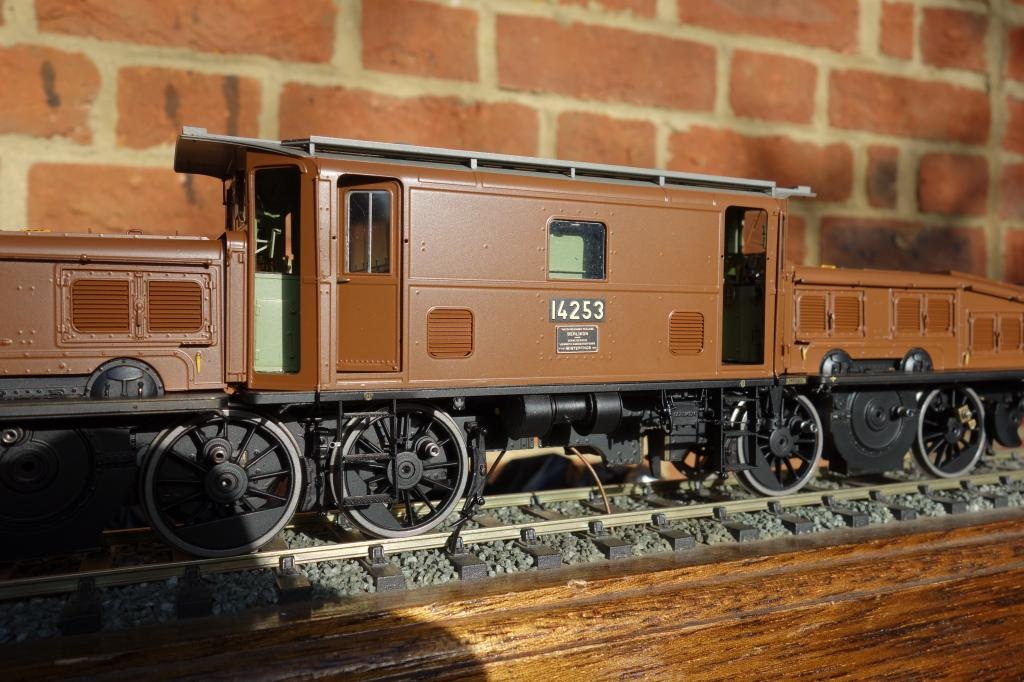
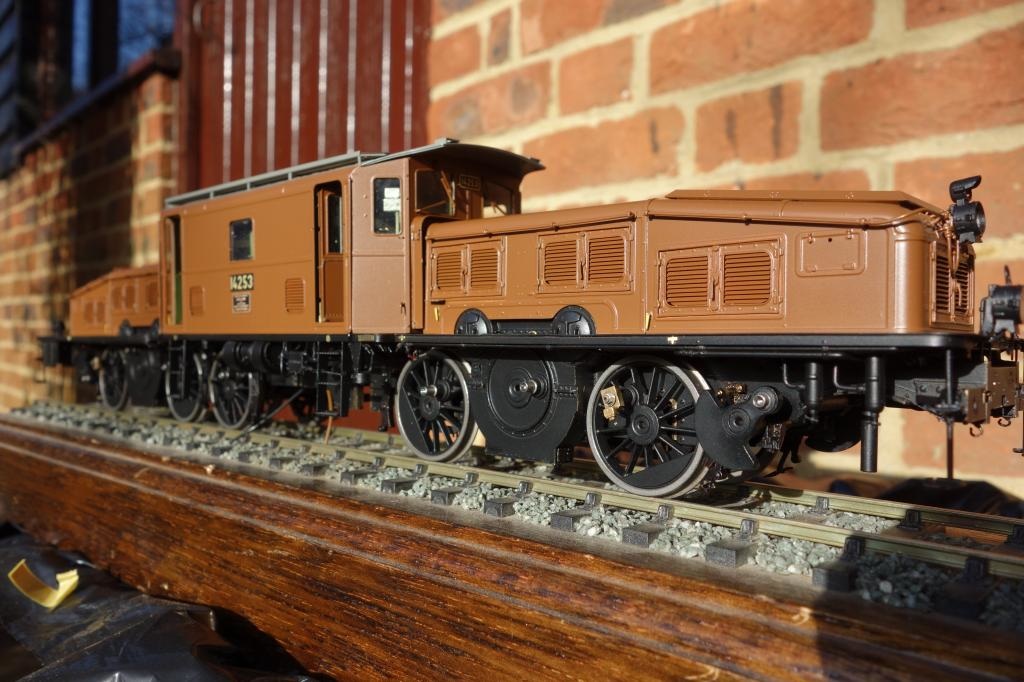
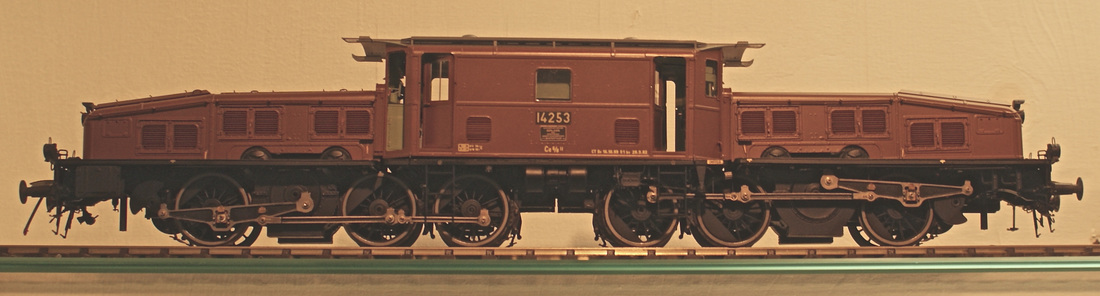
The Lombardi Kroc is done, but it needs to have its DCC chip fitted before it can run or raise it's pantographs. If you are interested in these Italian electric locos, make sure you don't miss the astonishing scratchbuilding work of Attilio Mari
Attilio Mari
Jonathan Marcus brought a superb rake of L.N.W.R. carriages to form a Holyhead express. (see detailed captions in the 'Visiting' page soon).
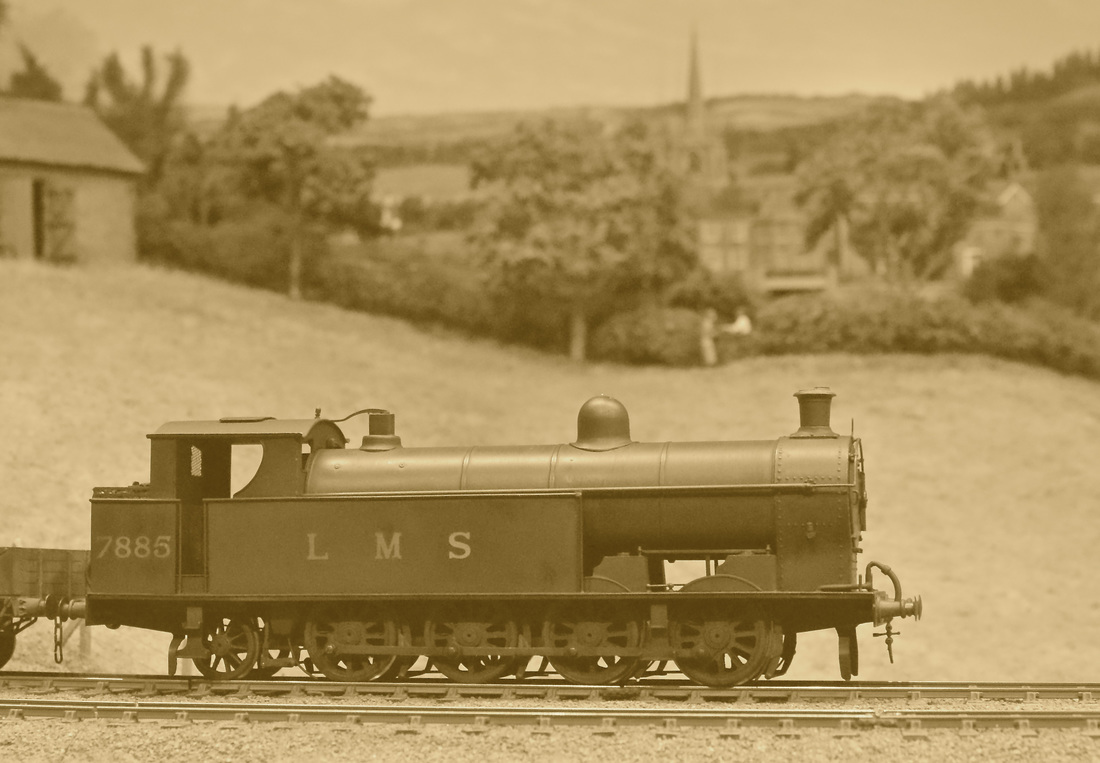
Jack Anziani brought this ex North Western 6F-A 0-8-2T No 7885 which was essentially a Super D side tank. The Bowen-Cooke designed workhorse was built at Crewe at the end of September 1915, with Joy sllde valves and 27,240lbs of tractive effort.
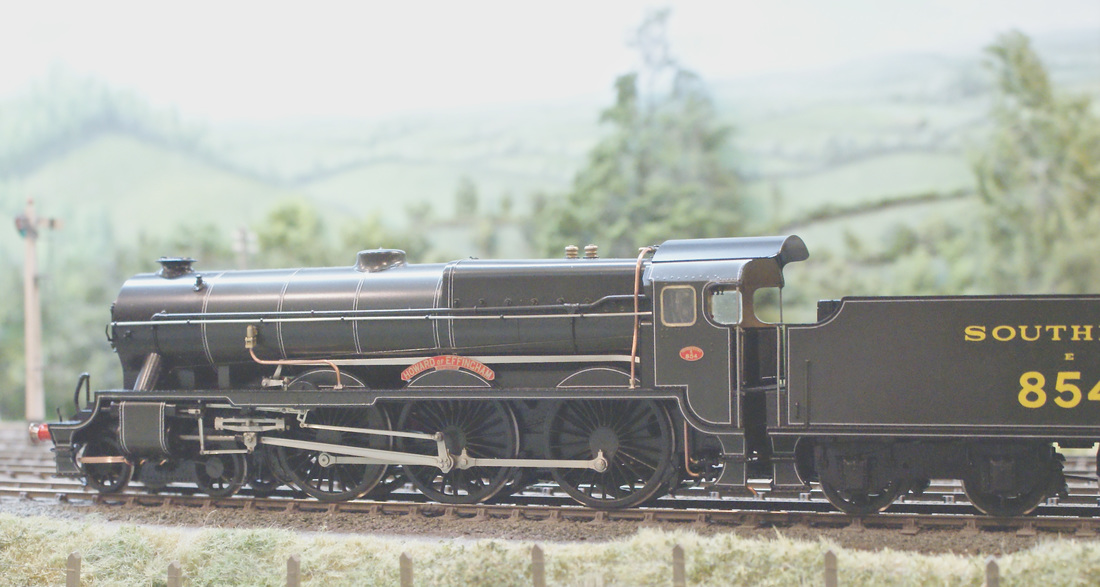
Simon Hill has just recently finished his very fine Maunsell Lord Nelson class No 854 'Howard of Effingham', seen here in the original 1926 small chimney condition. The build time was 300 hours, from an Iain Young ‘Sanspareil’ kit. Simon machined the Alan Harris wheels and fitted an inside crank and valve gear.

James Aitken's Drummond T9 4-4-0 heads a Great Western corridor rake along the up main. This ex L.S.W.R. greyhound was built by Dubs & Co in summer 1899.
10th December 2015
A new Youtube clip has been added to the movie page, with one of Lee's Stanier Princess Royal pacifics making light work of the heavy L.M.S. Royal train, and an express rake in lined 1930s crimson lake livery.
28th November 2015
A good deal of activity lately, with many projects running simultaneously. Some more magazine feature content is due in the new year. but firstly thanks go to Steve Flint and the editorial staff at Railway Modeller Magazine for including a mention of the newly expanded sections of this site in their Newsdesk section.


Chris Nevard has just confirmed a date in the early new year to photograph some of the late Victorian GWR stock for Model Rail magazine. This will give us a perfect excuse to include some of Lee's 1898 carriages in period. and also to showcase some of the older locomotives for something a bit different.

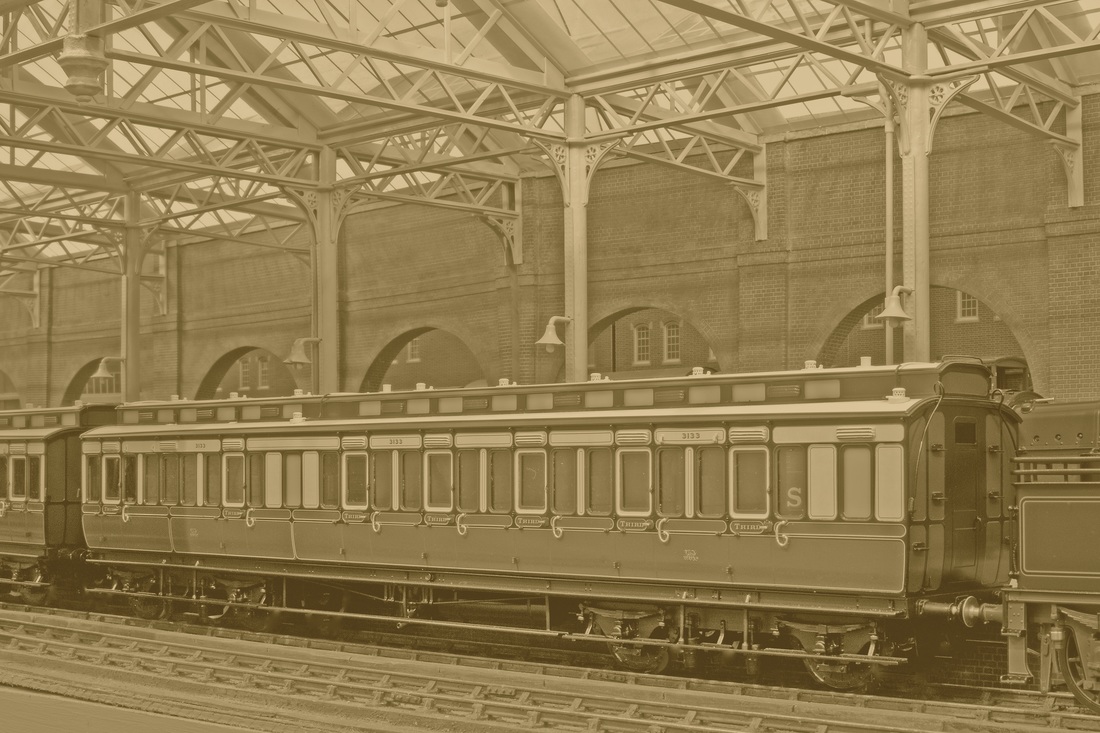
1898 Clerestory No 3133
Both the recently built Ivatt mogul, and the Stanier 8F are now done and tested, and they are with Fred Lewis at the Welsh Wizard Loco Works for some medium weathering (see new link). Pics of these in service on the layout ASAP, and regular appearances on the MOK trade stand next year.
The Gooch 4-2-2 is also away, this time with Alan Brackenborough for paint and lining, and this goes some way to freeing up workbench space.
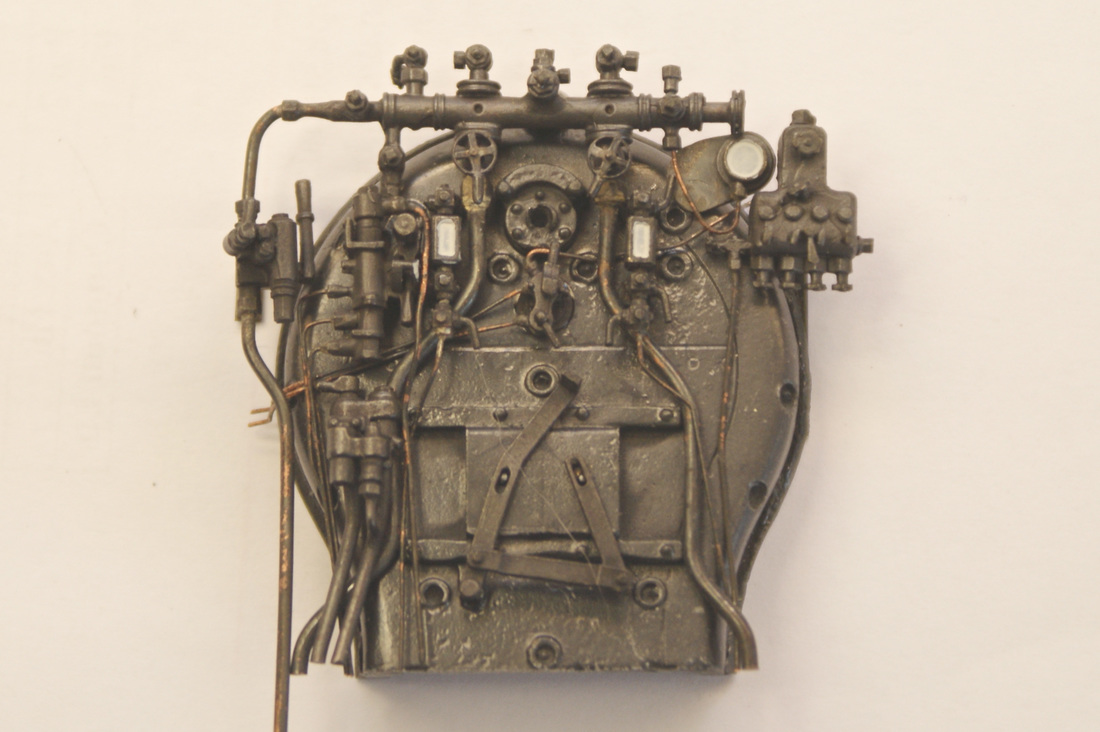
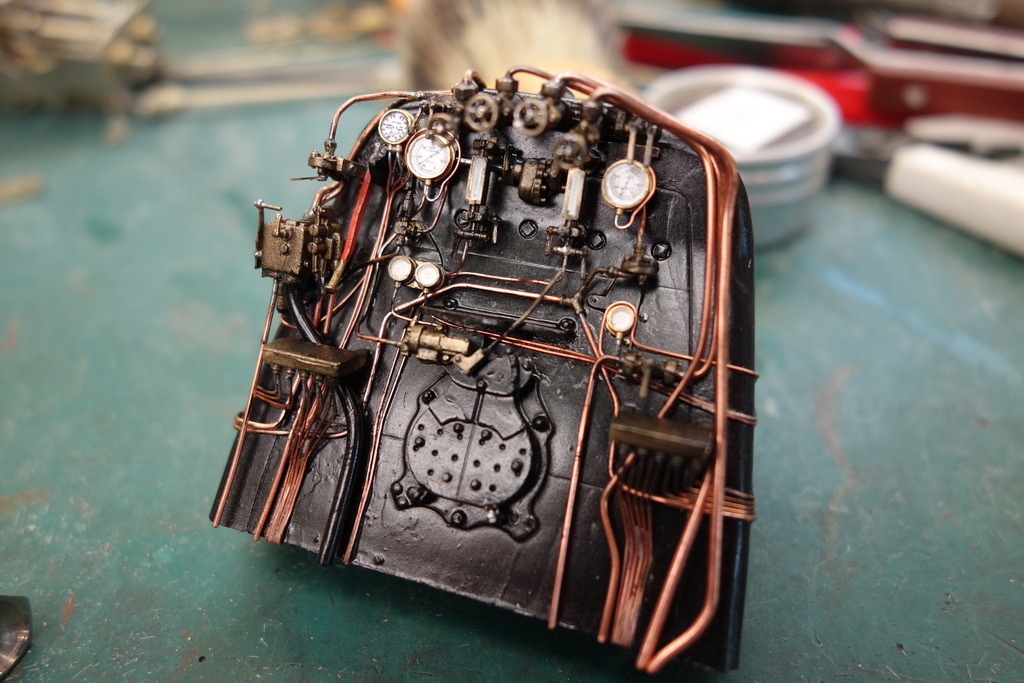
As a bit of light relief I got around to doing the gauges on the West Country backhead unfortunately I couldn't get dials for the smallest ones, a bit of weathering needed to finish it off.
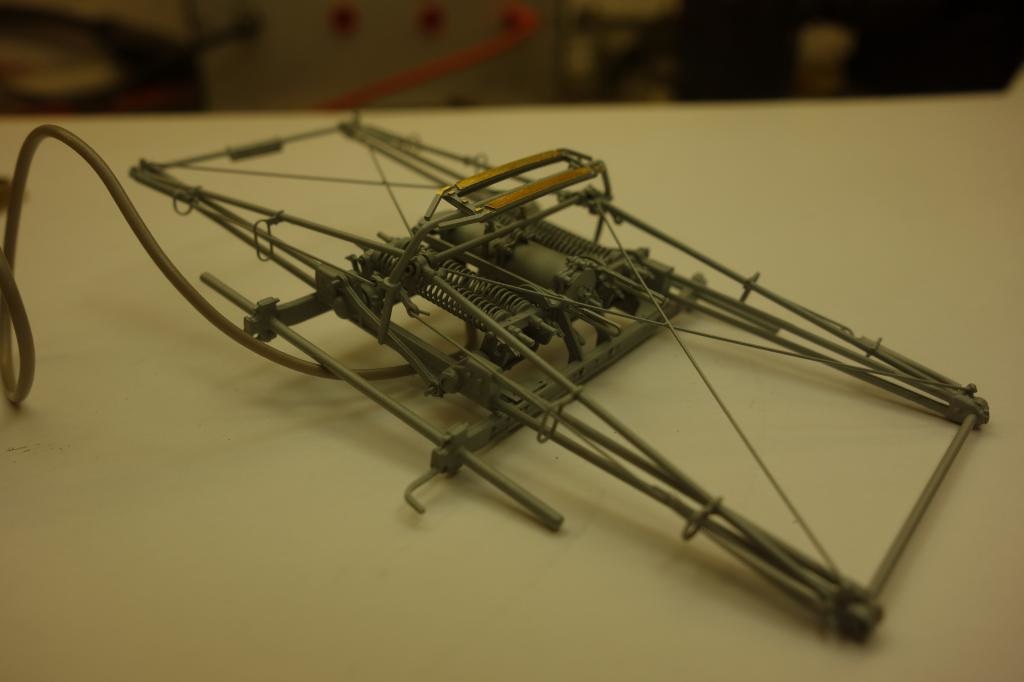
M.O.K. De-Glehn Compound Atlantic beginning
The Kroc is sitting on a shelf waiting for a chip to come from Italy, the first one gave all functions apart from sound and the second great sound no lights! So a perfect excuse to open a new box, and I thought I'd give the MOK compound a bash.
The frames and spacers are more hole than frame... scope for therapeutic cusp removal! As is Dave Sharp's normal custom accurate construction is aided by multiple slots and tabs, this is particularly helpful in getting this chassis straight because there is a massive gap in the spacers to accommodate the cage for the inside valve gear. Nearly all of these tabs are covered by the overlay.
If your iron has enough clout I find that if you apply heat next to a tab on the outside of the frames having applied flux to the inside as well as the outside solder will be drawn in and along the seams keeping cleaning up to a minimum.
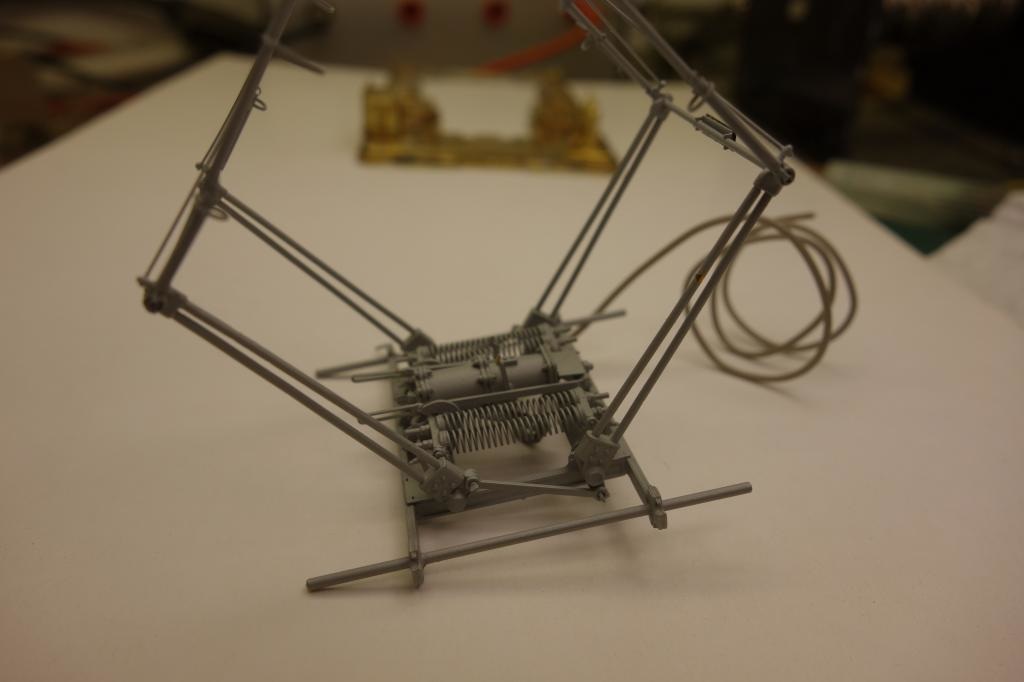
The inside valve gear pinned together, everything that must remain free of solder is blackened with gun blue, anything blued will not solder.
The cage is a tight fit in the chassis and the gear is a tight fit in the cage. There is an option to tap 14ba the bits of the gear that allow complete removal, this is worth the effort.
lifting links added.
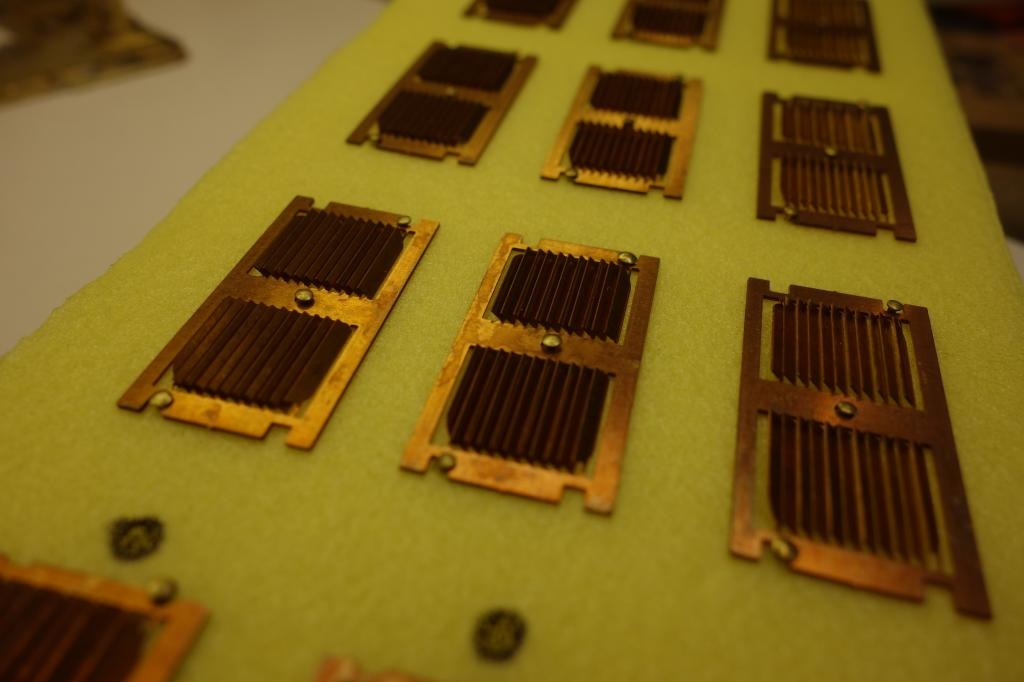
Quality of the castings is good.

The outside valve gear is pretty much a replica of the inside however I hadn't got far when a wee issue arose. The very delicate motion bracket didn't seem to fit into it's allocated place on the frames, there is a spigot that goes through the frame and forms the pivot for a brake shoe. This was 3mm out of line making it far too high. A quick call to Dave Sharp soon established that an incorrect master had been used and there was a strong chance that all kits would be incorrect. The photo shows the two types the one on the right being the correct one. Dave asks anyone with a kit to make contact and when the new castings are available he will send them out pronto.
Correct item in place along with the sllde bars, these are castings which need truing up as they get a tad twisted out of the mould. They need to be spot on parallel,and to be honest I farted about for some time getting a bit hot under the collar before I realised that the top sllde was not parallel to the top of the chassis and the cranked angle of the bar that needed bending more,once brain was in gear things got easier. Care needs to be taken though because cross head has v shallow guides so margins are small.
The arm on the cross head screws on from the rear using a turned and tapped collar provided, this allows removal.
Outside gear almost finished, the expansion link is threaded allowing removal of the complete valve gear without having to undo the return crank, the lifting gear is also tapped to get the body off.

A start has been made on the footplate, this is s pretty floppy affair. Strengthening plates are provided on the etch to be soldered on temporarily, even so it pays to check for squareness after every operation.
The paddle box sides are delicate. The broach is pointing to an etched line which needs to be on the outside, I only just noticed this in time,the previous photo shows I originally had them the wrong way round.
Splashers complete along with brass beading. They say confession is good for the soul so here goes- first time round I got the paddle box tops the wrong way round! i.e. the slot in the top was in the wrong place,getting it all apart and cleaning it all up was deep joy especially the half etched grooves.
I should have noted the cockup when a tab clashed with another part, hey ho all part of the fun.
The cab/firebox is build on a base, this is much easier than on the footplate. The corners on the top skin I found difficult,whilst it was straightforward to get a shape that fitted it had to exactly right especially at the corners in order to get the hand rails holes to line up with the inner frame,
The side skins overlap the top and are quite a subtle shape. I will fill the line on the casting join with low melt when everything else is complete. Cab cutouts are also supported to avoid deflection.
I found it pays to take time to fettle the splashers where the firebox slides in,the fit needs to be perfect causing no compression on the firebox sides, likewise where the cabsides curve round to join the firebox.
The string of springs are slightly too short in overall length, rather than creating a small deflection in the uprights.
I should have drilled the holes over size to gain a little leeway, only the mega picky will see that behind the wheels, I hope.

The lubricator has a small base so for security and painting it was drilled and tapped,soldering it on would most probably cause all the copper wires to drop out. the wheel is yet to be added and there is an actuating arm on the etch which is not mentioned in the instructions.

You've got to love the French, the hand rails go through the damper arms and the rail is actually used to move them, I presume oiling the hand rail knobs was part of the daily routine.
The smoke box door has a couple of hand rail knobs with plain shanks,the maximum size that the sockets could be enlarged did not accept the shanks which had to be turned down.Luckily the shanks were long enough to hold in a collet.
Captive outside bearings always cause me some concern(most probably misplaced) but the house style from MOK dictates that everything that can come apart does, the bogie is a case in point.
Downforce and side control are well catered for, this is not the case with all designers however should space allow I think these are available as a separate item.
3d printing has enabled small detail items to be produced economically,in particular the reach rod supports and the cab hand rail supports. These are particularly pleasing, trying to but join a hand rail to cab guttering is not rewarding!
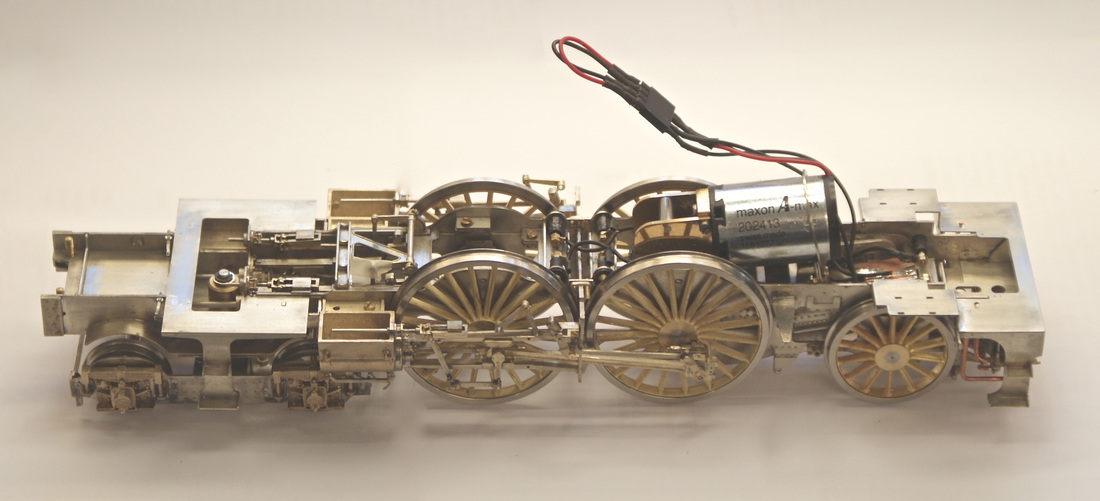
this motor mount carries the compensation beams on the outer bearings, in turn carried on a gimballed cage,this allows the motor to rock not restraining the compensation
The limits re close up shots have been reached! The parallax errors distort everything at this range. The handrail knobs in the smokebox door had to have the shanks turned down to sit in the raised casting, luckily they were supplied with an extra long shank that could be held in the collet and a small tool ground to cut up to the rear of the ball.The handrail I count as a bit of a success as this was number 2 attempt instead of the normal bin full!
The tender is straightforward especially helped by the neat castings for the corners, the only downside is hiding the join having linished the casting down to tank level, might use some low melt if needs be. There are no guide pips in the castings to help locate the holes for drilling, i thought about drilling from the rear but the inner edges aren't regular so plumped for marking up the outer face and used a .5 centre drill to get a pip.
The halfround copper beading is a vocabulary tester, the only bit i annealed was the tight front corner the others worked fine raw. The coal rails have a half-etched recess which is a boon but makes the transition to the tender flair a bit awkward.
its good to get the thing on its wheels for the first time
5th November 2015
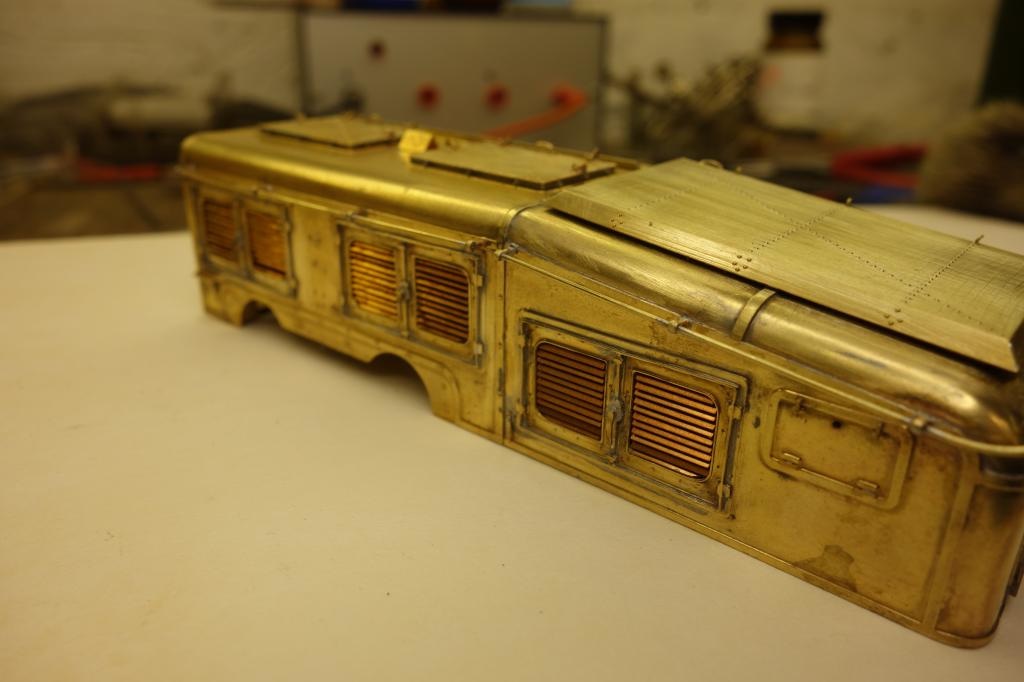
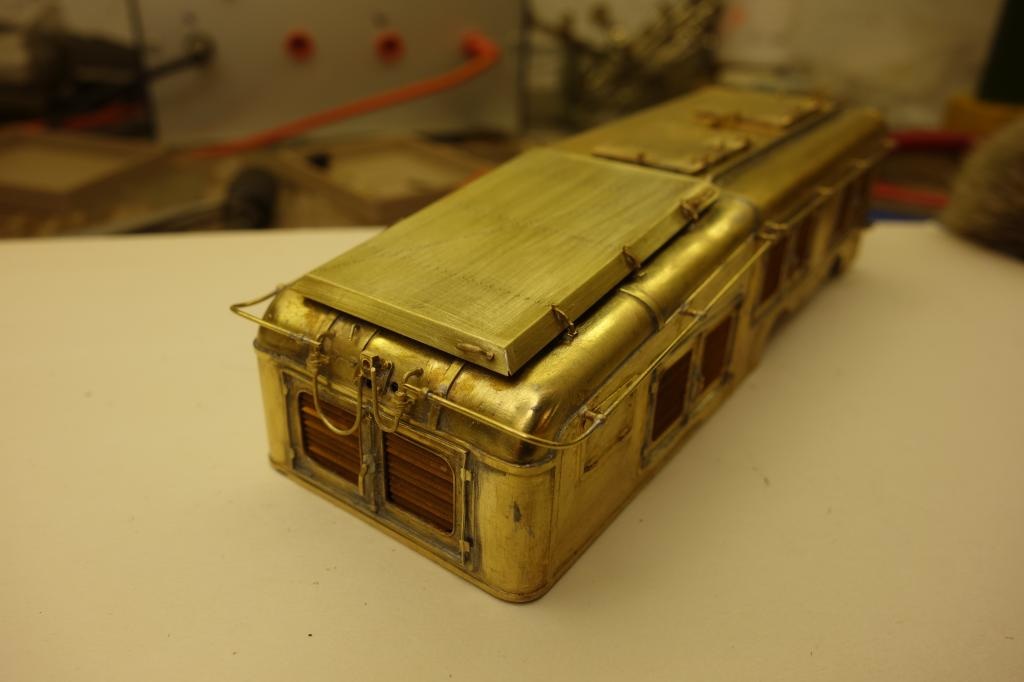
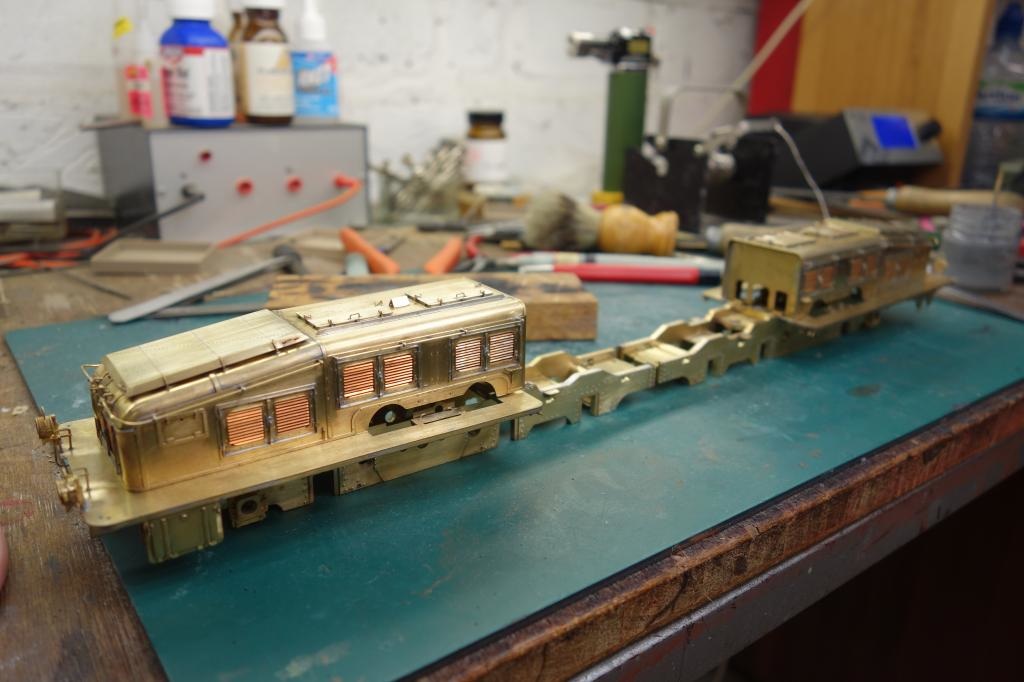
Lombardi Kroc
Lombardi Kroc
I have finally plucked the courage to open this v large box. This Lombardi kit contains everything for the model, and that means everything, paint,all glues,wheels,motors,solder paste, pick ups transfers the lot. The instructions are almost A3 and a centimetre thick,mostly photos with text in four languages. 4 cd's are all colour photos of each item sometimes 2 or 3 different angles on each part.
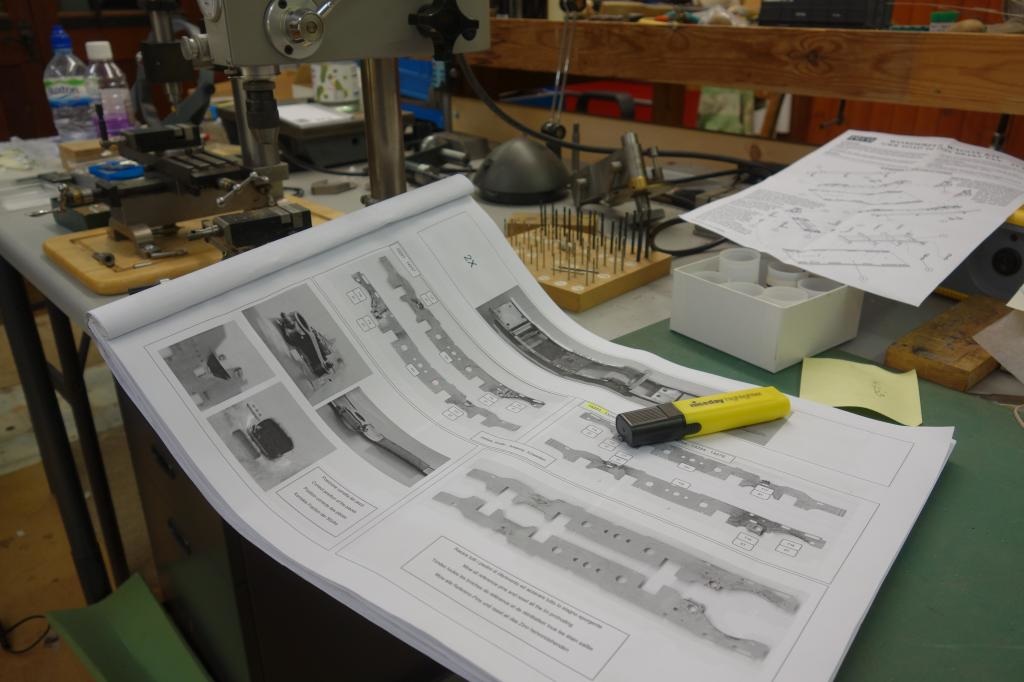
The frames and most of the spacers are milled from 2mm brass and drilled and tapped as required.The only soldering is the motor mounts the rest is screwed together. The Europeans seem to favour solder paste and blow lamps,no soldering irons involved in the instructions at all.
I didn't like the idea of gluing the frame overlays on but having had a go with a blow lamp leather gardening gloves etc doing one of them I succumbed and it was fine. It was best to solder the castings on the overlay first anyway.
The Pony trucks were straightforward although because all the rivets are punched for you getting the cusp off is a pain, the bits are difficult to hold in the vice without squashing the things. The castings are good. Everything is preformed.
The footplate assembly is 3 layers of 30 thou brass and the construction really left no option but solder paste, a lot of bulldog clips and heat had the desired effect.
The underside of the footplates has a fair amount of detail, the smaller bits that support the pipe runs are tiny and need to located carefully for the pipes to run straight, but its all well thought out if a tad fiddly. I have no idea what the bits do!
The Pantographs are a bit special, they come complete. On balance a bit of a relief but it would have been fun to have a go
It would be interesting to see the form tool they used for the ventilation grills,they are a bit delicate but look the part.
The next thing is install some of the lamps, the castings are exquisite, better than my photography.

Managed to get something done on the "bonnets" that cover the motors and transmission. The basic structure is straightforward however the very delicate etches surrounding the access louvers were interesting. Conventional soldering was going to be difficult given the amount of detail surrounding the installation plus trying to run an iron alongside the etch only deflected it so I plumped for the solder paste. Holding the blowlamp at a distance got everything hot without deflecting things and then decreasing the distance until the solder flashed over.
I feel that the Italians are either better at workbench limbo(trying to find all those tiny bits that ping off from your tweezers) or they are supremely confident that they are not going to drop anything because you get NO spares
of anything! Needless to say I have spent some time grovelling on the floor particularly trying to find the clips to hold this roof in place. This whole thing lifted using the handles, it must be 6 feet by 9 feet a tad heavy, maybe they had spring balances.
of anything! Needless to say I have spent some time grovelling on the floor particularly trying to find the clips to hold this roof in place. This whole thing lifted using the handles, it must be 6 feet by 9 feet a tad heavy, maybe they had spring balances.
The bonnets were now at a stage when the louvres were next in line. The were pinned to a piece of foam and although tempted to have a look I had resisted on the basis that I would damage/drop or loose one. There had been a deal of conjecture on how they were made, they didn't look fabricated but nor could they be a straight etch because the number of blades would have required more material than available. All was revealed when unpinned and guess what, I dropped one half!
The halves were soldered together to avoid any movement, I decided to glue them in position to avoid any possibility of the halves moving and also the bottom louvre was v tight on the frame and needed persuading with a scalpel blade into position. Snapping a blade off would definitely exercised my vocabulary.
A lot of heat must have been produced to warrant the available cooling.
A lot of heat must have been produced to warrant the available cooling.
Frames,bonnets and footplates complete,on with the middle bit.
The central footplate is blessed with its share of plumbing, the small upturned pipes in each corner carry the flexible pipes between sections, the cluster of pipes in the foreground are supposed to be that convoluted ,honest its not the red wine!
The large blowers (they obviously don't get the wrong type of snow over there,only about 3 metres a year) and the steps complete things.
The buffer beams are festooned with bits, in fact 18 in total. Great fun trying not to unsolder the last bit. Black buffer beams are a tad unusual in the UK.
The transmission surround castings are a very close fit on the output cranks, the position of these castings has to be adjusted by loosening the mounting screws which are covered by the output cranks, this process was made a little tedious in that the correct position of the cranks is only achieved with them fully installed by knocking in the smallest roll pins I have ever seen. I had to knock them out a few times before it all worked!
The motors are I think from a spin dryer! They fill the whole area available, the spiral gear is nicely cut
The beginnings of the central cabin with roof walkways etc. Using solder paste for the pantograph mounts meant very little residue. Using an iron would have risked deflecting the v thin etch and would have been a pain to correct. I am definitely a convert unless it is the buffer beam in which case using a blowlamp it would have re-kitted itself.
The door surround is another area where paste made it easier.
Pick ups are novel, this plate screws into the bottom of the chassis, the phosphor bronze arms push the pick ups(shown bottom left) through the chassis onto the wheels. It makes maintenance pretty straightforward.
Printed circuit mounts above the motors and runs the headlights etc. Leaving small fingers on the etch to fold over and secure the wires is a good idea.
Wheel sets are sprung.
Small indents in the hornblocks locate the springs, seems to work fine.
First wheel set with a bit of the bizarre gear.
More bits,vents etc.
This chassis ran fine, the other one didn't.

And here is the reason why,this wheelset is quite a few degrees out as can been seen by looking at the vertical edge of the quartering jig. The wheels are pressed on so this will have to go back to Italy.
Didn't get much done over Christmas, can't imagine why! I did get into the workshop once,why do they use carbon fibre cable ties for children's toys? The control panels have been undercoated and need some paint before all the detail gets added. All the hinges and catches have long spikes on the rear which makes getting them straight a lot easier.Handing a loco when it's painted is not ideal,the construction is designed around the factory RTR practice not the amateur. In some of the photos you can see the jigs and specially designed rests to avoid damage, these I have copied but still get some chips.The document holders are lit by the tiniest of bulbs,can't fathom at the moment how they made the cable run invisible.
will straighten out the bent tangs I didn't notice them until I saw the photo.Lots of bits on the roof.
At long last the footplates are on, this has allowed the wiring to progress. Everything travels towards the chip in the main cabin. The spare plug on the top of the printed circuit is for the pair of lamps on the bonnet.

Headlight bulbs and glasses are in allowing the buffer beam next.If maintenance is needed it will take a week to get it apart!
The control panels have been pretty much completed just the handles to paint red and orange.
The panel sits on a wooden floor with the rear bulkhead with the swivel seats, it was at this point the I realised that I had formed the left hand side of the bulkhead incorrectly, it should be at an angle to match the floor, luckily the paint stayed put when i re-bent it.
Panels,floors and opening doors are in. A few surface details added.

Winter sunshine is a tad harsh, it all seems to fit together. I will strip everything off the chassis and weather it in bits. The whole thing is too heavy and cumbersome to manhandle in one bit.
G.W.R. Gooch Rover kit
I have an aversion to opening a new box before finishing a project, however I am waiting on some bits from Italy to finish the Kroc so having cleaned the workshop,renewed the emery sticks etc I was bored so opened a box.So continuing a slightly out of the rut mode I thought i'd have a bash at the Rover spurred on by a visit to his ship whilst down for the Bristol show.
The inner chassis is a v simple affair
The inner chassis is a v simple affair
Brake pulls that are close to wheels particularly either side of the wheels always cause a little concern,the need for some sideplay is in conflict with the design of some brake systems.Having suffered short circuits some years ago on a simple GWR pannier I decided to insulate the brake pulls,I use 24 hour Araldite because its machinable sandable etc, spread this as evenly as poss on the rods,a few lumps and bumps don't matter.
After 30 to 40 mins in the oven it goes glass hard and looks like this.
Might be easier to see in this one
This can now be filed flat into a thin film.
I turned up some brake supports.
Added some brass tube to the top of the hangers to allow the lot to be screwed on. The piece of pcb is just a spacer.
The outer frames fit perfectly as long as all the cusp is removed
The footplate is v thin, Martin gives a spare and there were a couple of times I thought I might need it!
Managed to get the "mudguards" on, its one of those jobs(of which there seem to be many)where a third arm or prehensile tail would be useful.Again Mr Finney provides lots of splasher top spares,I completely screwed up the first attempt,the beading makes bending tricky and I found the beading had to be bent first on order to get the flat section flat otherwise it seems to distort, even then I'm not 100% happy with the result.
The design incorporates screwing the inner splashers to the frames whilst the outers are soldered to the footplate. The top is then soldered on Hmmmmm. Keeping calm is an issue. In the end I tack soldered the back and cut a small block of silicone rubber to fill the gap between inner and outer to help with spacing.
The smokebox, like most of the model is designed to separate for painting,a lot of thought has gone into achieving this.
Whilst it doesn't look as if much progress has been made a fair bit has gone into trial fitting all the castings and pipework and then removing them pending paint, I would normally prefer to leave the buffer heads off but access to solder on the retaining washer made that impractical. I finally plucked up courage to drill the holes in the chimney and solder in the bolts.
The whole shooting match viz cab,firebox,boiler and smokebox are all screwed together to facilitate painting, the gold plated firebox front and smokebox ring are just sandwiched between sections.
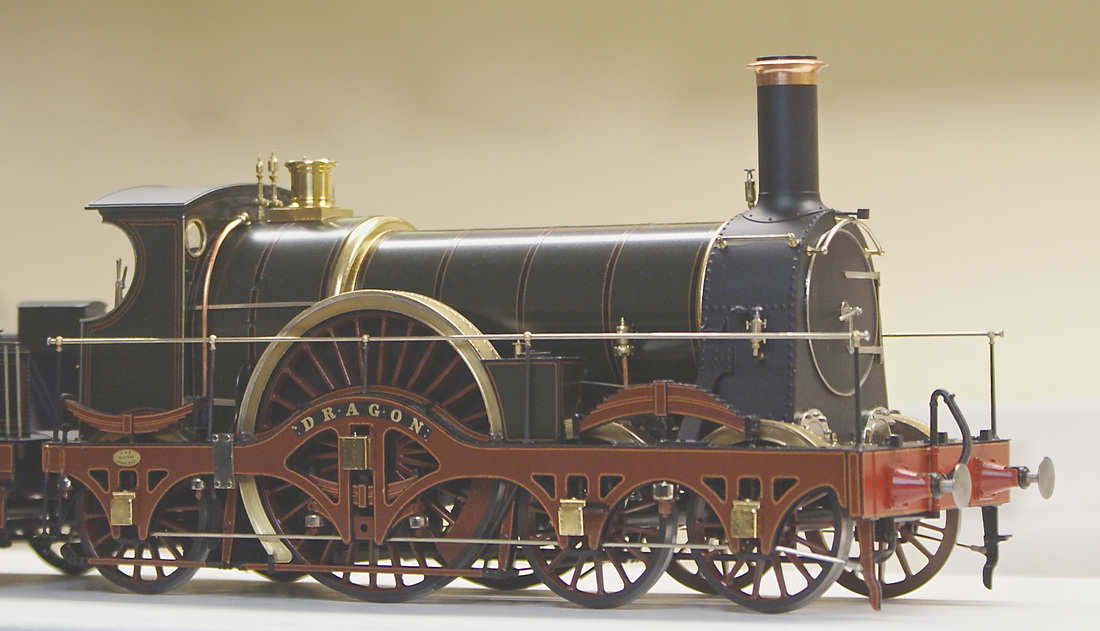
Up until yesterday afternoon I was going to name the loco Dragon, this loco according to the limited information available always appears bolted to a 2700 gal tender. The tank wrapper has the normal GWR curve on the top edge, this is formed by taping the etch to a pre-prepared piece of timber and persuading it to assume the position. As I reached across the bench for the second piece of masking tape I caught my sleeve on the etch causing a graceful 45 degree crease. Lots of dodgy language and hard rubbing could not put Humpty back together again! So the 3000 gal tender it will be. Who's to say it never ran with one anyway? On a lighter note the bits from Italy that I have been waiting for to finish the Kroc are on their way,thinking of the pantographs I'd better wear a T shirt or maybe less! Certainly no sleeves.
The final stages putting all the bits together for the first time. Its all a close fit particularly the brake hangers on the inside of the double frame.
Still looks wide even after a few weeks of working on it!
If the safety valve doesn't look square its because its just plonked on,maybe you notice these errors using an SLR but I find squinting at the screen on the back of a compact it is difficult to frame things let alone fine tune the image.
The emergency cord supports are vulnerable but there is really no option other than soldering them.
29th October 2015
As this is the first entry here, I will quickly introduce them, and we can return at their most interesting or challenging steps of construction. Most of the source components for these new additions to the Bucks Hill stable, and other locomotives of interest come from the best quality kits I can find, so let's meet some of the new faces as they make their way through the workshop. I will delete them from this page as they finish, and introduce new ones as they crop up.
Lombardi Crocodile
M.O.K. Stanier 2-8-0
Martin Finney Gooch Single

Bulleid West Country pacific
M.O.K. Armstrong 4-4-0
M.O.K. Standard Mogul
M.O.K. Ivatt Mogul
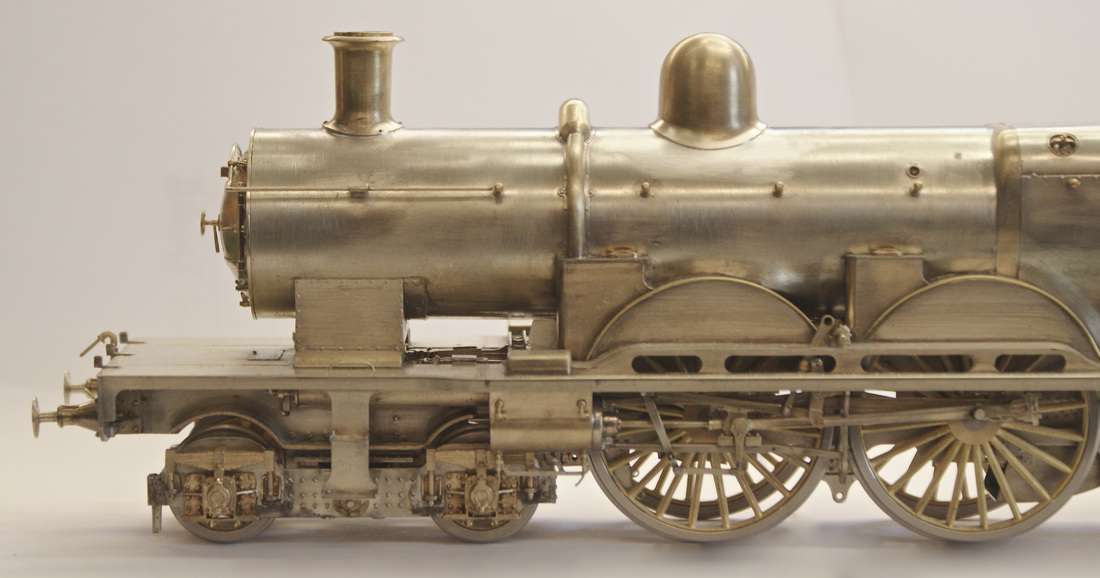
M.O.K. De-Glehn Compound Atlantic
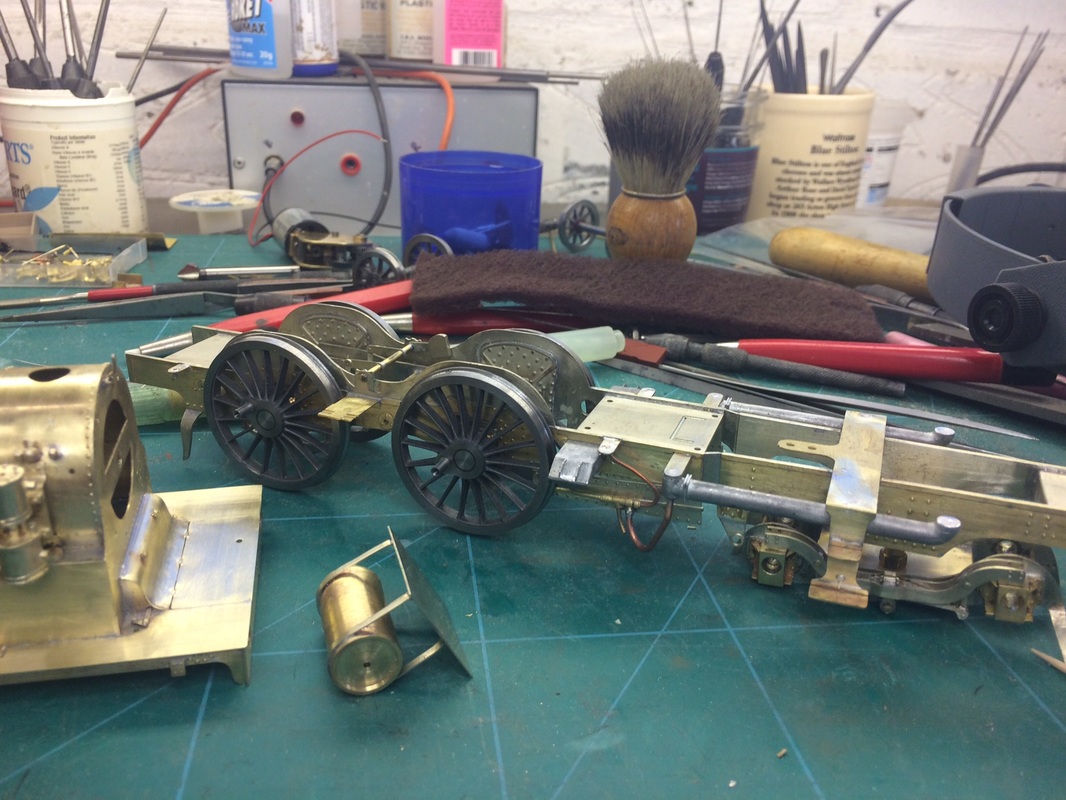
Many of the sub assemblies for the Atlantic are now taking shape,
L.H. Outer cylinder, slidebars and motion assembly.
Inside cylinder rears, slidebars and frame stretcher assembly
